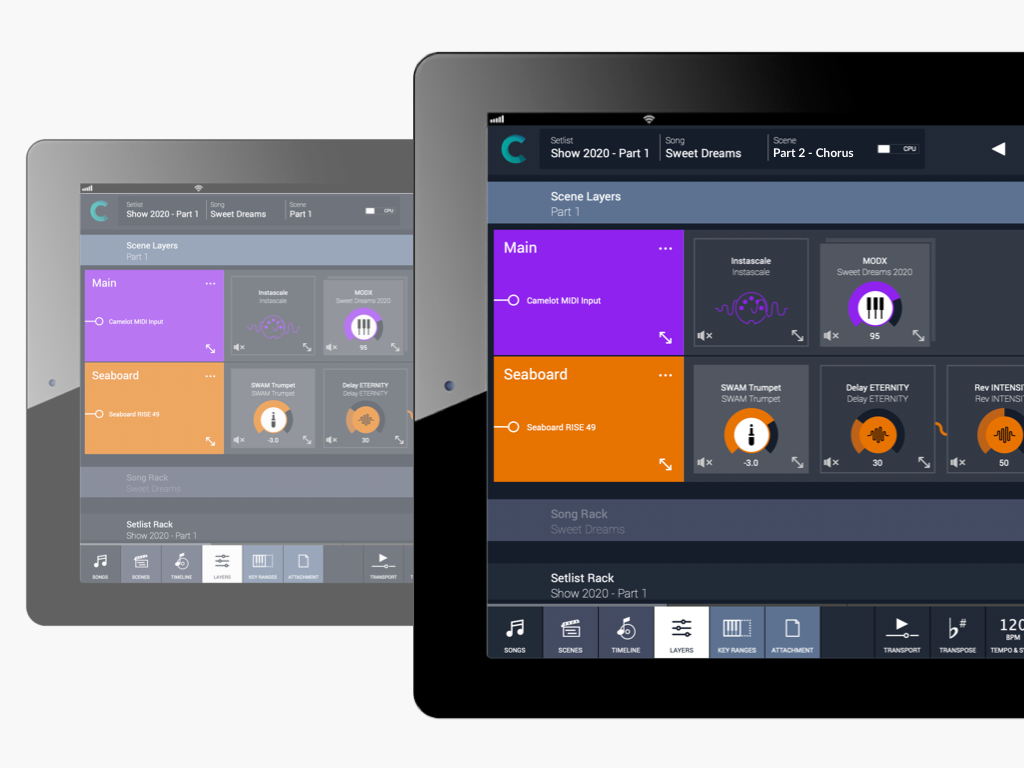
Setlist, Song and Scene Manager
Camelot is an application created to address the most complex live performance needs with a simple and guided workflow. What in the past could only be achieved with a complex setup of different applications and devices connected together, Camelot acheives in one convenient and beautifully designed workstation. The Song in Camelot collects all of your Hardware Instruments Configurations & MIDI Routing, Software Instruments & FX instances, Music Scores and Audio Backing Tracks.
Rearrange, Move, and Duplicate Songs with Drag&Drop, directly on the Setlist.
With Camelot 2.0 Drag&Drop editing has been extended to Layers, Items, Backing Tracks, and Timeline elements.
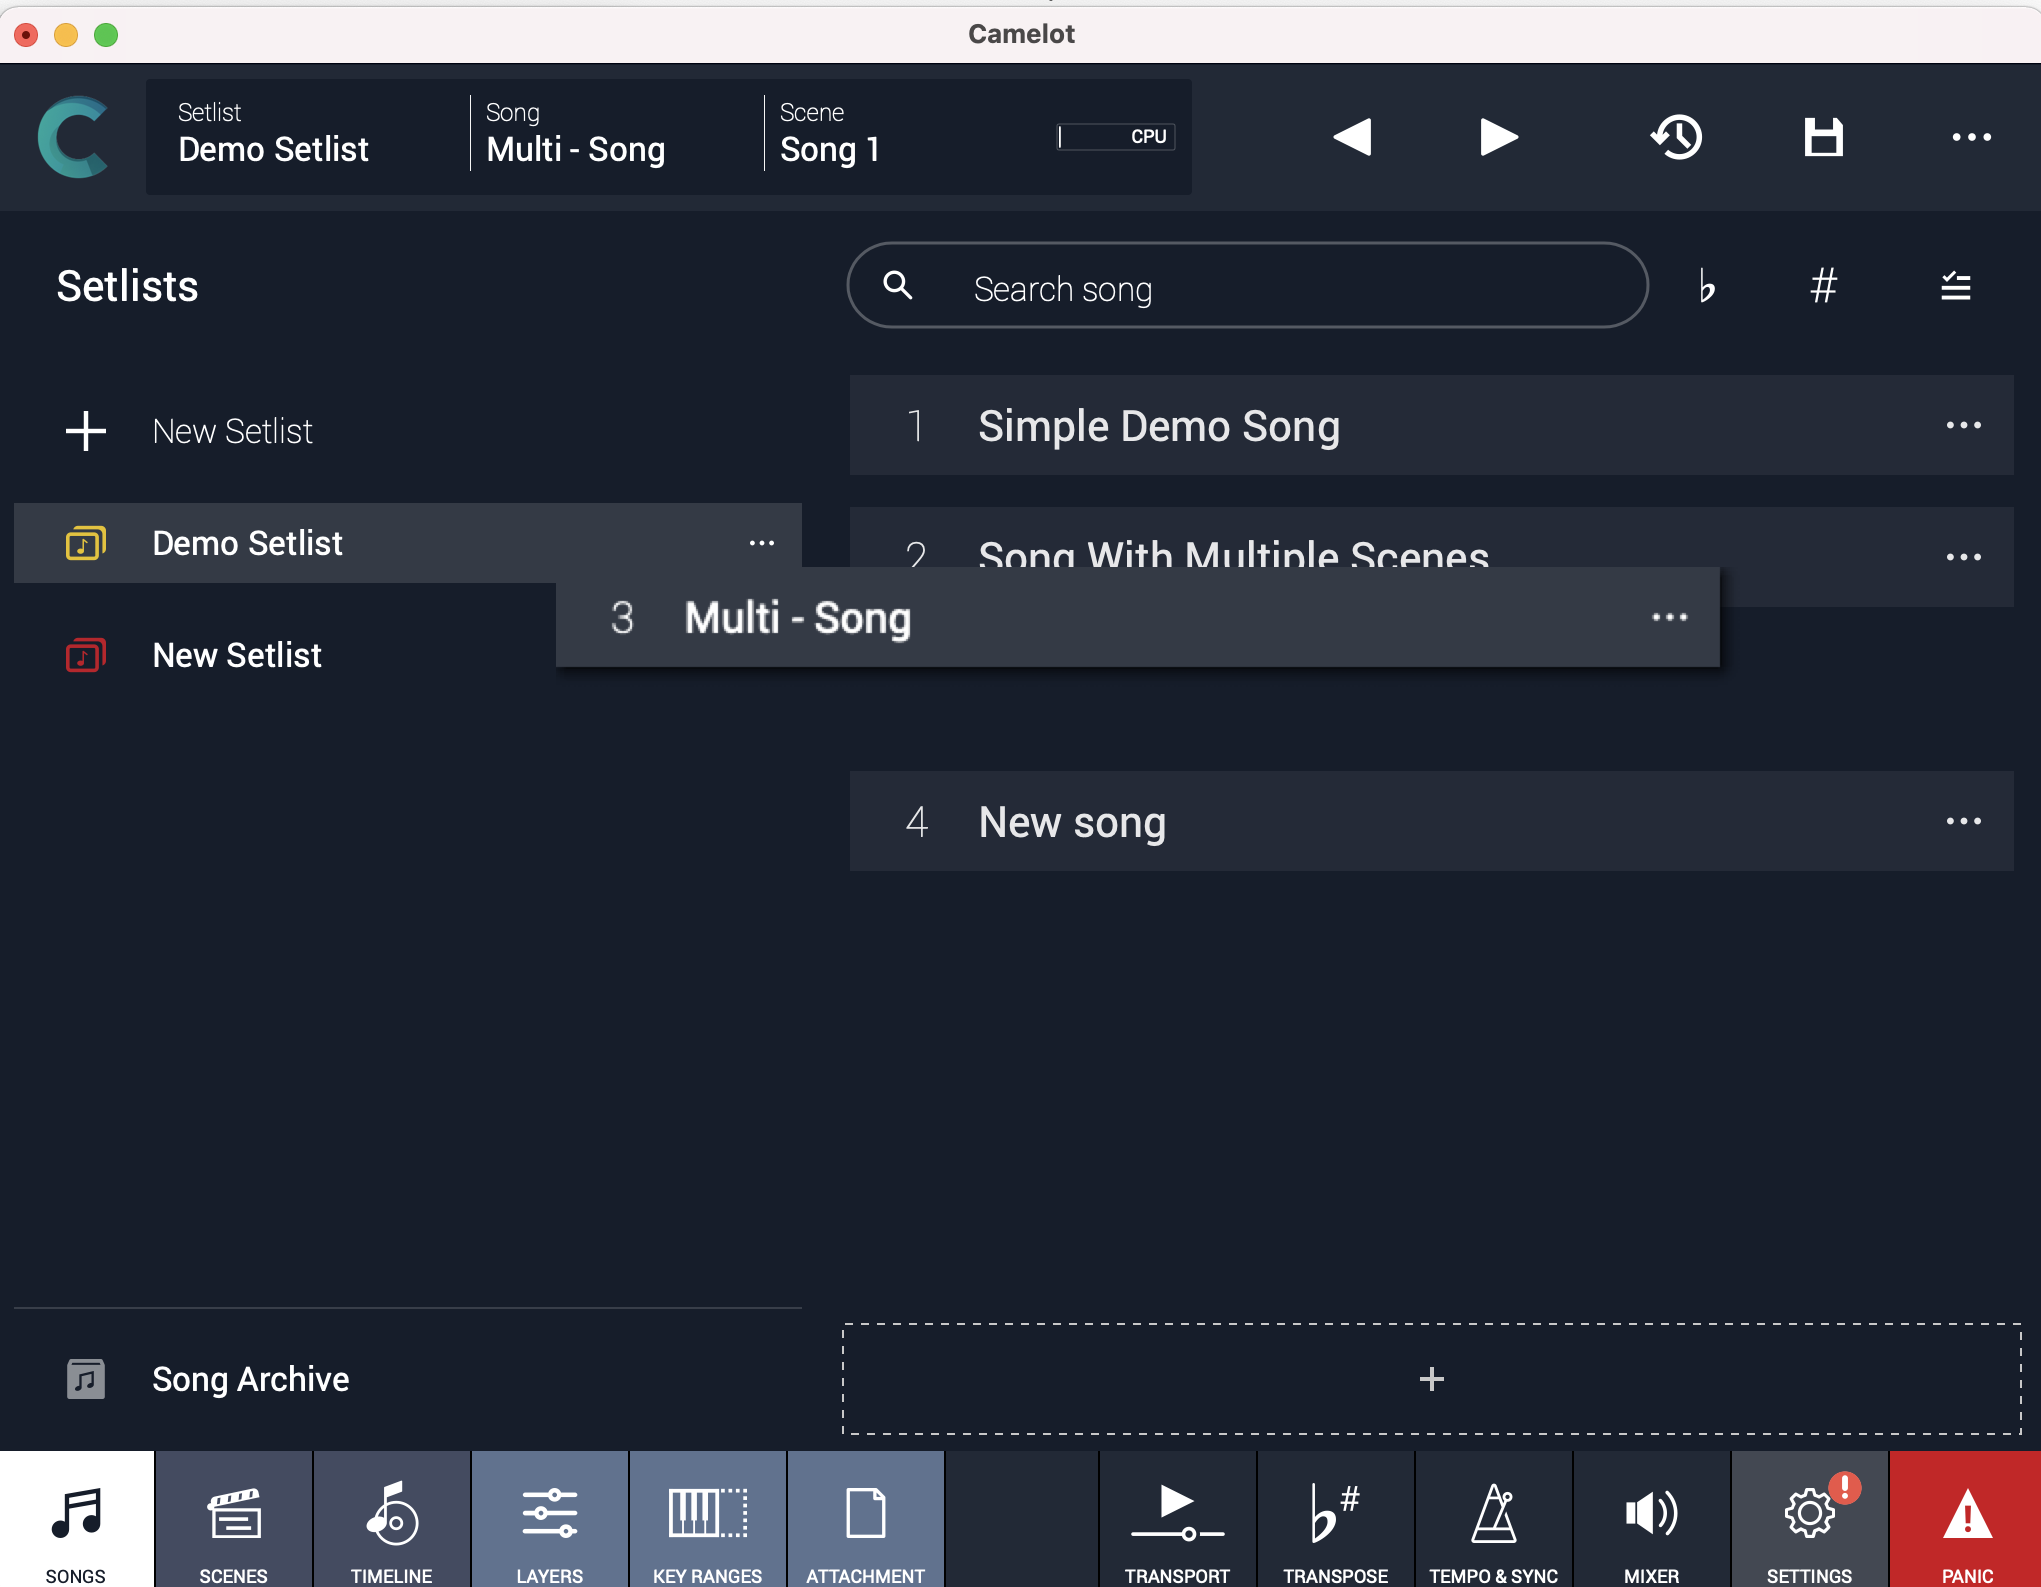
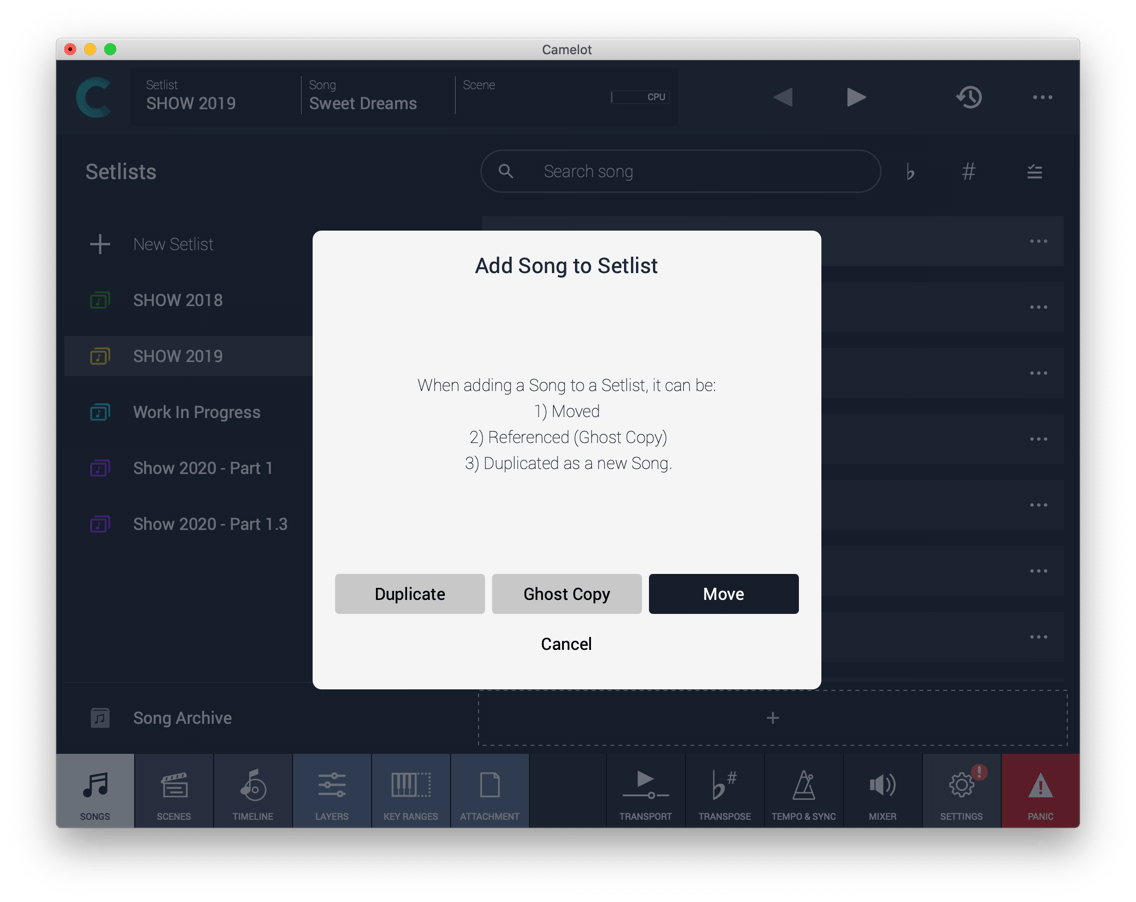
The same Song can be used in different Setlists, but you can also create a brand new copy for another version of the same Song. You can also have multiple “ghost” copies of the Song on several Setlists and by modifying the Song once, apply those changes to all copies. Of course, you can also just move the Song from one Setlist to another.
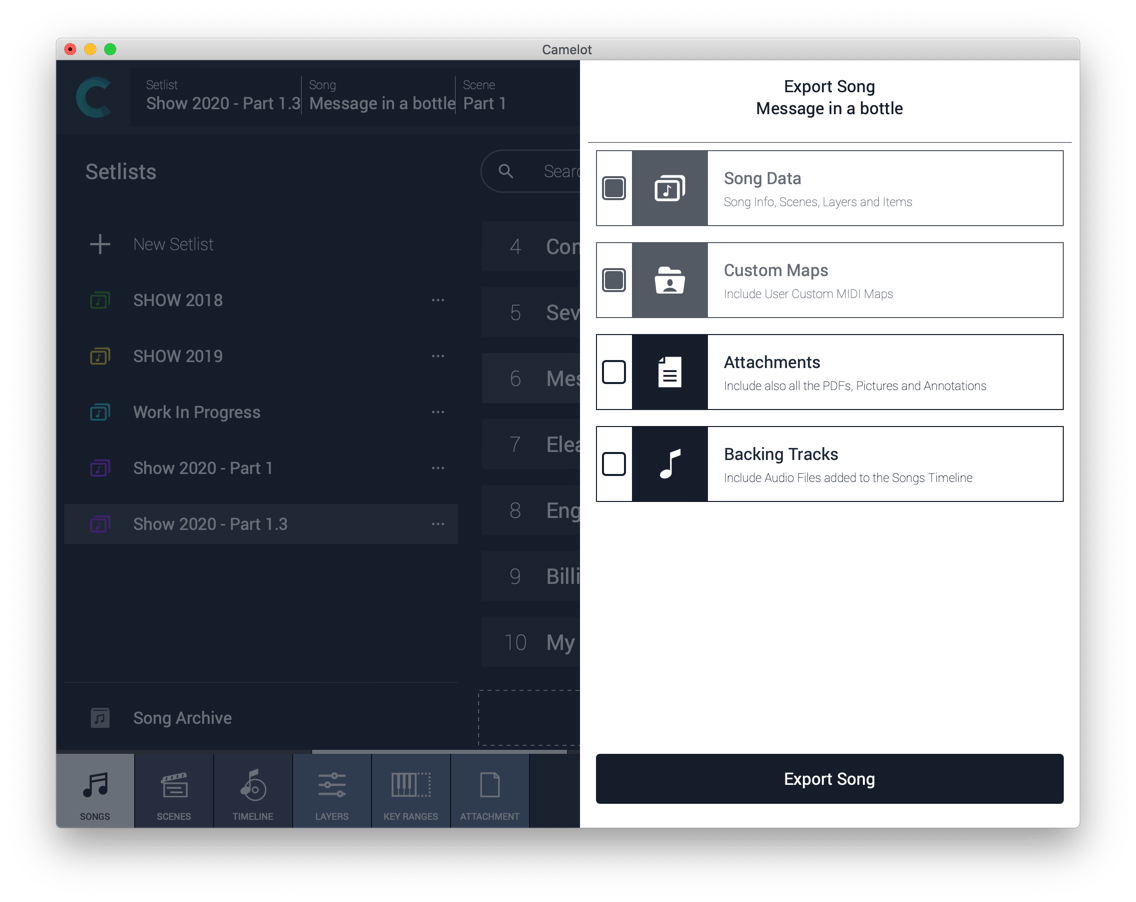
If you want to manage Setlists and Songs separately as different projects, you can export and import them with a dedicated function that allows you to choose whether you want to include or not include any attachments or audio files. This feature is convenient if you want to share the Setlist with a band member without the audio files or to sync Master and Slave Camelot instances running on different devices without loading redundant files.
- The Setlist is a collection of Songs.
- Songs can have one or more Scenes that each include a Timeline. When you select a Song in Camelot, you load all the resources needed to play that Song i.e., Virtual Instruments, FX, and Audio Tracks.
- Scenes recall and organize Hardware instruments presets, MIDI connections, Software plugin presets, and Music Score Attachments. You can switch freely from one Scene to another without Sound interruptions.
- Layer & Items are the building blocks of each Scene. Layers allow the connection between MIDI Input Controllers and the Items like HW or SW Tone generators. Layers manage the MIDI and Audio flow for all the Items that are loaded on them. It might be easier to think of Layers as Audio channel strips with Insert FX and MIDI patch cables. When you switch from one Scene to another changing the Layer’s Configuration, is like having a virtual stage tech reconnecting Audio and MIDI cables instantly!
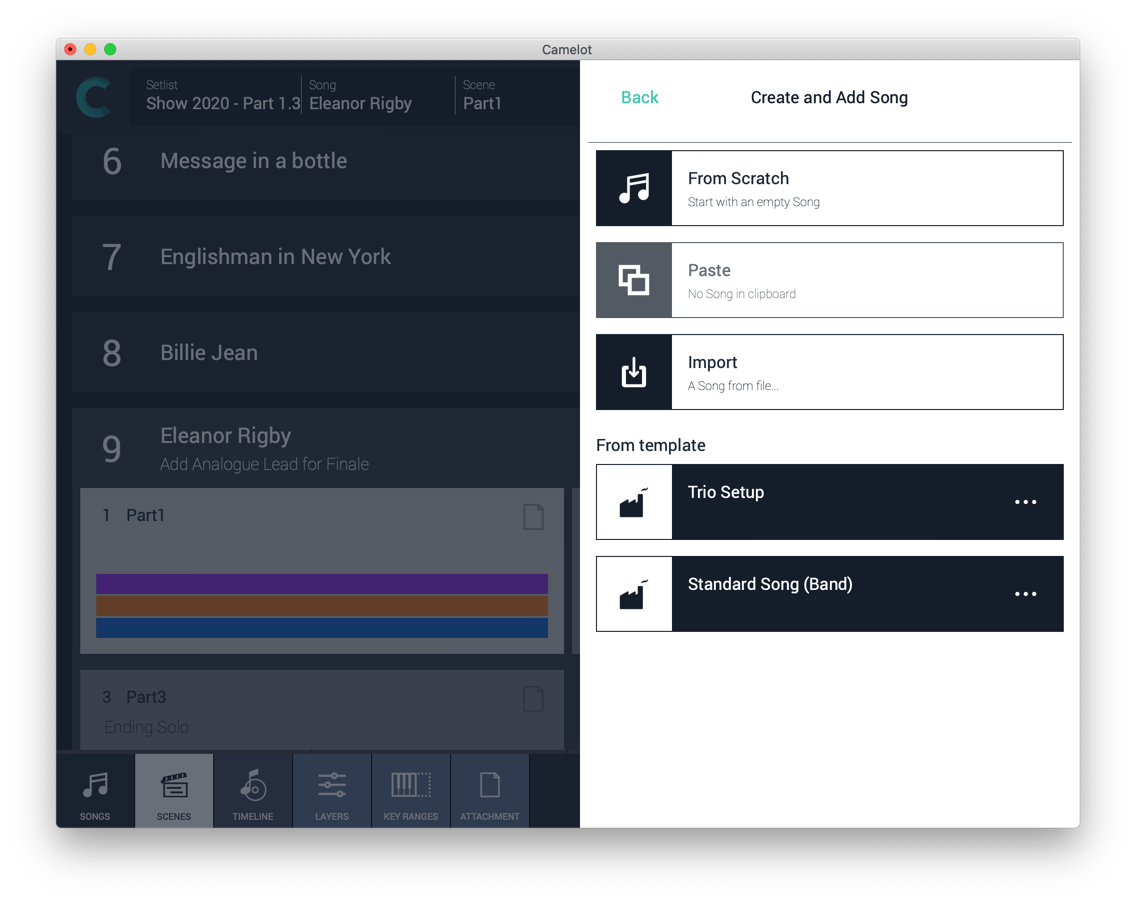
Songs, Scenes, and Layers can be easily created by custom Templates. When you have created a good starting point for your project, just add it as a Template so you can speed up your Show preparation.
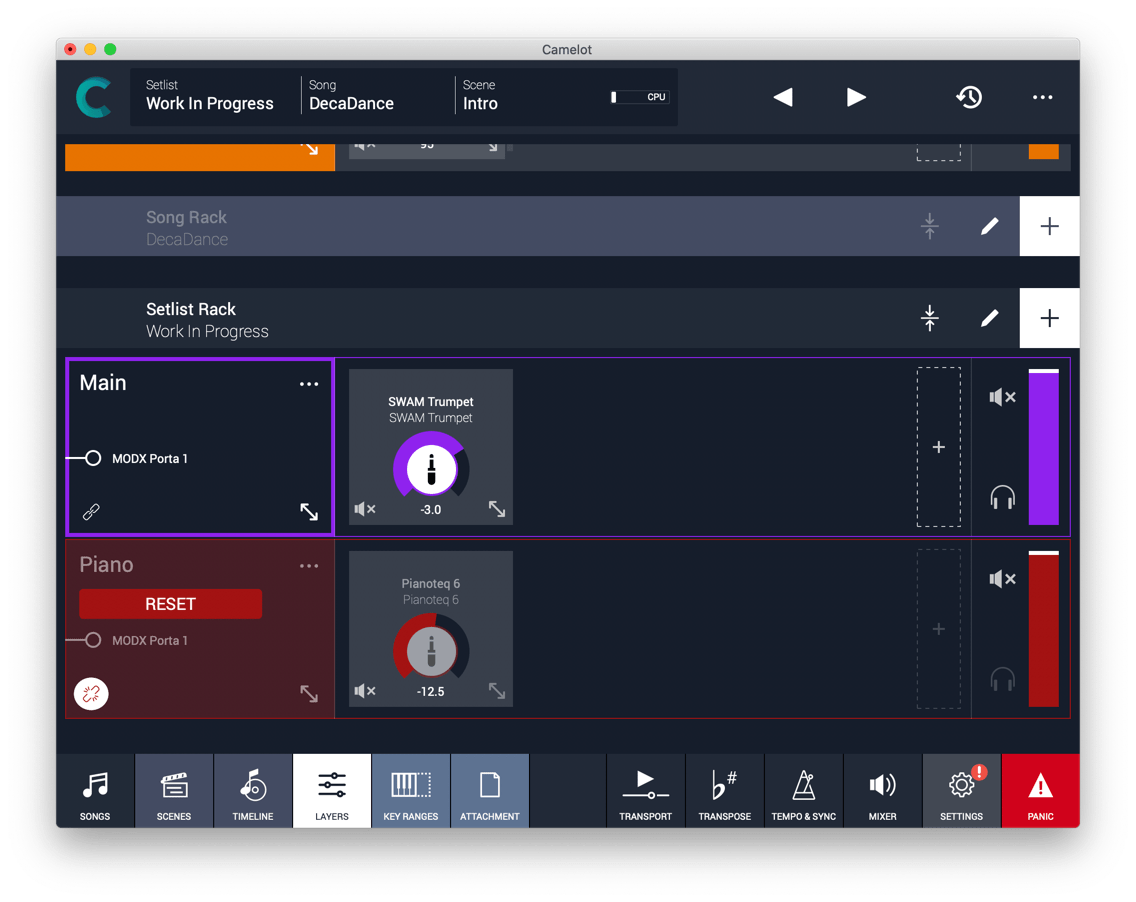
Loading Instruments and configurations on a Scene that can be switched is powerful and flexible, but sometimes you need something that stays loaded during the entire Song or even on the entire Setlist! For that reason, Camelot provides Setlist Racks. For example, load a Grand Piano Instrument at the beginning of the Show without the need (and waiting time) to re-load and unload it. If you need to adjust levels or mute/unmute Rack Layers and Items for each Scene, you can press the “unlink” button to detach the Layer levels from the master value and apply an exception only for the current Scene. This way you can reuse Virtual Instruments and Configurations that have different settings.
Camelot has several tools to save your work or create backup instances ready to support you on another device. The Snapshots are not copies of the data, only a picture in time of how the data was organized. You can create different Snapshots to go back in time when you are editing your Setlists and want to compare different versions. Snapshots are also useful when you want a clean starting point before the Show. For example, if you tweak and adjust items during the performance of your Songs but you do not want to keep those adjustments for the next Show. Backups are a copy of the entire Camelot session in one convenient zip file. Save the backup file in another drive or on the cloud to keep it safe. You can restore the Backup file in any other system running Camelot, even on a different operating system (with few limitations).


Multitrack Audio Player. Timeline and Automations
Camelot 2.0 introduces a new area called Timeline. The Timeline is the place dedicated to automation. In the Timeline, you can attach audio backing tracks, add auto-play and auto-stop markers, and even add scene automation. On the Timeline you can have multiple audio tracks with separate audio outputs and, at the same time, use the playback feature to automate the Scene Switch at exactly the right time in the sequence. Keyboard players, Drummers, Guitar Players, really any band member can benefit from Camelot’s Timeline. You can play back music tracks hands-free and switch hardware and software instrument presets, levels, music scores, and more. You don’t even need to press the ‘Play’ button! Trigger your samples and scenes in perfect sequence, using only one pedal, or automatically play and stop tracks without the need to follow the sequencer for the entire song. The power of Camelot’s Timeline is that it allows you to perfectly structure your song in the exact order it’s meant to be played.
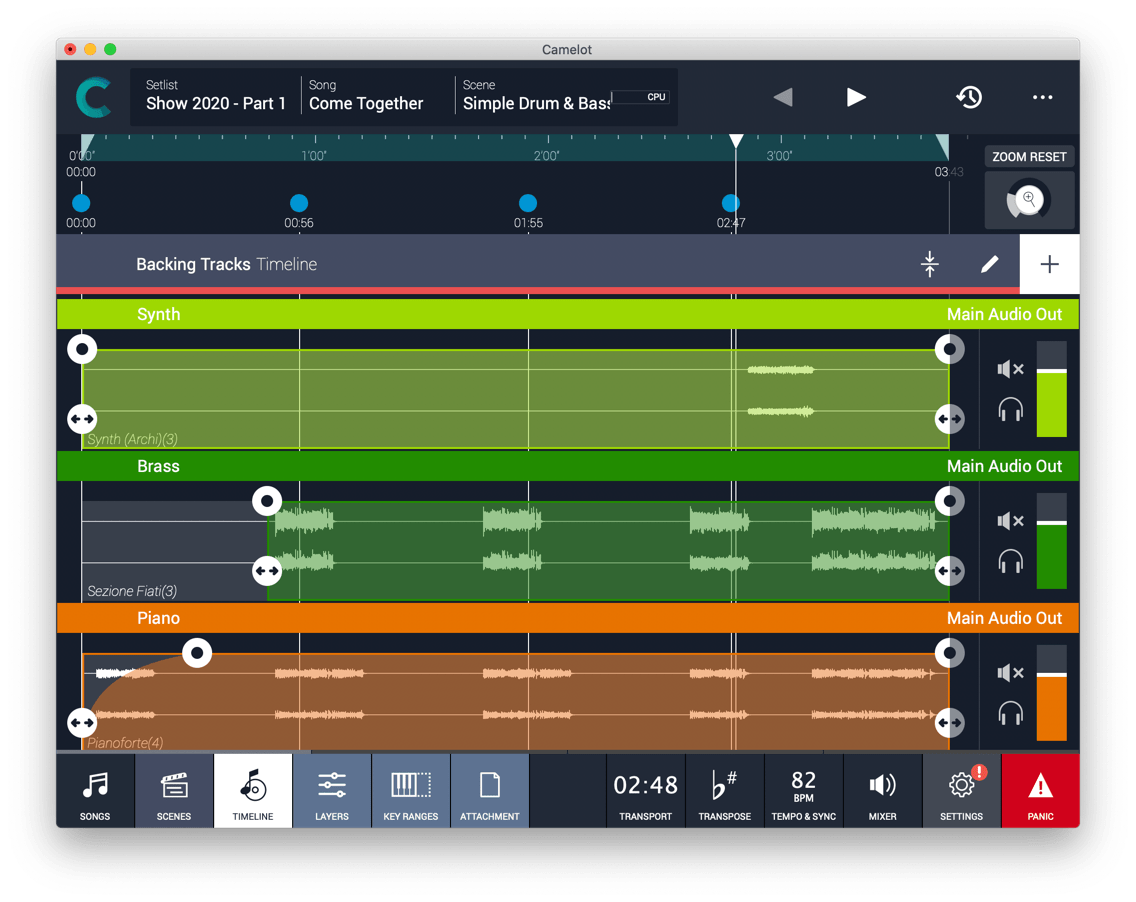
The Backing Tracks section in Camelot is powerful and very easy to use. Contrary to most DAWs where you face crowded and overly complicated menus, Camelot is intelligently designed to only provide you what you need on stage—nothing more, nothing less. On the Timeline, you can move the audio tracks, adjust the volume, apply in/out fades, and select audio output channels. Just expand the Backing Track section, drag the audio file in the correct position and that’s it! Move the handles to apply a fade in/out just in case you need it.
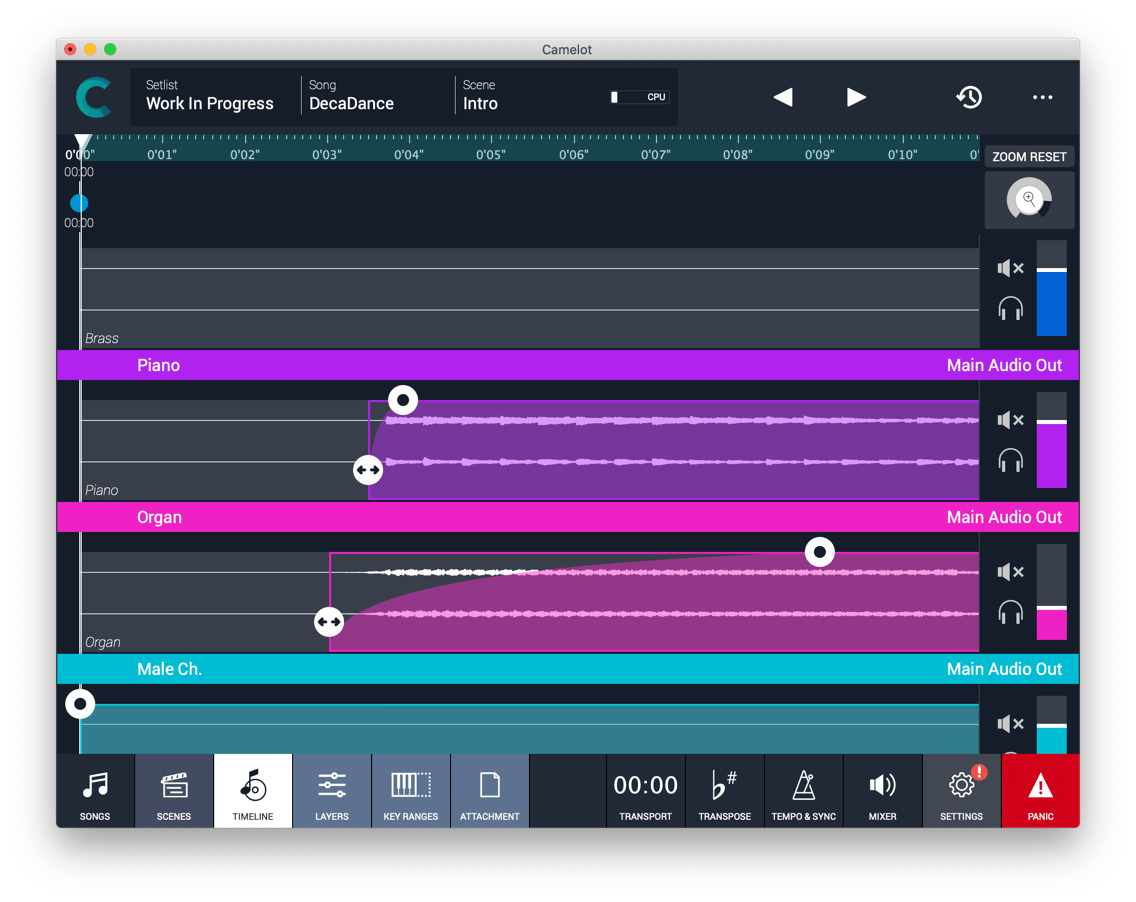
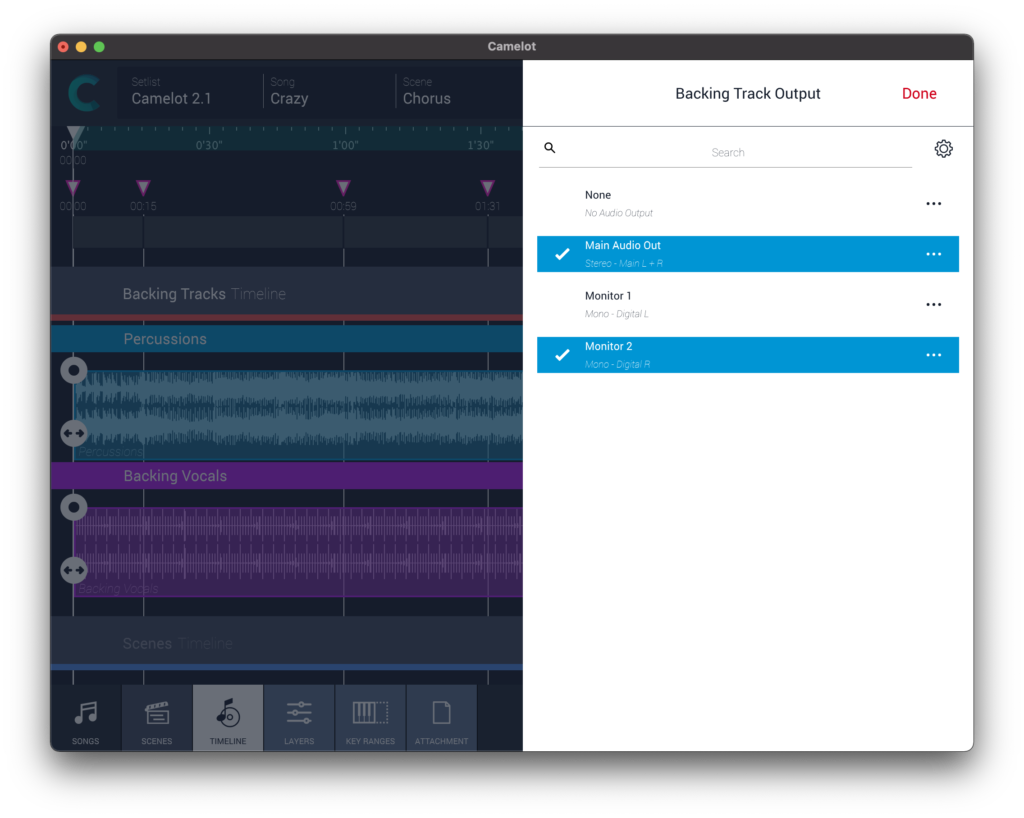
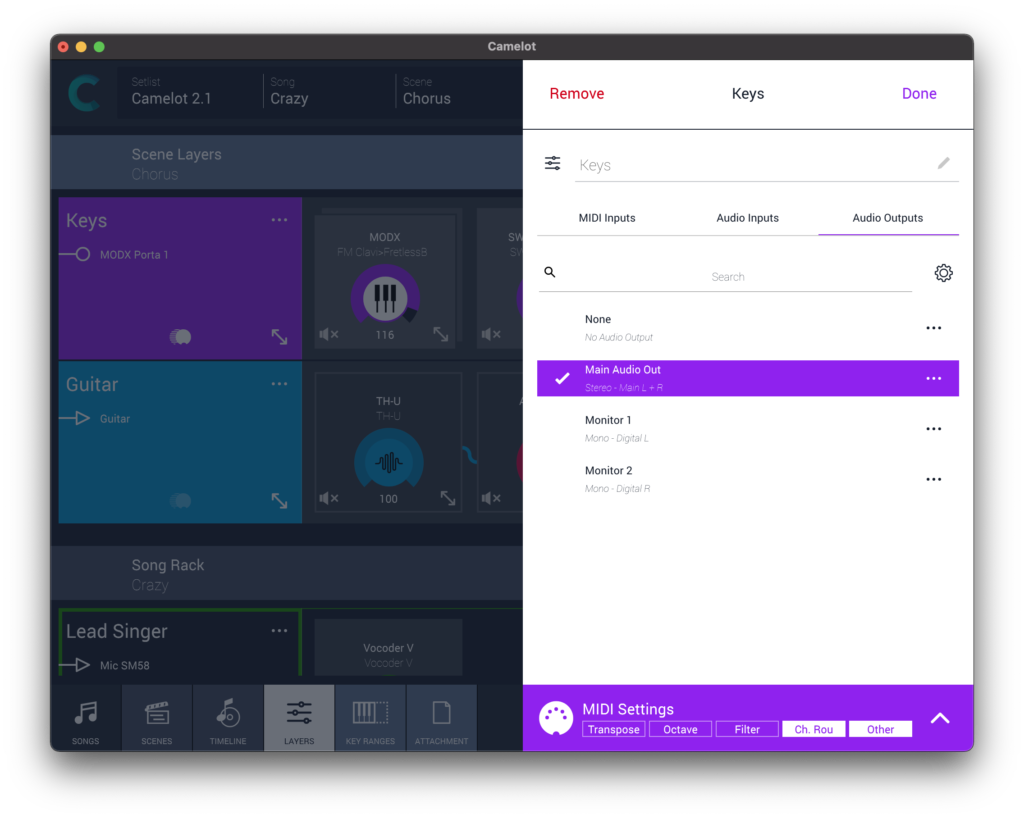
By default, any Backing Track is assigned to the Main Audio Output. You can always change the output used for a Backing Track by clicking on the output shown for the track in the Backing Tracks area of the Timeline view. But there’s much more to the Main Audio Output! Any track can benefit from the Master FX (compressor, EQ, delay, and reverb) available for processing audio sent to the Main Audio Output. The convenience of these onboard FX can’t be overstated. The Master FX settings apply to the entire Setlist, so you can adjust your mix at each show to ensure you sound the same with each sound system and venue as you did in your studio or during rehearsals. This straightforward workflow is great most of the time, but bypassing the Master FX is easy when you need more flexibility. Output assignments are flexible, too. The Main Audio Outs can be set to play through any available channels, and multiple outputs can be selected for each source item to provide quick monitoring of any track.
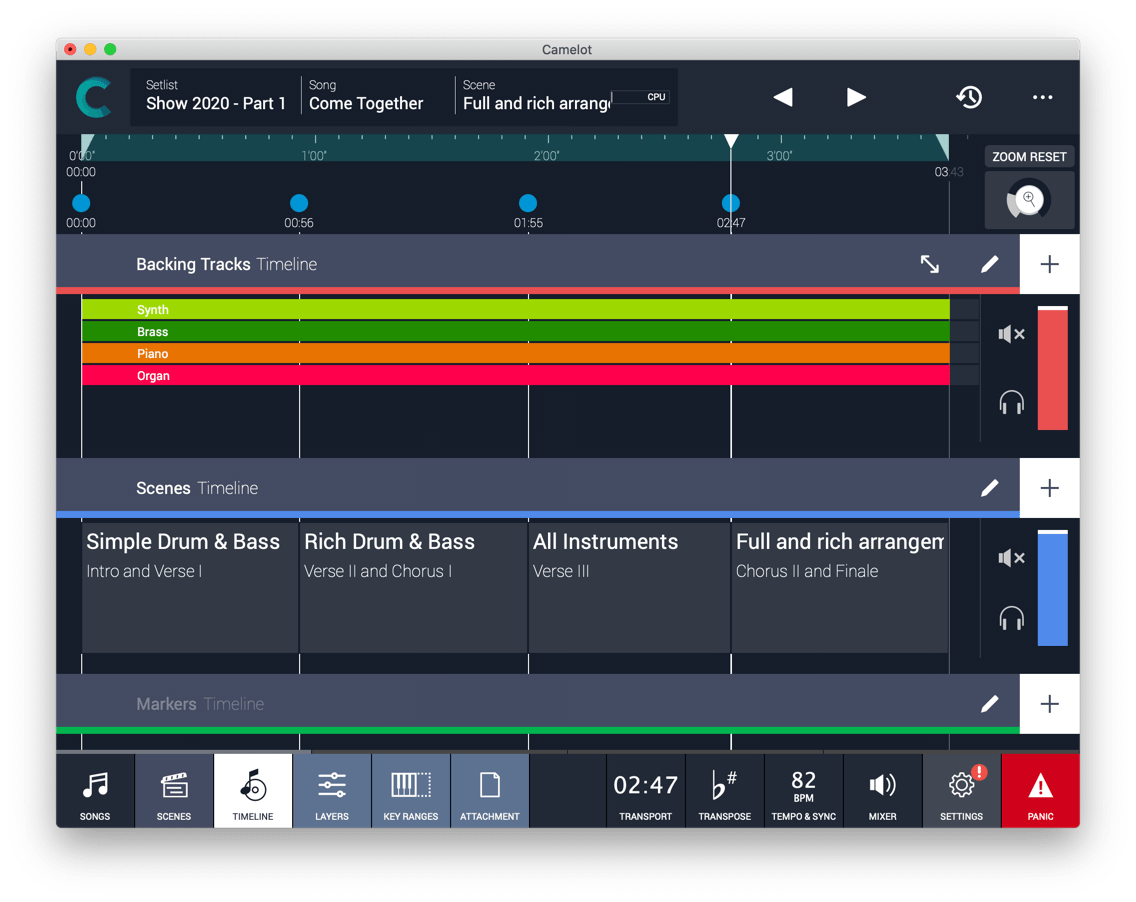
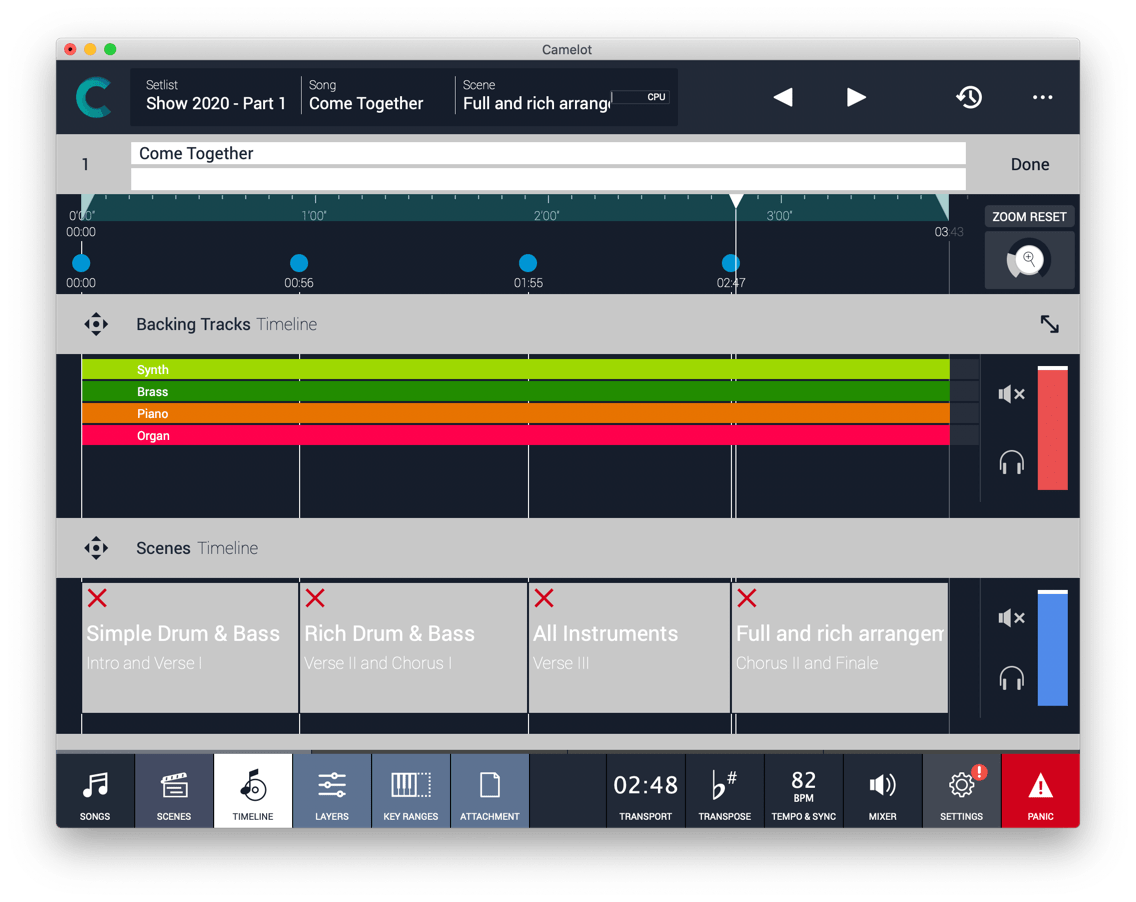
Do you wish you had a stage tech to switch your instrument presets at the right time while performing? With Camelot, you can automatically switch songs and presets allowing you to focus on your performance and the connection with the audience and your bandmates. Camelot’s Timeline is not only a playback area, it allows you to keep everything under control, even automating or sequencing different events and actions. There are three sections: the Backing Tracks Timeline, the Markers Timeline, and the Scene Timeline. On the Scene Timeline, you can sequence the Scenes that are recalling your Hardware and Software instruments presets, MIDI routings, configurations, your music scores, and annotations. Program your favorite sounds on the Layer view for each Scene and using the Scene Timeline, and put the Scenes in the order you need. What happens if during the rehearsal the band decides to cut one part or add another section? No worries! In a few seconds, you can add and remove Scenes or click and drag to move them around. Camelot gives you incredible freedom and flexibility to quickly change and improve your performance show after show. Adding Scenes to the Timeline is easy. Press the “+” button on the Scene Timeline and follow the Wizard. Feel free to add any Scene more than one time if you need to recall it at a different moment.
In Camelot, there are different screens specialized in managing different aspects of your show. The Setlist & Song Manager, The Song & Scene View, The Layer & Instruments Setup, The Timeline, and The Attachment / Music Score View. If you are working in one area of Camelot, you don’t need to worry about switching and jumping from one screen to another. In the footer, you can find the Timeline Transport Panel. You can keep this panel open and accessible when you need to see the playback progress or need access to play/pause buttons. The Timeline panel layer is very handy because it also includes the prev / next event buttons. These buttons can jump to the next event placed on the timeline, so you can easily and sequentially trigger the events of your live show.
We know that everyone has different ways of organizing information in a way that is clear and immediate to them. For this reason, we have researched the best way to customize the Timeline area to make it familiar for anyone. The pencil buttons on the Timeline will access the edit mode where you can reorder the main groups and decide where to view each timeline group. For example, putting the Markers as the first option on the top and the Backing tracks in the bottom part of the screen. That’s not all. As you can see, the drag icon is applied to any object that can be rearranged. So, in the same way, you can rearrange the Backing Tracks order, their color, but also rename tracks, labels, annotation wherever you are.
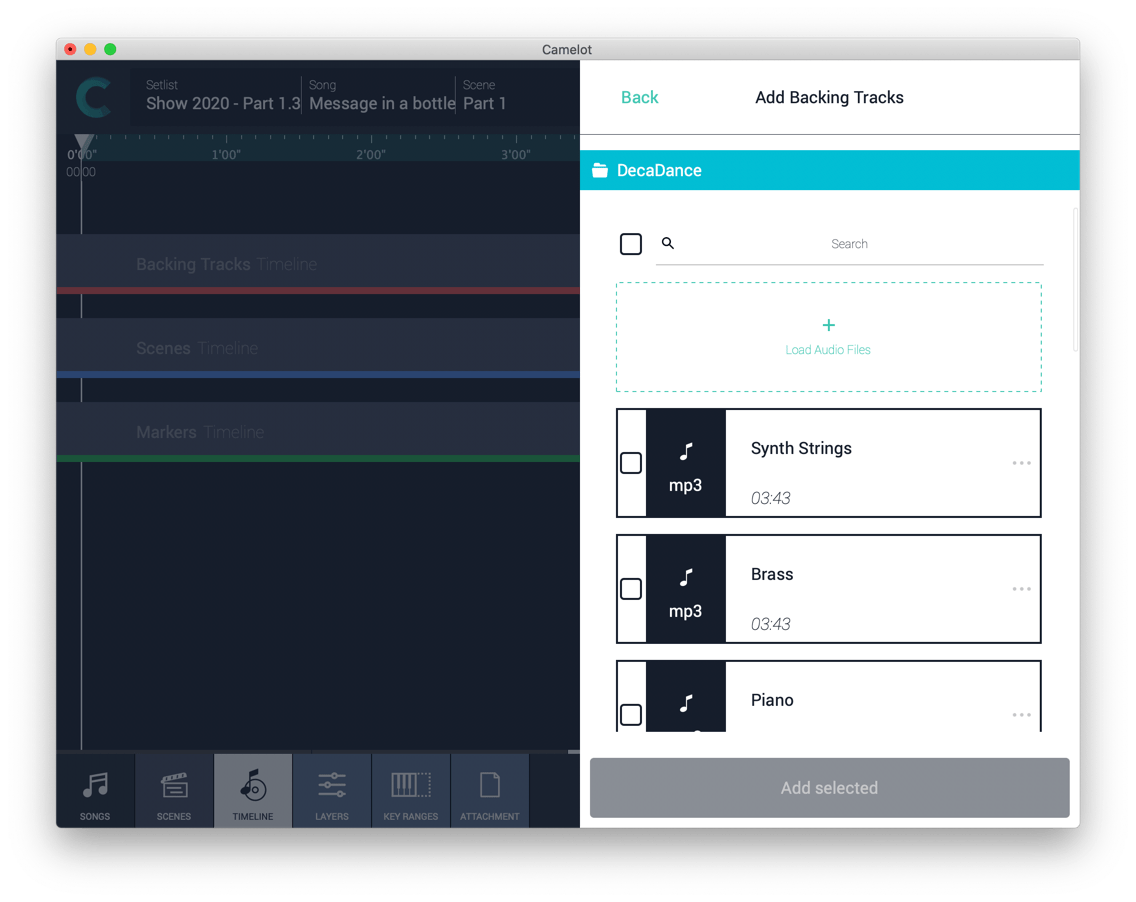
If you need audio tracks to support your live show, select the song you are playing and access the Timeline area with the dedicated footer button. Just press the “+” button on the Backing Tracks section, import the audio files, and select them to add to the Timeline. You can load WAV or MP3 audio files.
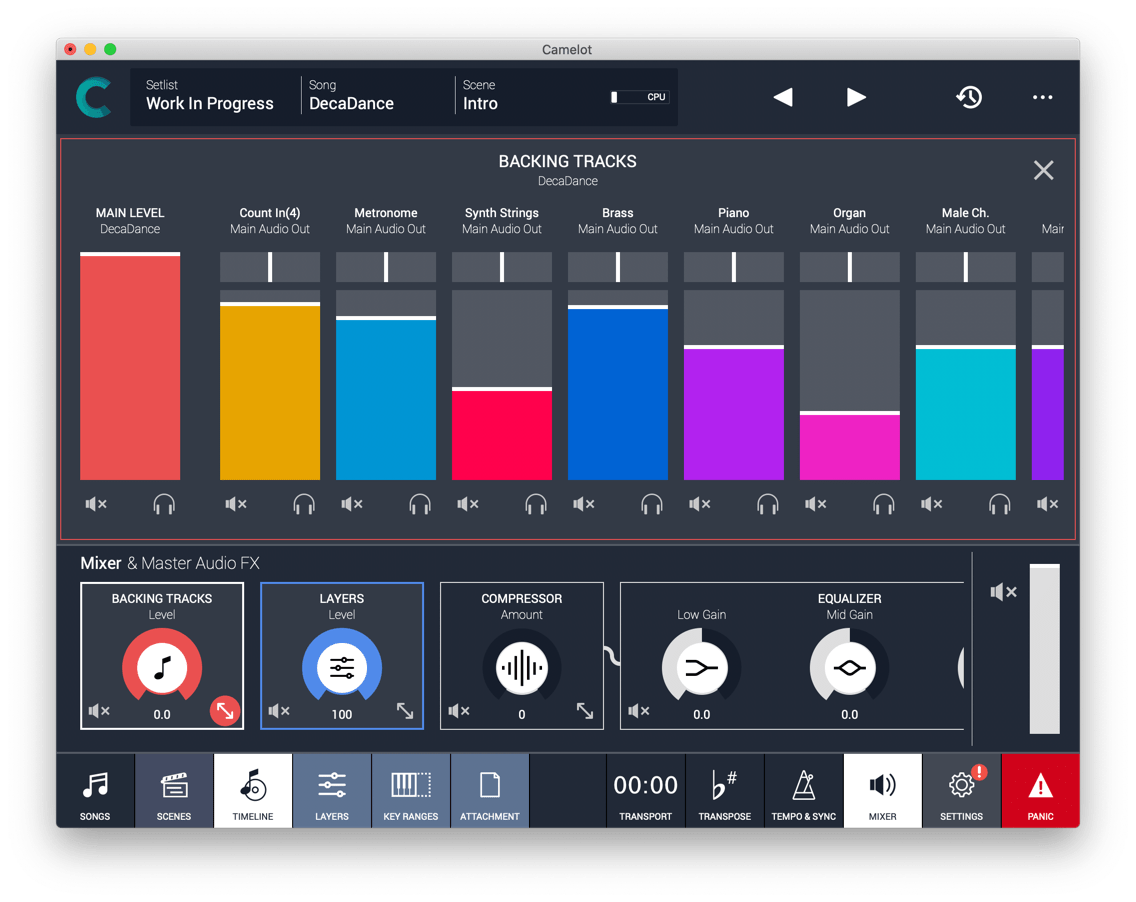
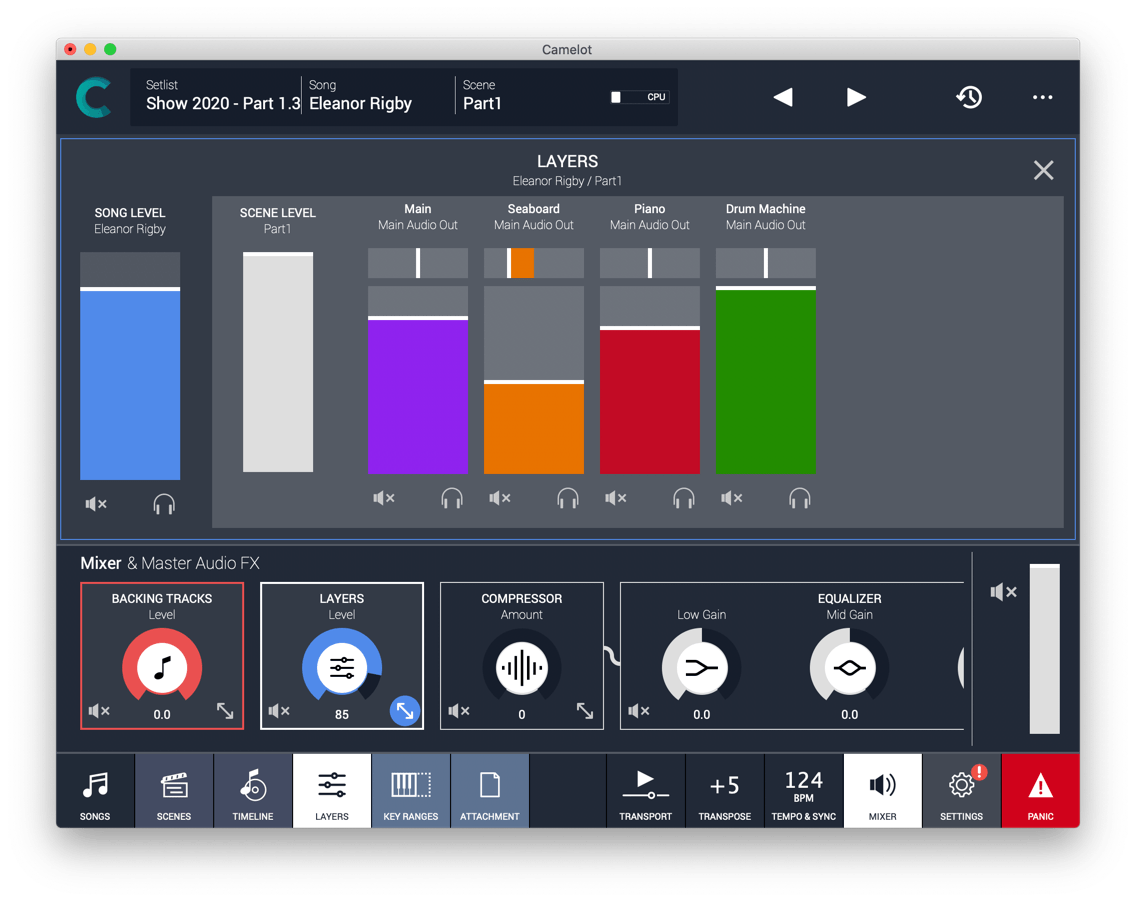
Camelot can generate sounds by playing Software Instruments and also playback Audio Files for backing tracks. The Audio Files are located in the Timeline, in the Backing Tracks Section. In this section, there are local faders that allow direct control over each track’s level, mute or solo options, and the output settings. You can also see the “big picture” on mixing with the convenient Mixer expandable panel on the footer.
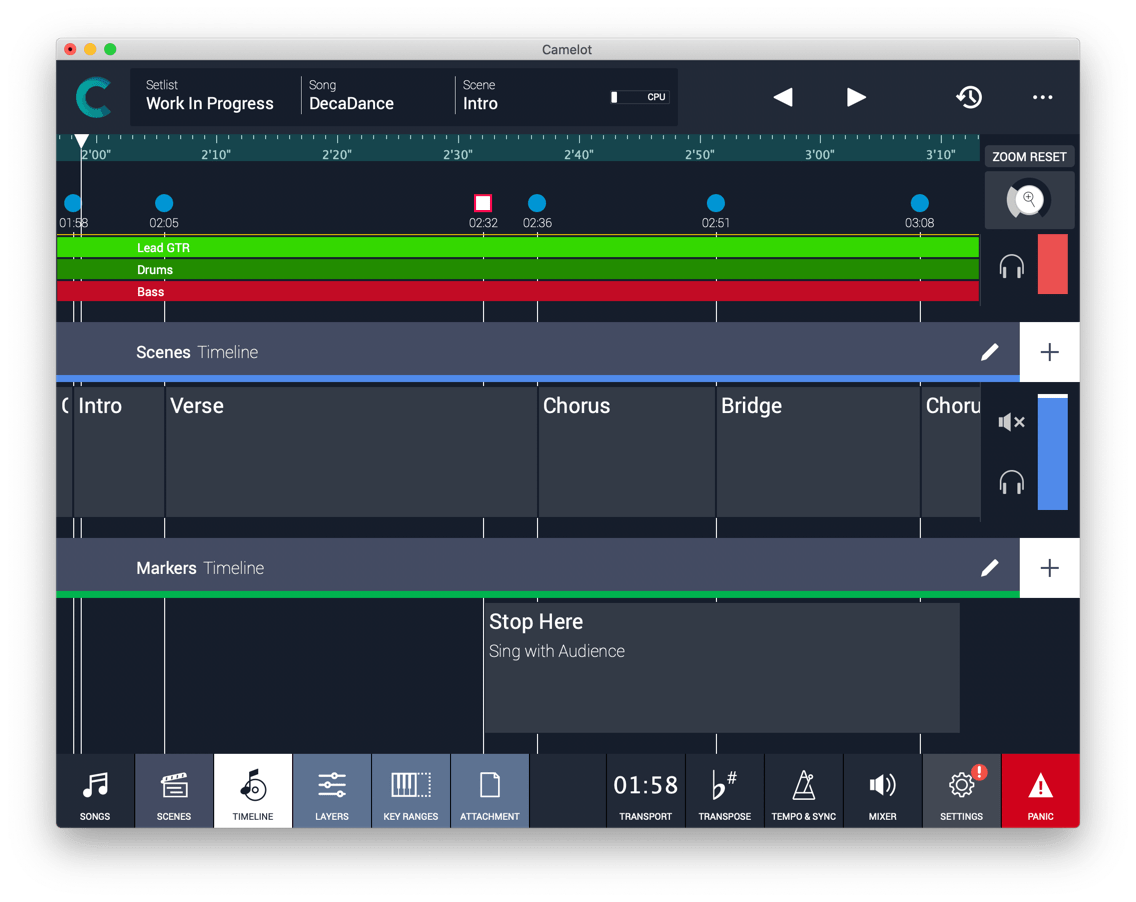
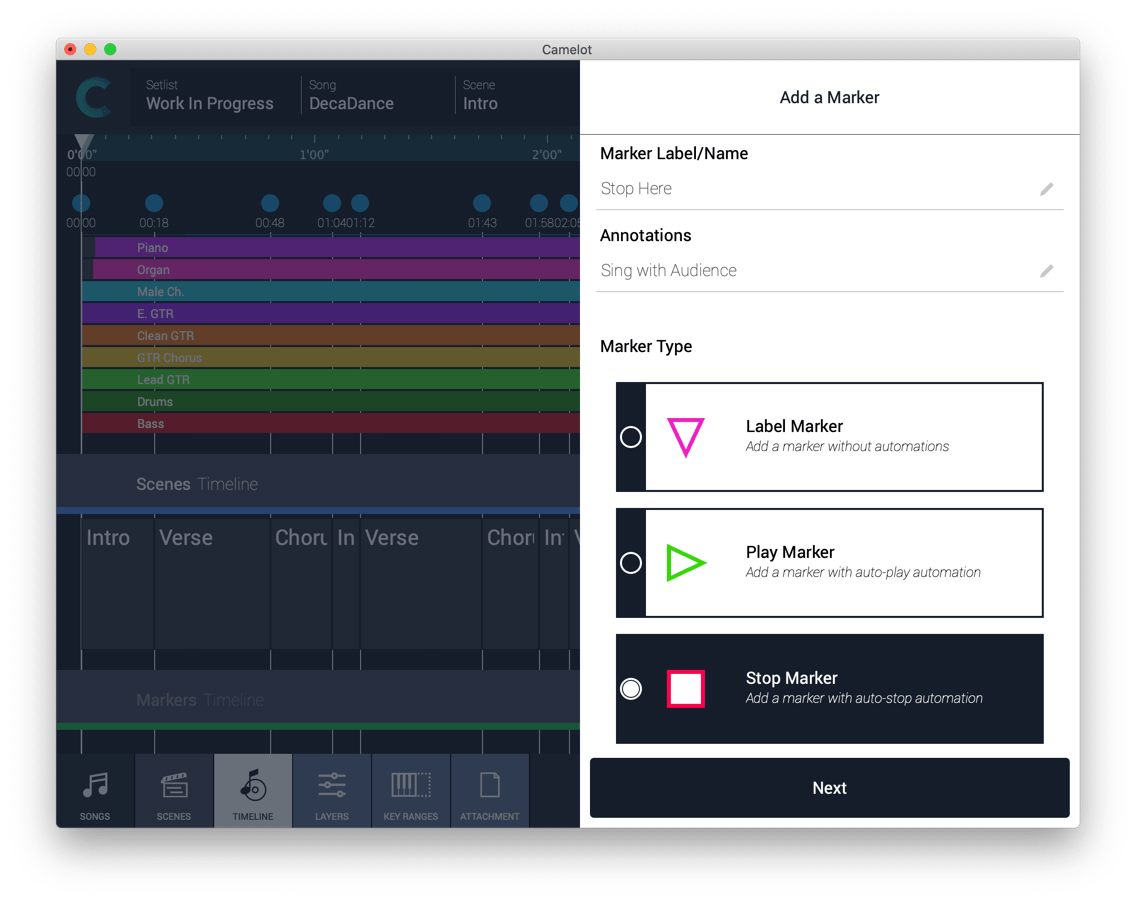
Camelot’s Timeline is not only a playback area, it’s a place that keeps everything under control and allows you to automate or sequence different events and actions. There are three sections: the Backing Tracks Timeline, the Markers Timeline, and the Scene Timeline. In the Markers Timeline, you can add markers and annotations to give you the big picture of the song’s structure and evolution. If you have audio tracks running, you can identify different song parts on the timeline to be always prepared during your performance. The Markers can be also automated and trigger playback or stop action on the transport. Adding Markers is easy. Press the “+” button in the Markers Timeline section and follow the Wizard. Feel free to add Labels and Annotations that are displayed on the Timeline.
Camelot is designed to effortlessly be performed on stage but to also be easy to edit during rehearsal. There are many different ways and solutions to playback audio files on stage. If it isn’t easy to quickly move and arrange the different song sections on the fly, you and your bandmates will be quickly frustrated and you’ll be forced to work offline during the pre-production phase. With Camelot, you can quickly and easily move the scene automation, markers, or auto-play and auto-stop events during your rehearsals and refine it show after show. Just drag the Scene and Markers flag handles on the Song ruler, then press the pencil edit button to remove them quickly. You can also add annotations, change color, or make them more visible. Double click or tap the markers flag to access the full info and edit panel.

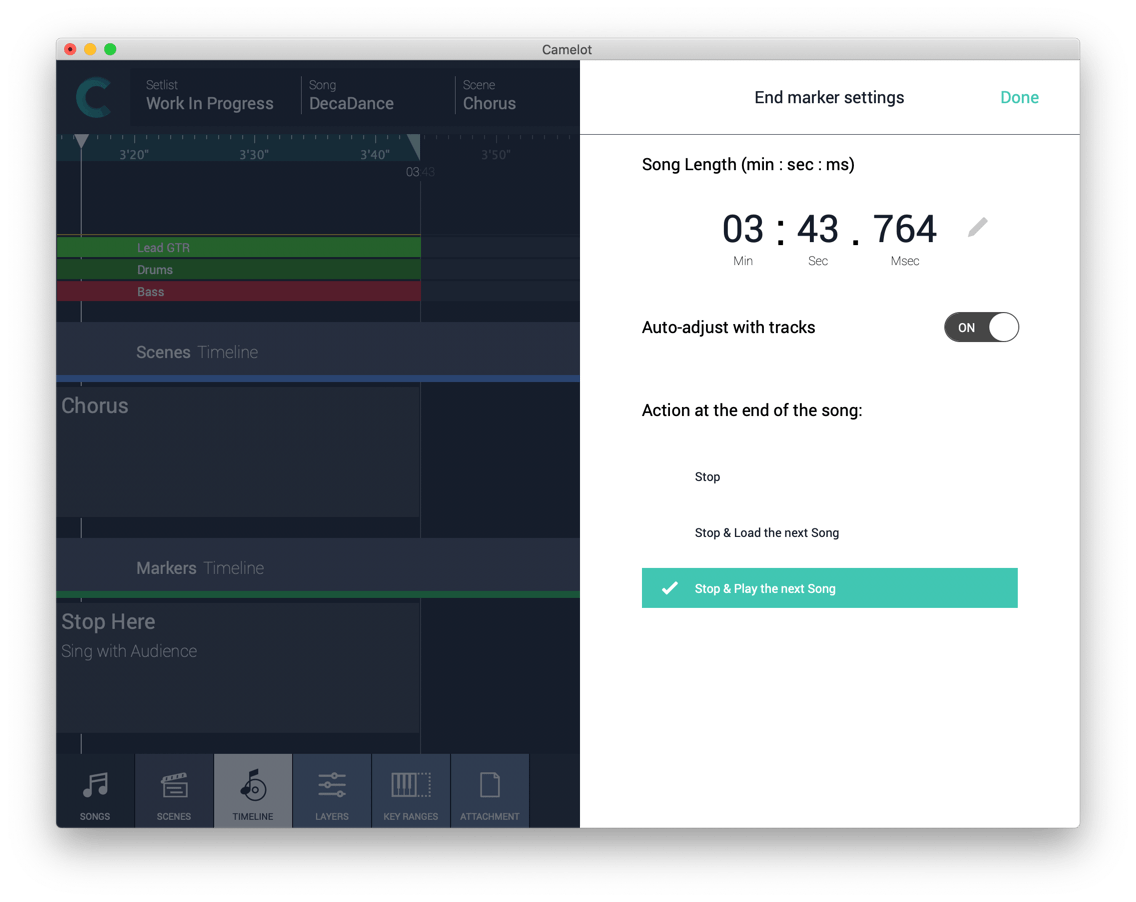
Automating your live show is addictive 😉 The more you explore areas of your show that can be automated, the more you desire a better Show and with less stress and less real-time management. After listening to many user suggestions, we decided to introduce automation at the end of each Song. So when the Song playback reaches the end marker, you can decide to stop, load the next song, or Autoplay the next Song. Setting up this automation is easy—just double click or tap the end marker and select the desired option.
Most requested feature—hands-free sound switch, play/stop sequence, music score next page. Keeping your hands only on your instruments couldn’t be easier. The Timeline Transport Controls can be easily assigned to a pedal, a MIDI controller, computer keyboard keys, or a Bluetooth page switcher. Play, pause, stop, the previous event, and the next event can be mapped from the Main Settings on Remote Controls section. Just create or define a controller and edit it.

HARDWARE INSTRUMENTS MANAGER
The MIDI engine in Camelot is not limited to sending only basic messages, it delivers you a plug & play experience with your Instruments. Camelot Smart Maps deeply communicate with Hardware devices, allowing you to recall your hardware presets with minimal knowledge of MIDI.
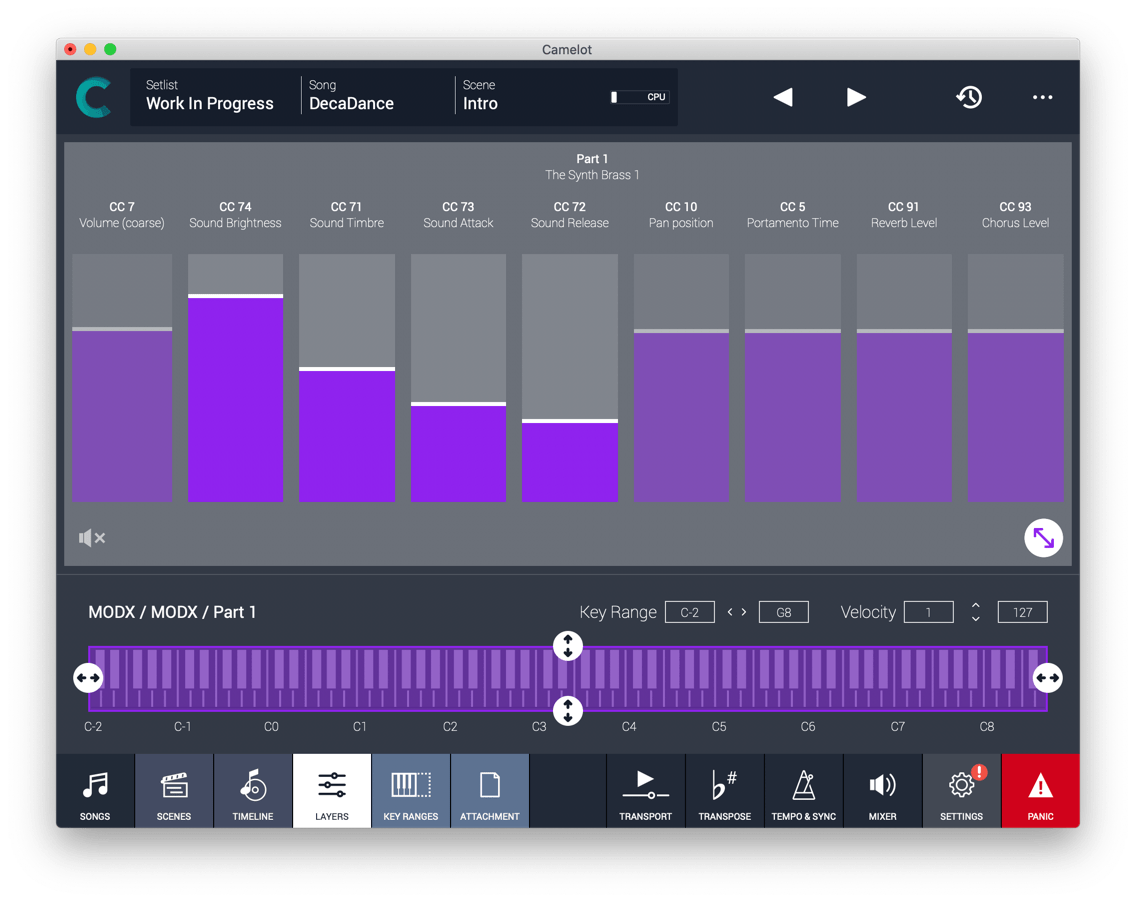
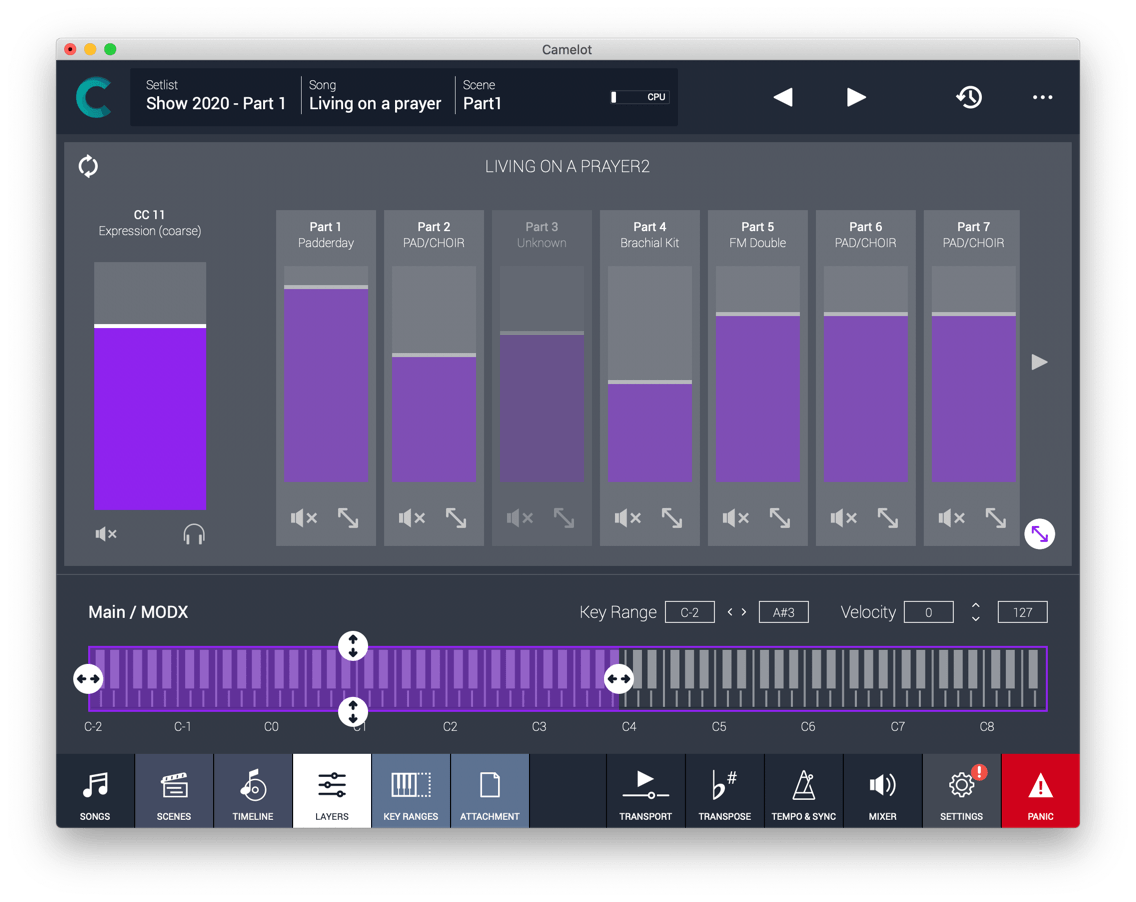
You can tweak your sounds without creating new presets on your instruments. Expand the Item, select the CCs and move the Faders to apply changes to the Tone Generator.
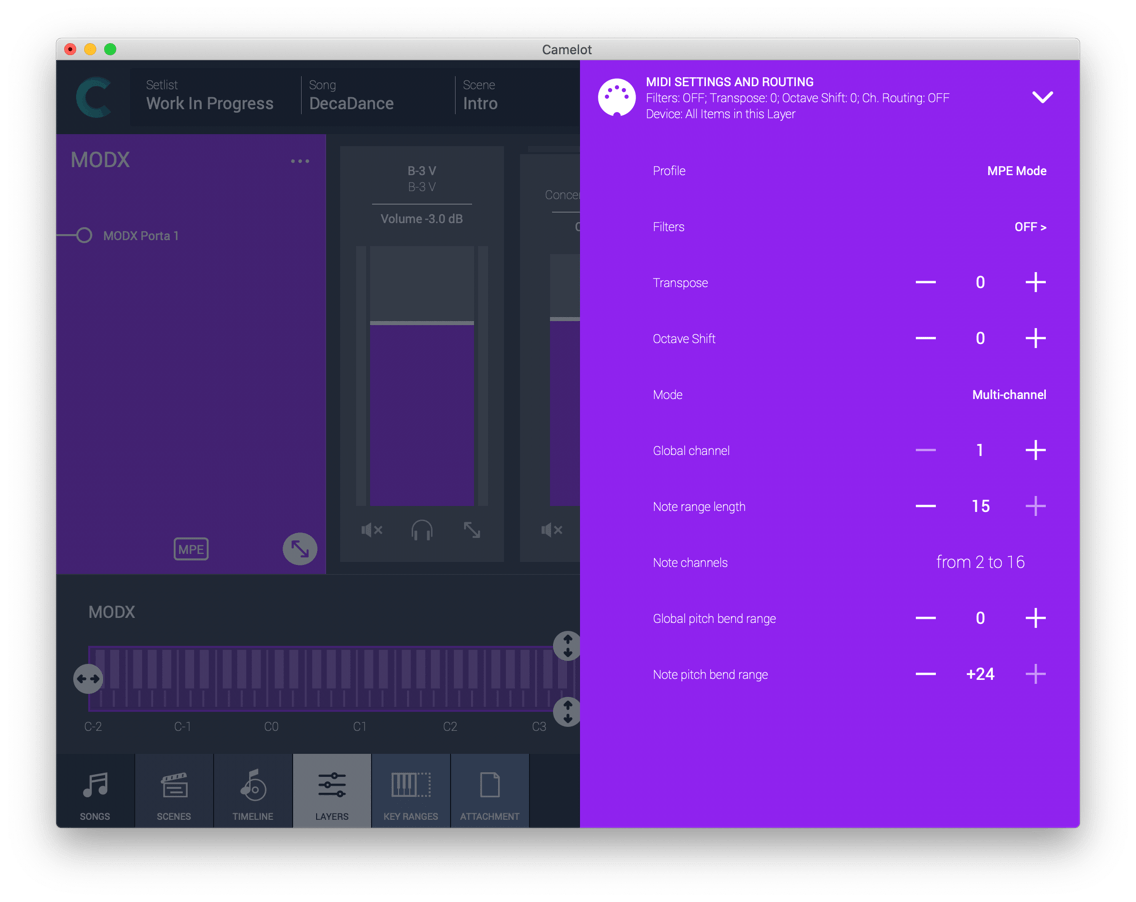
If you are familiar with MPE Controllers, you know that it requires time to build a multipart preset that can be played by them. Camelot allows you to select a sound preset with ease from a multi-part hardware instrument and replicates it to the other MIDI channels with the same pitch bend range and level. Easy.
You can switch modes or manage multi-part patches in Camelot without accessing the panel of your instruments.
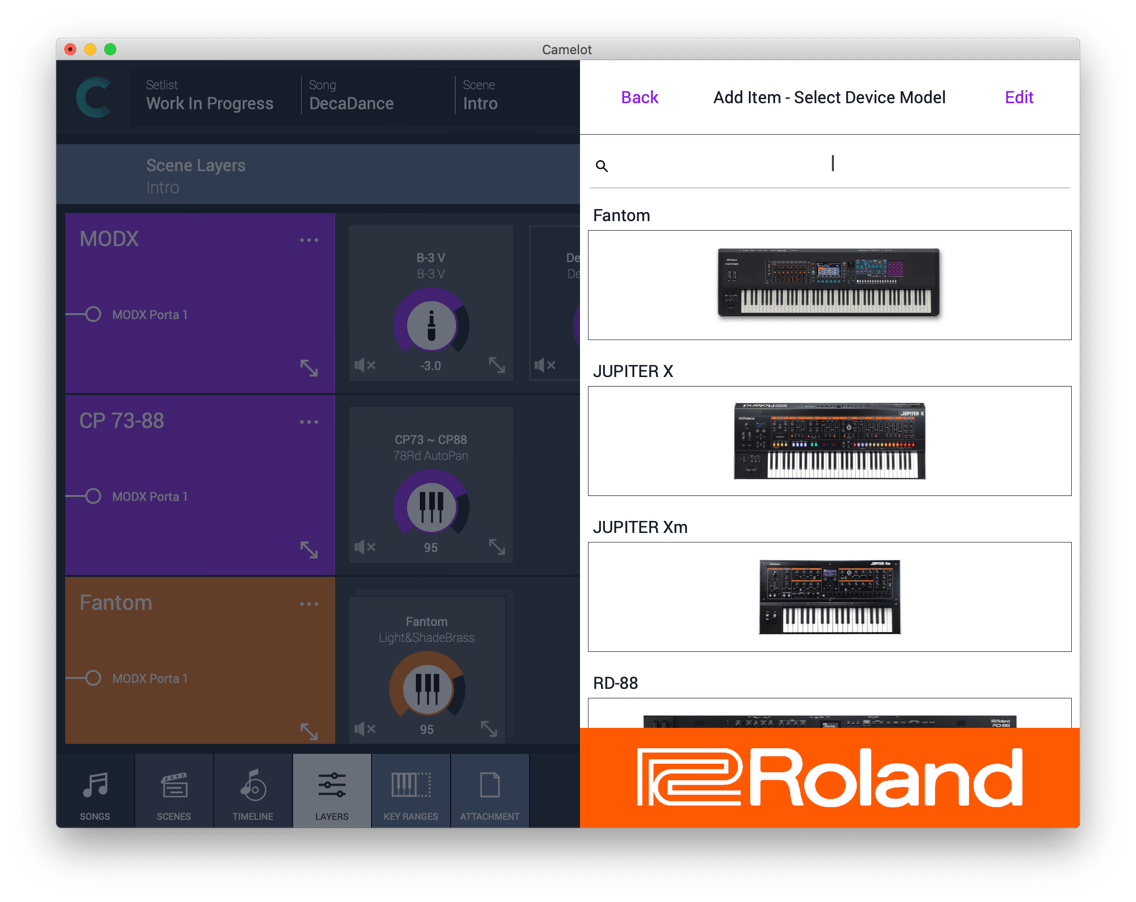
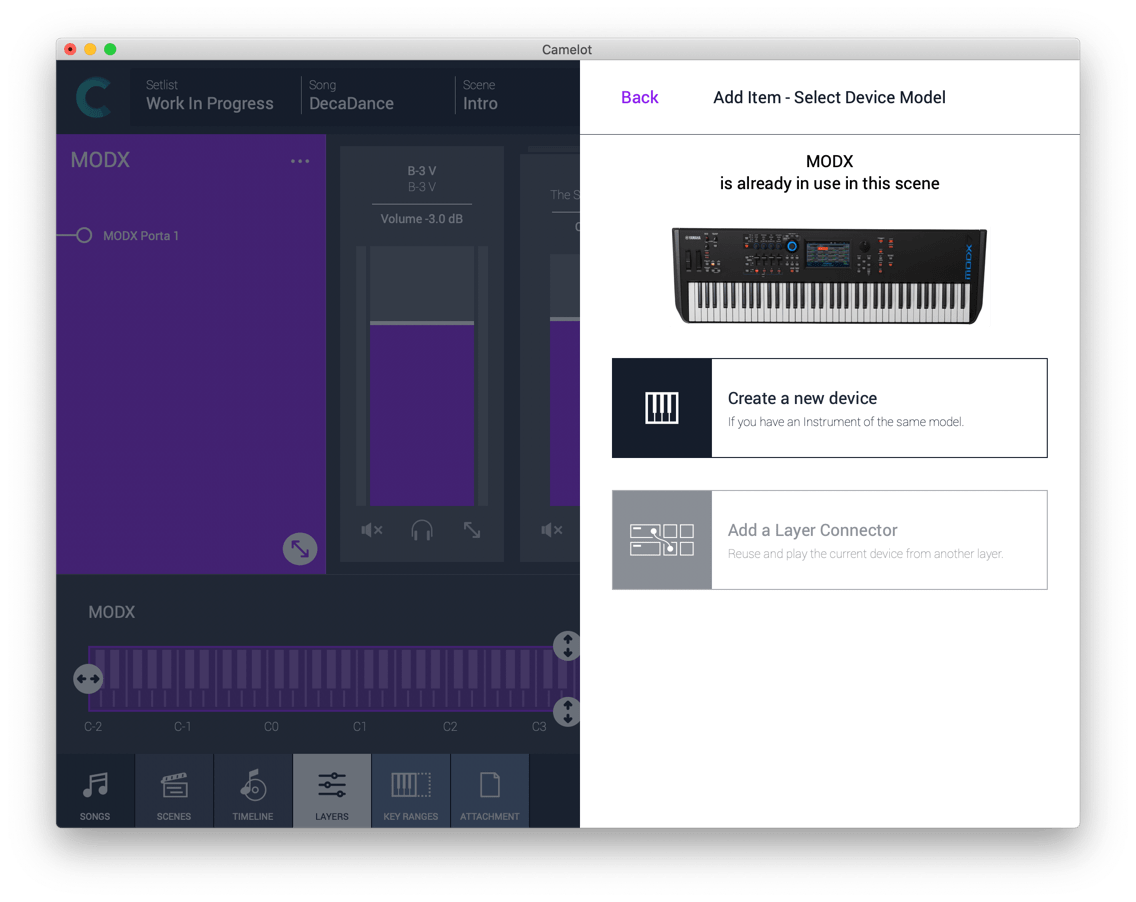
From Camelot 2.0 you can have separate instances of Smart Maps to manage multiple devices of the same model, so you can have, for example, a Yamaha Montage 6 and a Yamaha Montage 8 at the same time with separated maps and presets lists.

SOFTWARE INSTRUMENTS & FX HOST
Extend your sonic choices by adding Software instruments to your performance. Depending on your system, Camelot allows you to host plugin instruments on each scene. On laptop/desktop systems (Windows and macOS) are available VST and AU formats, on iPad (iOS) Audio Unit v3.

Camelot can generate sounds by playing Software Instruments and also playback Audio Files for backing tracks. Software Instruments are loaded and controlled on each Scene from the Layer View. In this section there are local faders that allow direct control for each track level, mute or solo options, and access to the output settings, to select the output channels. You can also have the big picture on mixing with the convenient Mixer expandable panel on the footer.
Extend your sonic choices by adding Software FX to your performance. Depending on your system, Camelot allows you to host plugin instruments on each Layer as an Insert FX. On laptop/desktop systems (Windows and macOS) are available VST and AU formats, on iPad (iOS) Audio Unit v3.
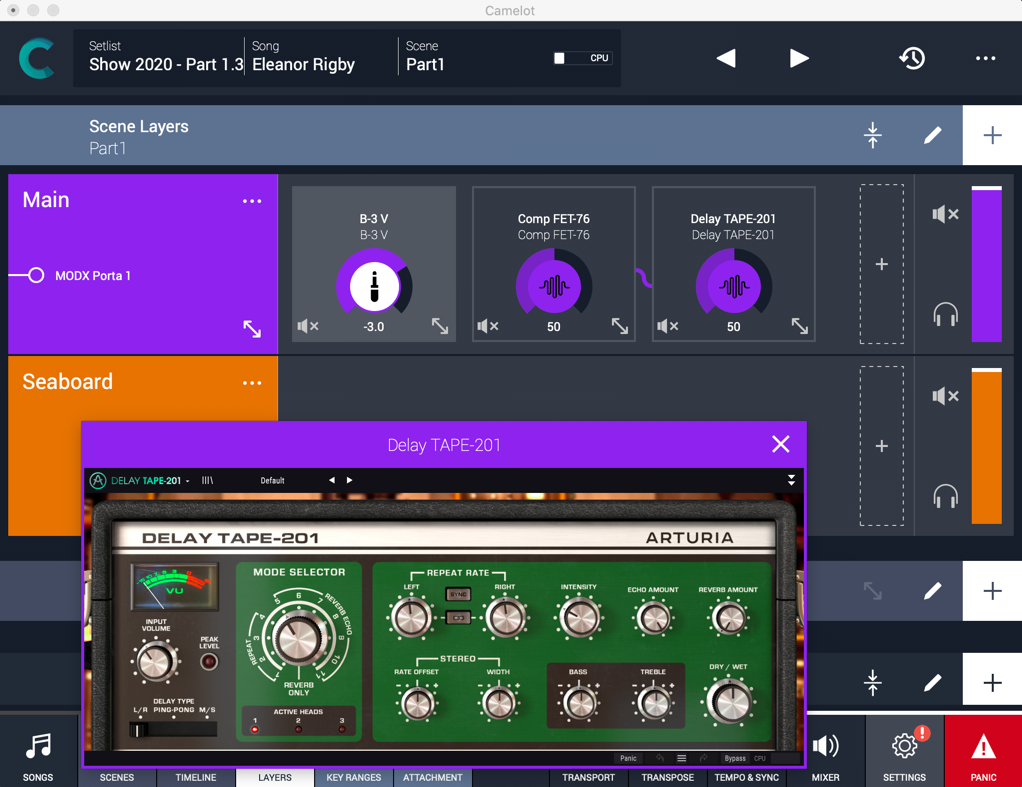
By default, any Layer is assigned to the Main Audio Output. You can always change the output used for a Layer by clicking on the output shown for the Layer in the Layers view. But there’s much more to the Main Audio Output! Any Layer can benefit from the Master FX (compressor, EQ, delay, and reverb) available for processing audio sent to the Main Audio Output. The convenience of these onboard FX can’t be overstated. The Master FX settings apply to the entire Setlist, so you can adjust your mix at each show to ensure you sound the same with each sound system and venue as you did in your studio or during rehearsals. This straightforward workflow is great most of the time, but bypassing the Master FX is easy when you need more flexibility. Output assignments are flexible, too. The Main Audio Outs can be set to play through any available channels, and multiple outputs can be selected for each source item to provide quick monitoring of any track.

PDF MUSIC SCORE READER
Perform without worries! You can read your Chords, Music Scores, Lyrics directly in Camelot. Simply attach PDF, PNG, and JPG files on each Scene or Song.
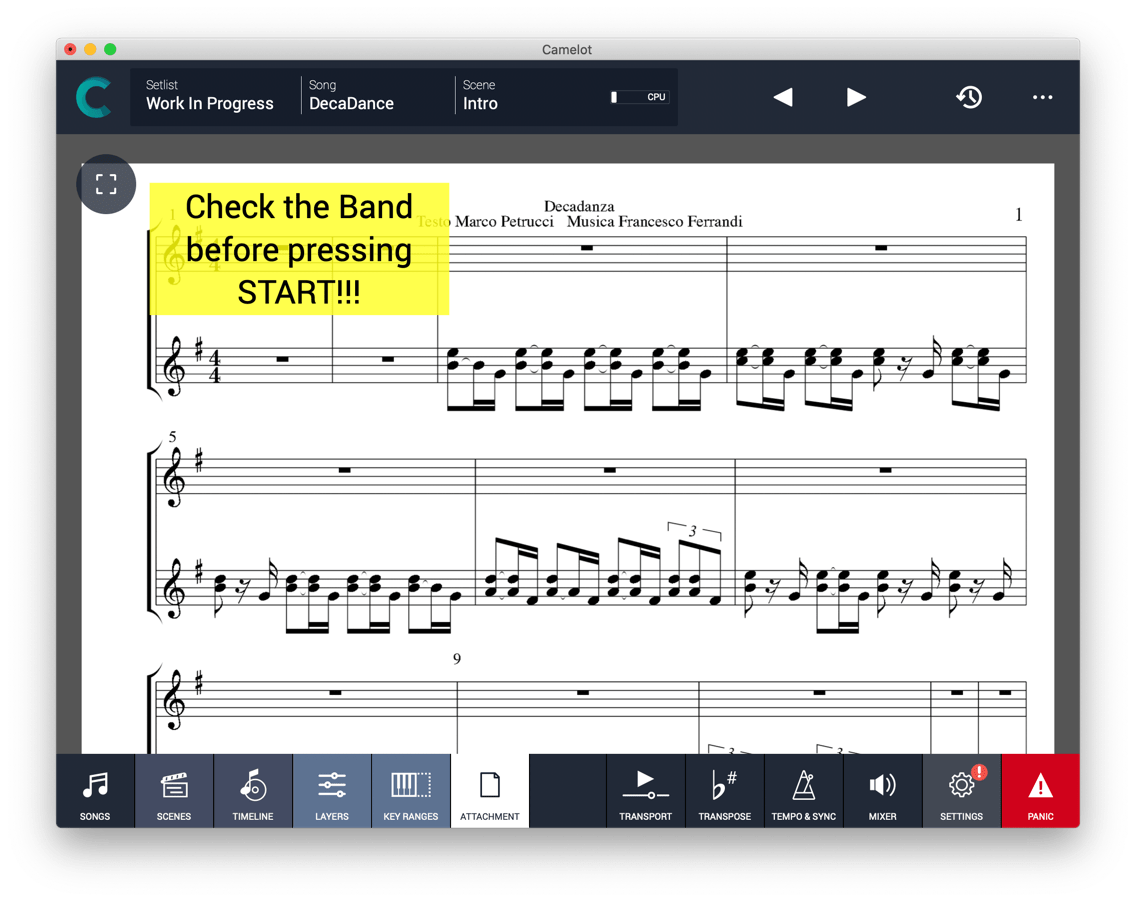
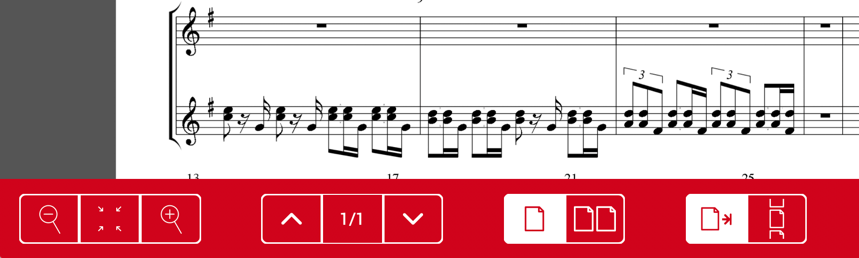
View your attachments on one or two pages. You can also select if you want to scroll or switch pages for browsing.
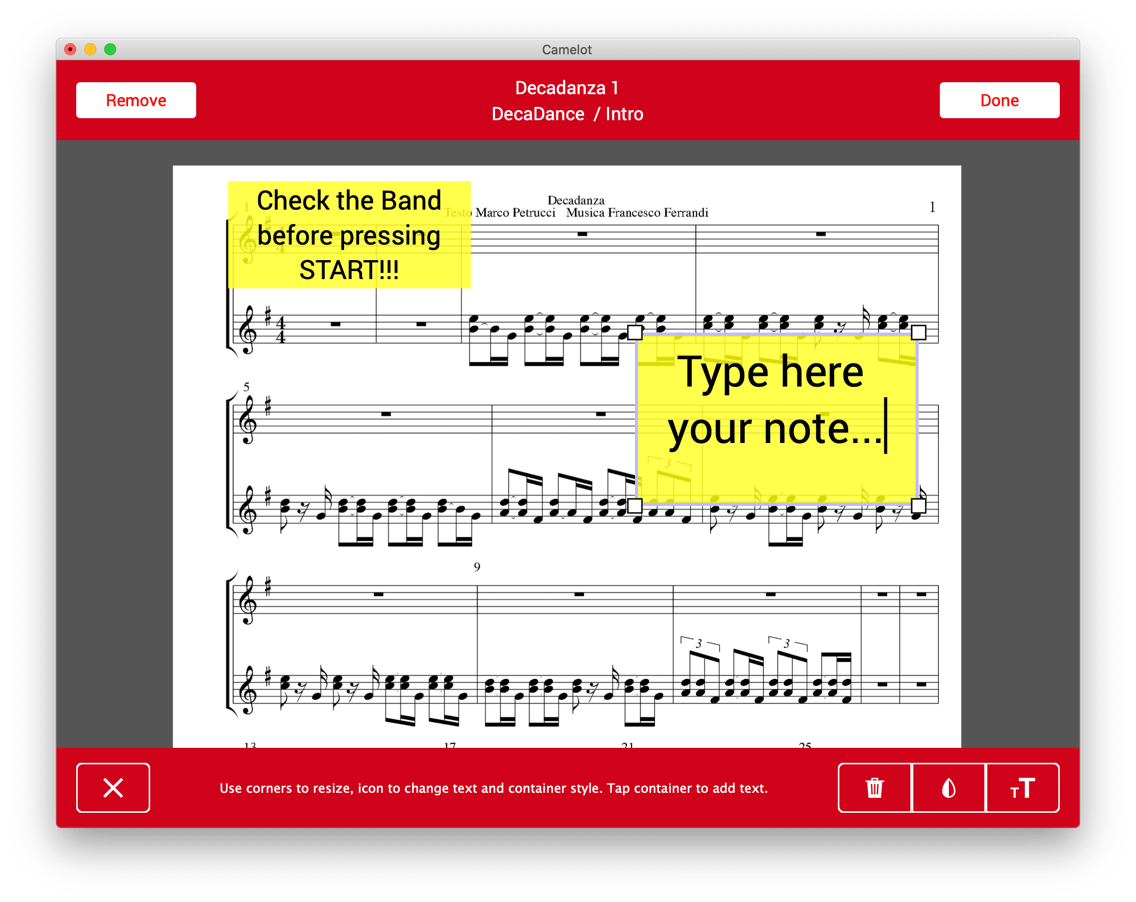
Write your own annotations and place them on top of any attachment or on a convenient annotation board.

MIDI PATCHBAY AND ROUTER
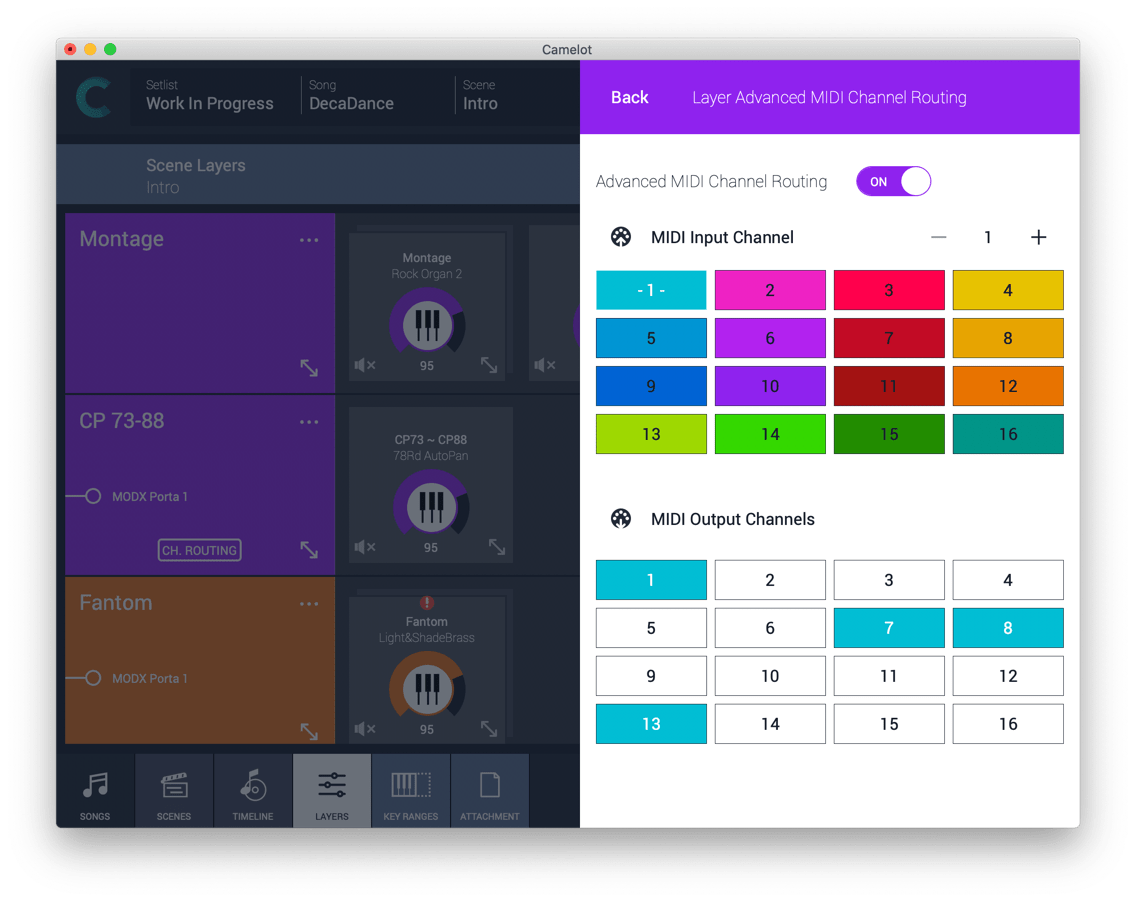
Layers and Items have a dedicated MIDI Settings section that can Transpose, Octave Shift, Filter unwanted MIDI events, and route/replicate messages from one input channel to another. This MIDI routing and processing unlocks endless combinations. Imagine playing your instruments from one controller in one Scene, then switching seamlessly to another configuration that plays other tone generators and audio effects. This is all done without the need to unplug and re-plug MIDI cables on the fly!
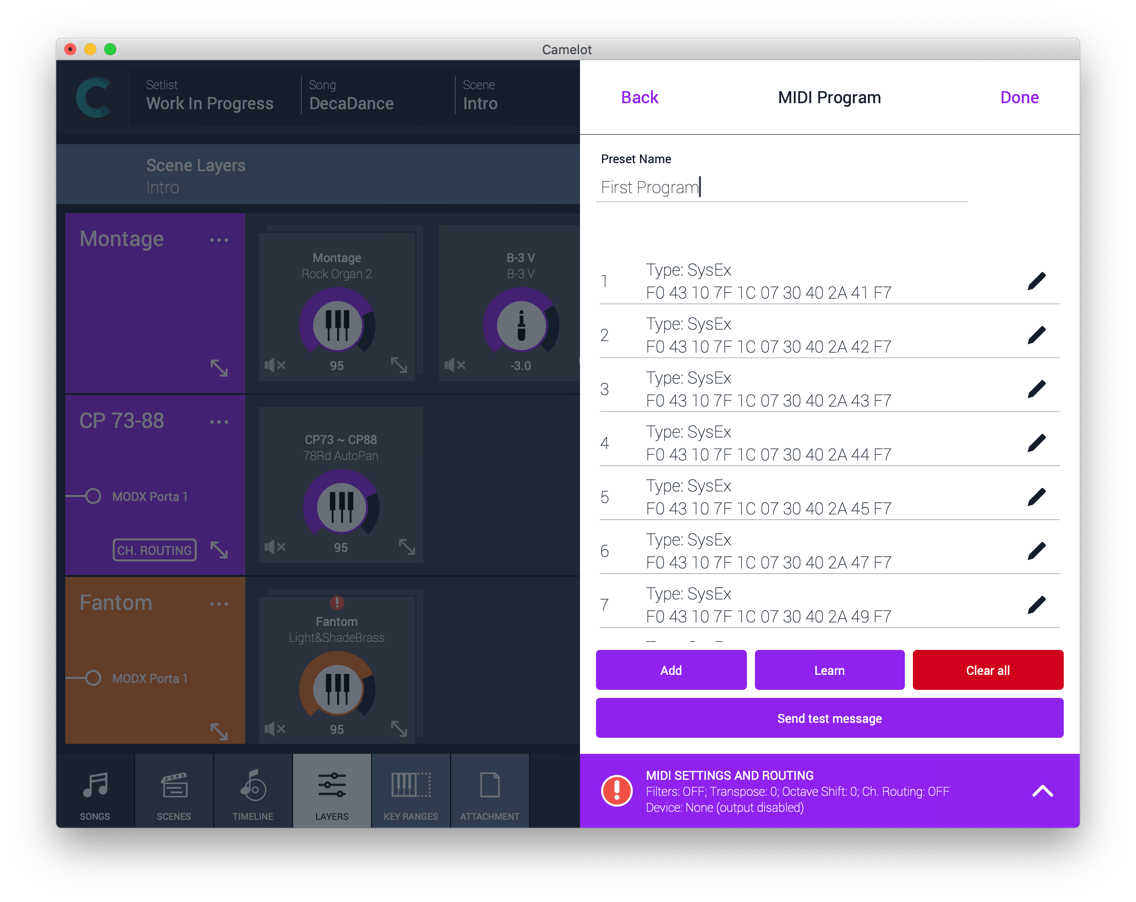
The advanced MIDI item allows you to generate a wide choice of massages, including Sysex. You can also learn and playback the list of messages just recorded.
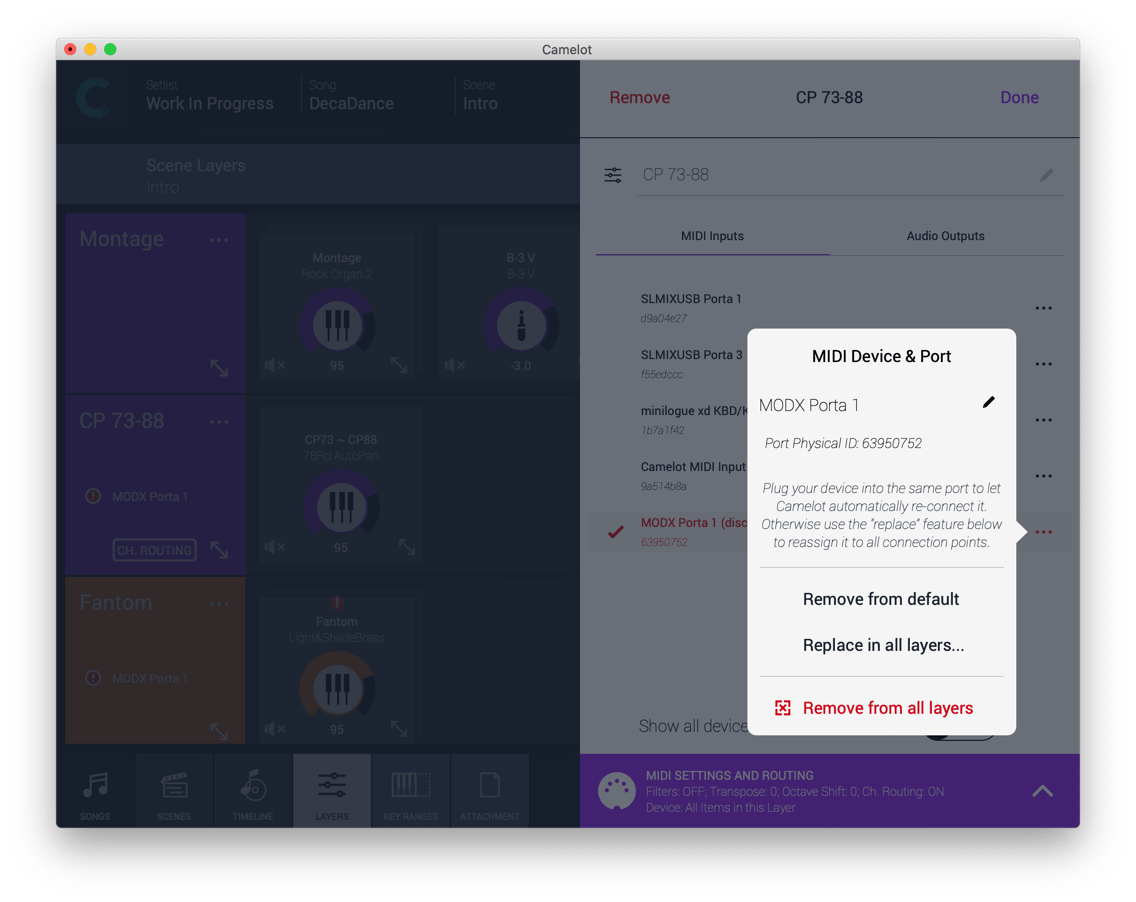
The MIDI Port Manager is the best ever created, and it does not rely on aliases or technicalities. When a MIDI port is not detected, a red badge pops up to quickly address that issue. You can either replace the missing port or reconfigure your setlist with different Hardware. You can do all of this with one button. Easy.
Layer Connectors allow cross-connection and MIDI bridges between layers. For example, you can have only one sustain pedal connected to one device and use it with all devices that are played by another controller.

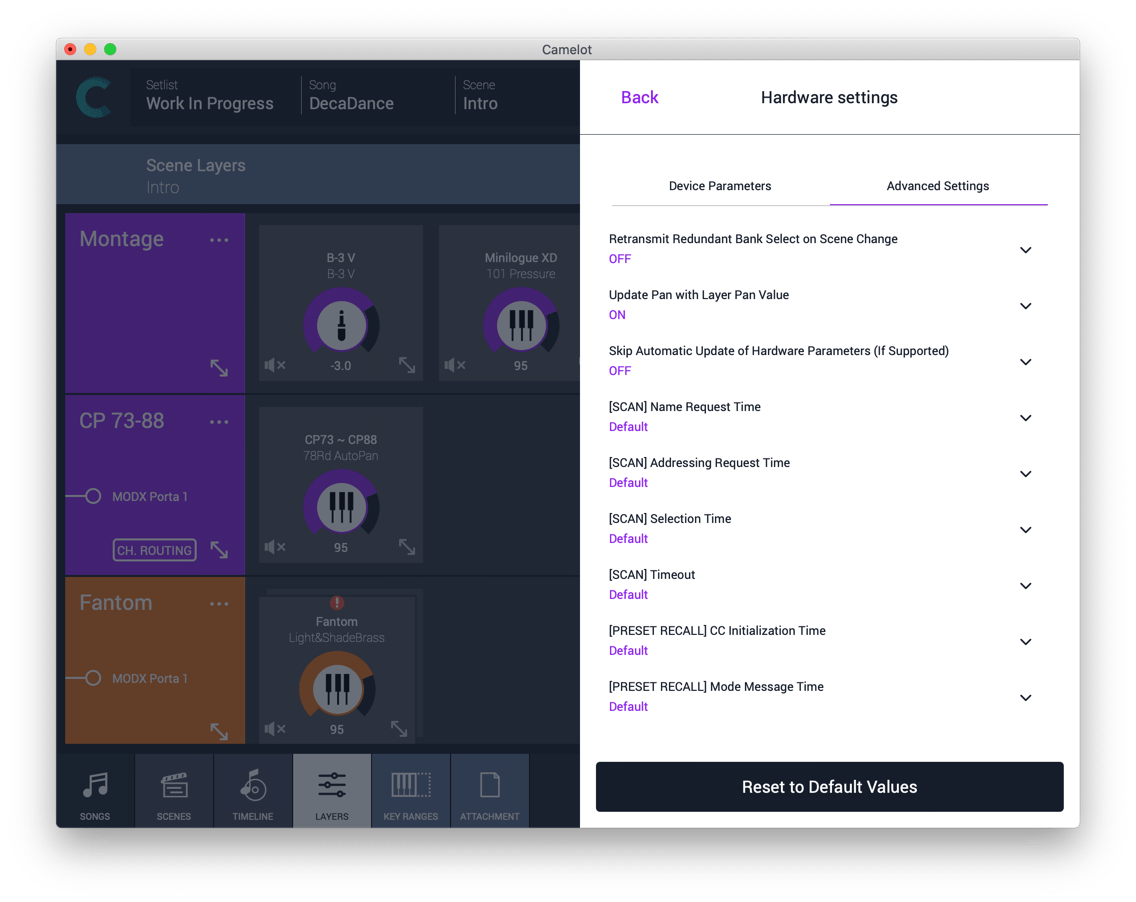
Dealing with Hardware Instruments is challenging when you want to unify and control different devices, made by different manufactures. They have different MIDI implementations but also respond to commands in different ways. For example, some devices need more time between Bank Select and Program Change Messages to work properly. Some Devices need to not receive redundant Bank Select messages otherwise they interrupt the sound. For this reason, we have tested many devices and applied a default choice that should be perfect for most cases. In special cases where you need to go deeper, Camelot can help you set up the MIDI Transmission Time (the option of resending redundant MIDI Messages). Discover them under the cog menu on the Hardware Instruments preset list.
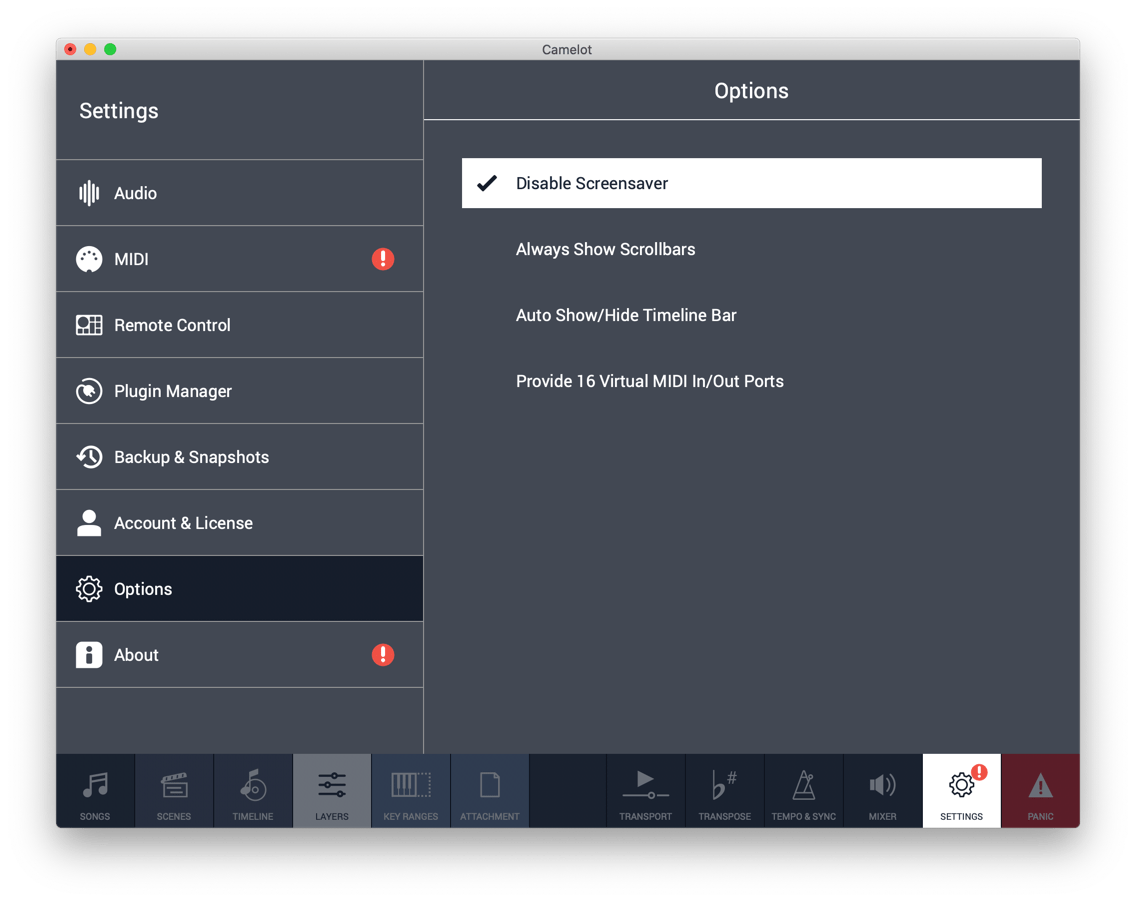
Control Applications running in background that cannot be hosted with virtual MIDI Ports. On the Options Settings, you can enable up to 16 ports.
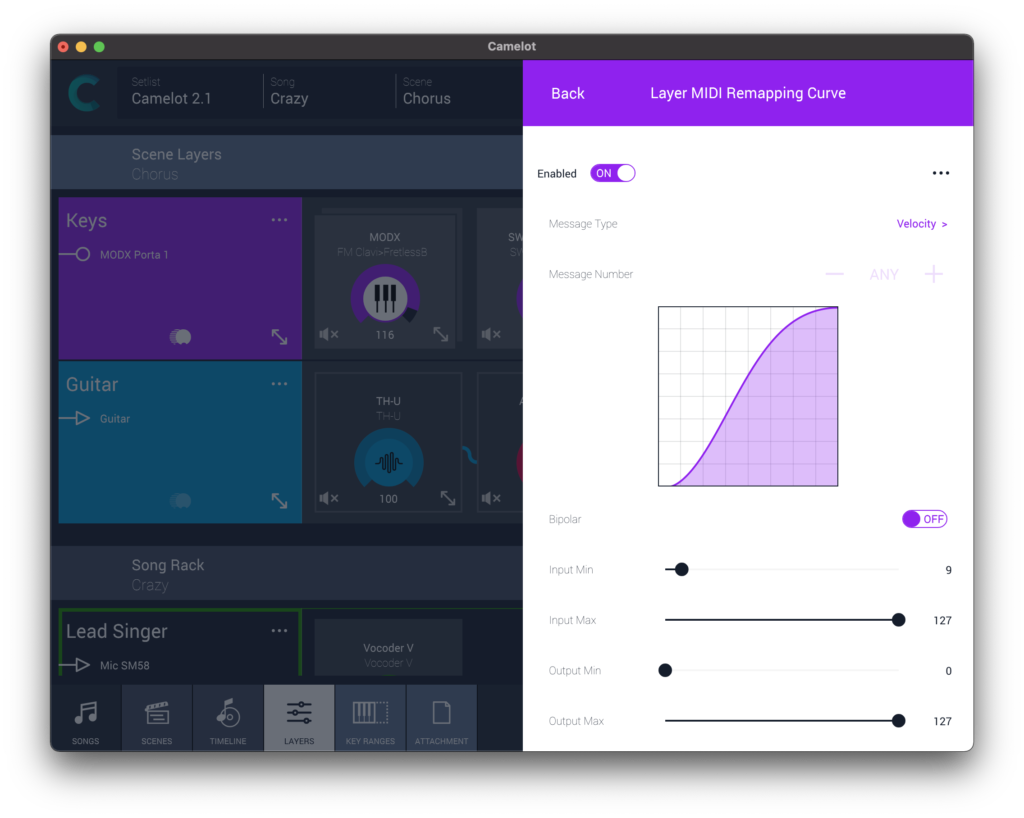
Remap/rescale any CC or Velocity curve. If you are playing a hammer-action keyboard , you can have a different velocity curve to play a synth solo by using a Remapping Table on your synth solo Scene,, or you could globally assign it to the device you use.
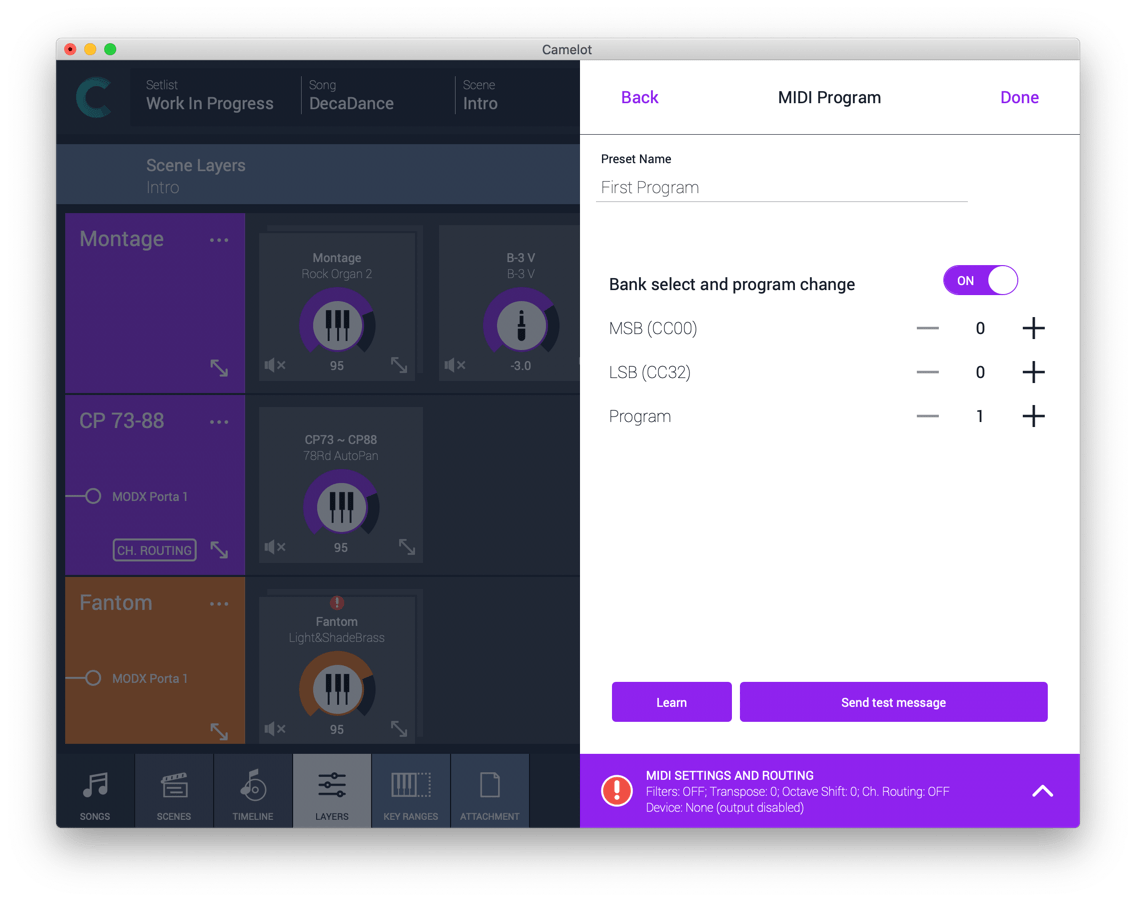
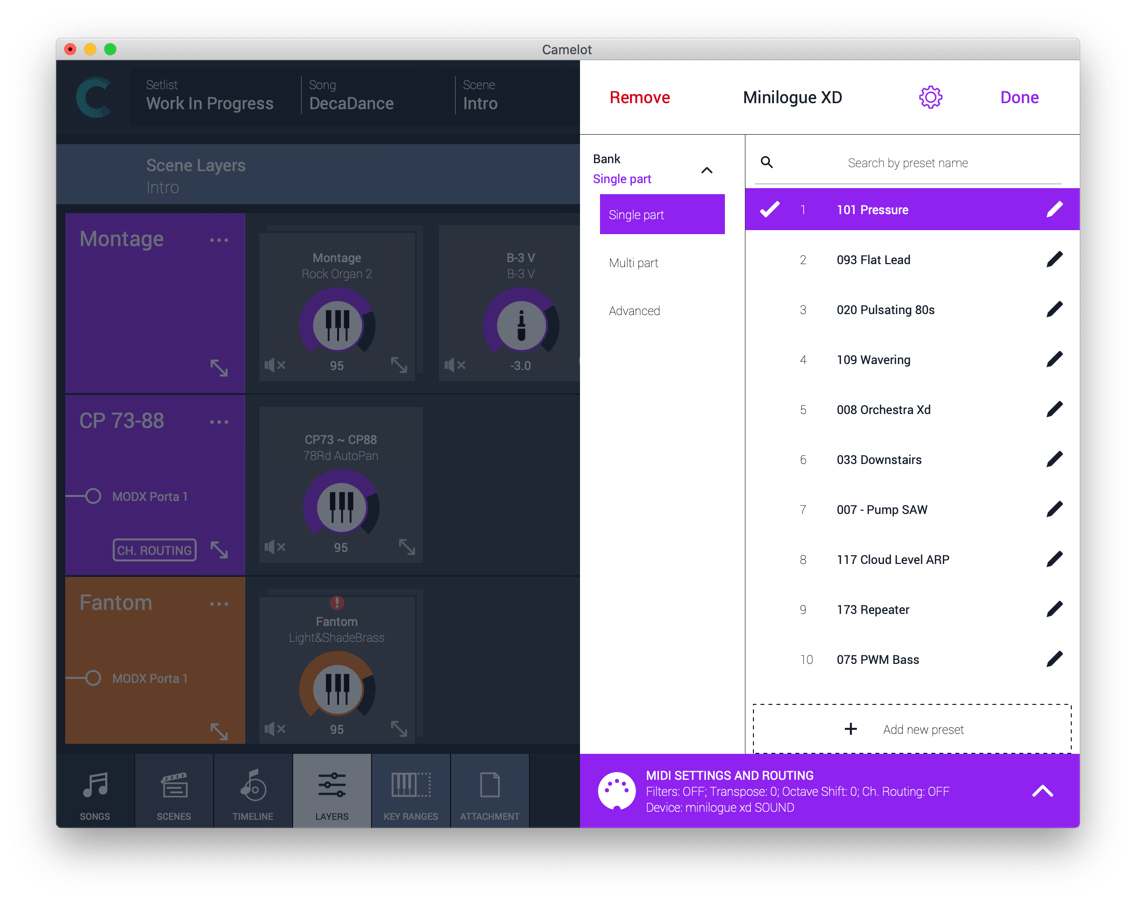
All MIDI Instruments are supported in Camelot, even if there is not a smart map yet. You can use Program Changes and Bank Select messages to manage your MIDI Instruments. It is possible to create Single Part Item (simple and standards ) but also Multi parts items that can manage a Combi/Performance program with subparts settings.
Organize and recall MIDI generic and advanced items with ease. All the MIDI items in use can be added to a Custom Map for reusing. Click or tap on “add to custom” map button on each MIDI item panel.
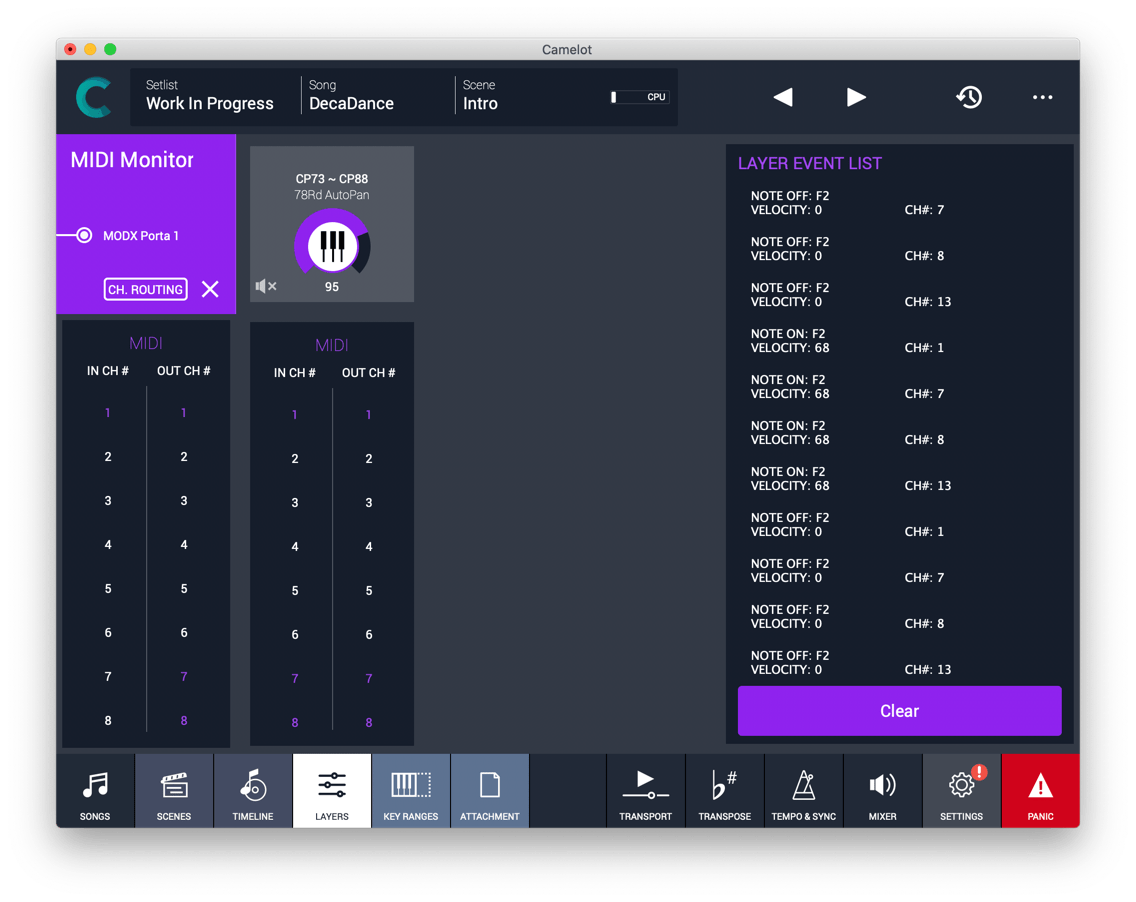
With the 2.0 version of Camelot, MIDI is even better. We introduced a MIDI monitor on each layer so you can easily check your connection and advanced channel routings.
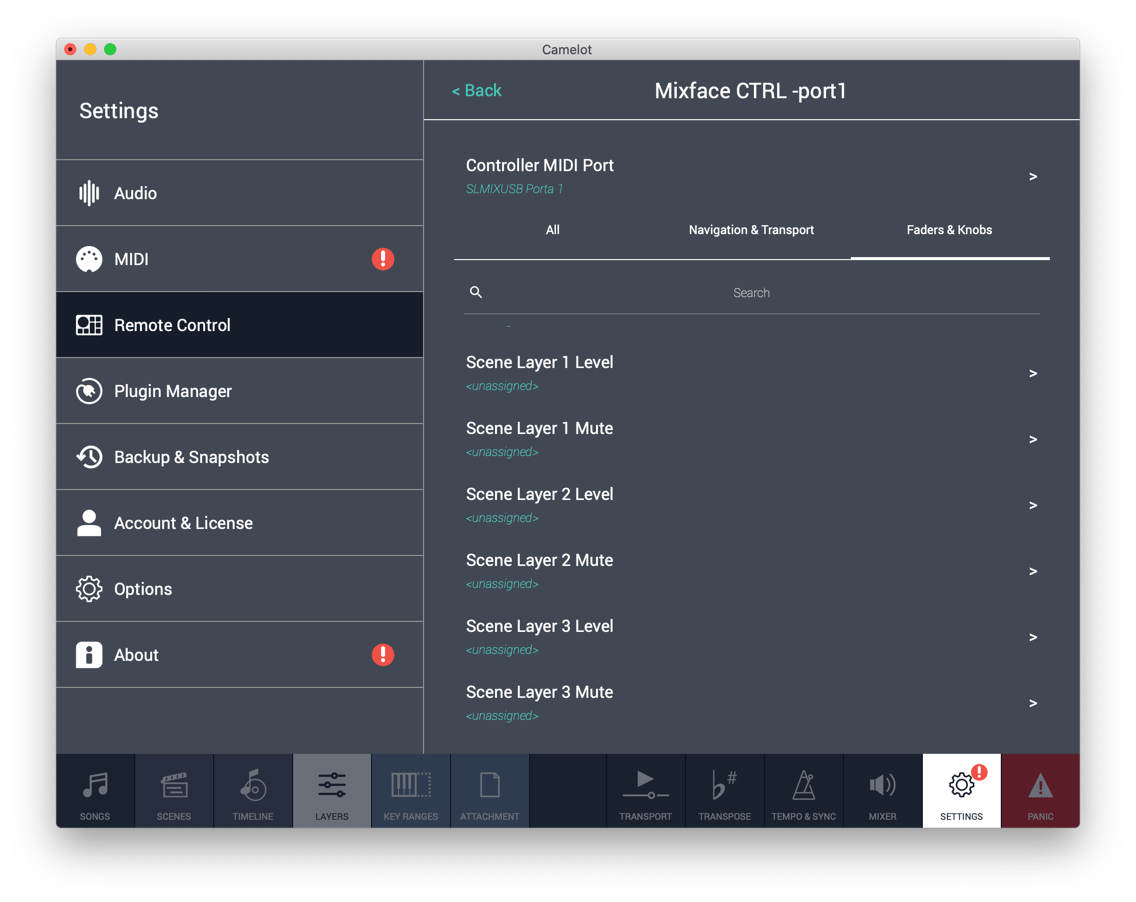
With Camelot 2.0 we extended the Remote Controls to the Master Levels, the Layer and Backing Tracks faders, and Item’s main Knob, giving you the opportunity to keep the most important levels of your live performance under control. Level mapping can be considered a simple problem to solve. Many production DAWs have a MIDI Learn mapping feature to assign a parameter to an external MIDI Controller. On a Live Performance Setlist, this seemingly simple approach fails because each song could have a different layer and MIDI configuration. This makes one to one mapping a frustrating and never-ending task to do in pre-production and also proves to be inefficient and difficult to use on stage considering that you need to remember many custom configurations. The human brain usually can manage and remember a few things at a time, so we decided to provide a simple mapping system based on a track’s order. Just map the 1st Layer Level to your controller once and it will be the same for the entire show. Easy and quick to do, easy to remember.
![]()
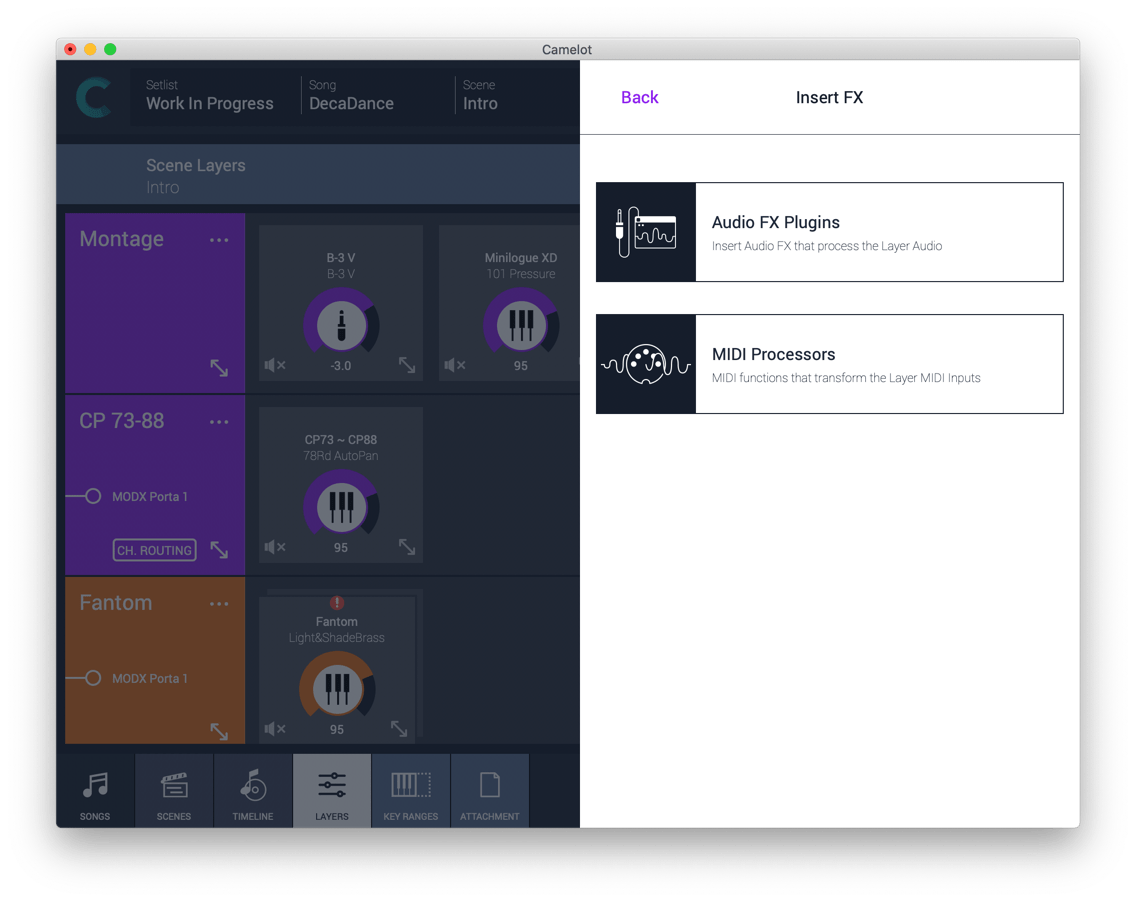
Load MIDI Processors (like arpeggiators for example) at the beginning of any Layer. In this way, you can transform your layers’ MIDI Inputs and feed the Items in a very creative way. It’s easy: MIDI FX is available in the add Item menu when adding Insert FX.
Converts a continuous controller message from one CC number to another. This can be useful, when you need to an expression pedal to generate a different CC message in a special scene, or when you need one pedal to change two instruments that use different CC numbers for the same action, e.g. CC7 or CC11 for level.
![]()
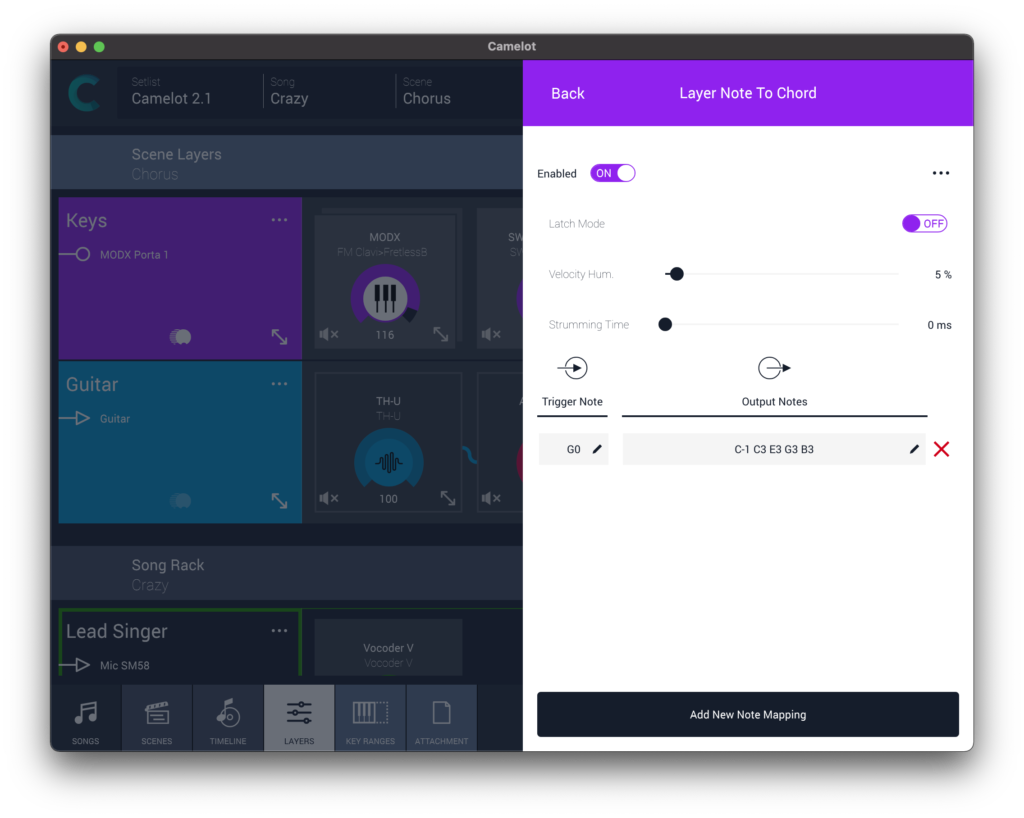
Triggers a chord by pressing one note…with interesting humanization and creative options.
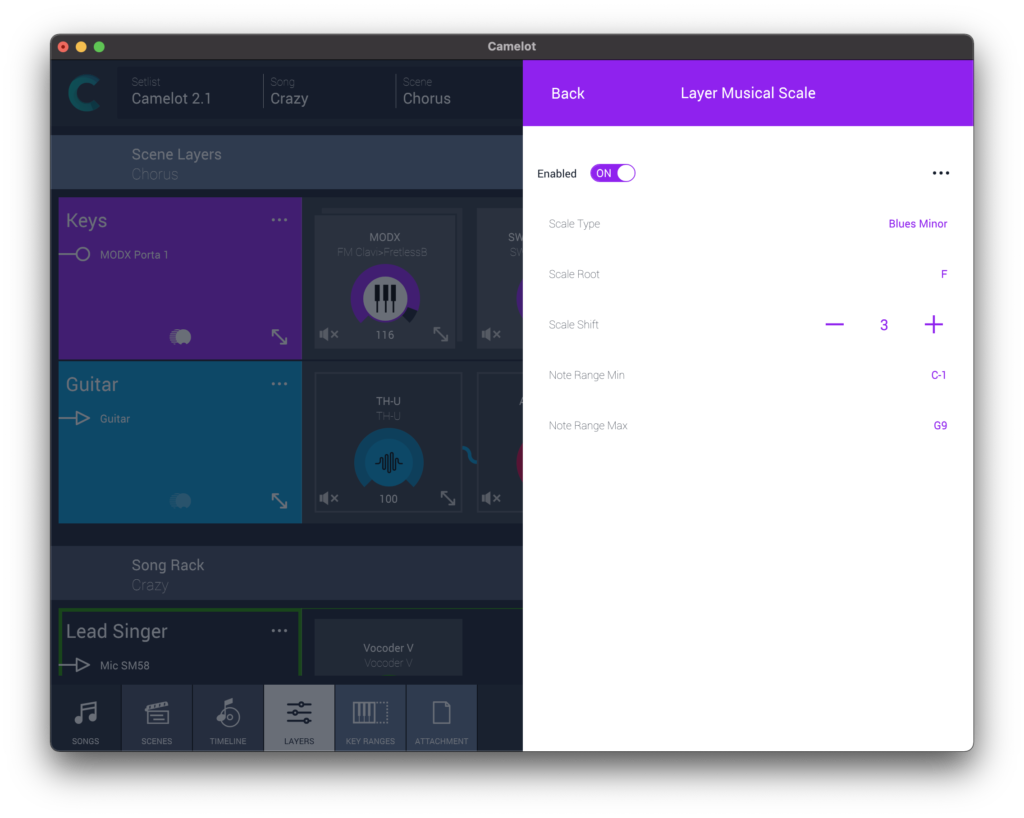
Easily play different scales or harmonize/shift parts to an alternate musical scale.
SMART SCENE TRANSITION
The Smart Scene Transition in Camelot is unique because it not only allows you to switch scenes without sound interruptions from audio plugin instruments, it also takes care of smooth MIDI transitions between different routings and configurations. For example, if a MIDI device is not in use in the scene you are transitioning to, you will not get stuck notes because the MIDI instances from the previous scene will stay alive until you release your finger or the sustain pedal.

Digital Mixer
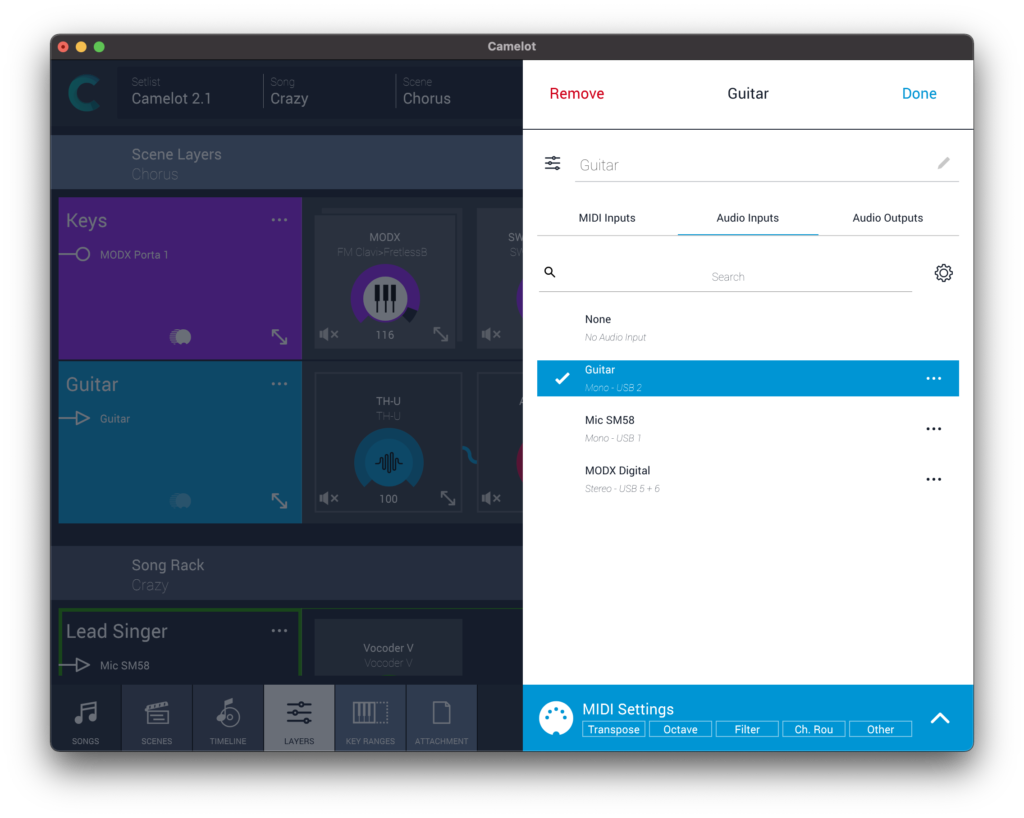
The Audio and MIDI settings for each layer now allow an audio input channel to be selected, in addition to MIDI input and audio outputs. Any external audio source can be processed by Camelot, making it a powerful digital mixer that can apply audio processing and FX to any instrument or vocal.
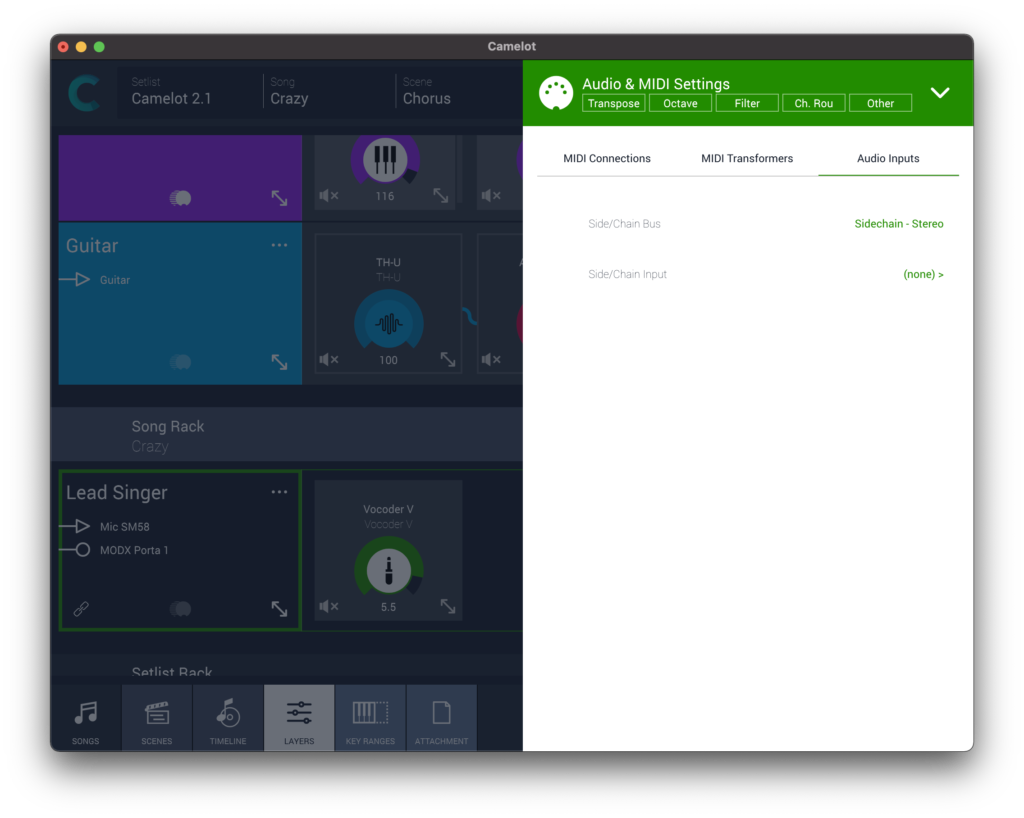
Any software instrument or FX plugin can have additional audio inputs for auxiliary purposes, for example a synth with a vocoder module can use it to connect the mic or to trigger the compressor envelope to create a sidechain effect with the audio coming from the bass drum
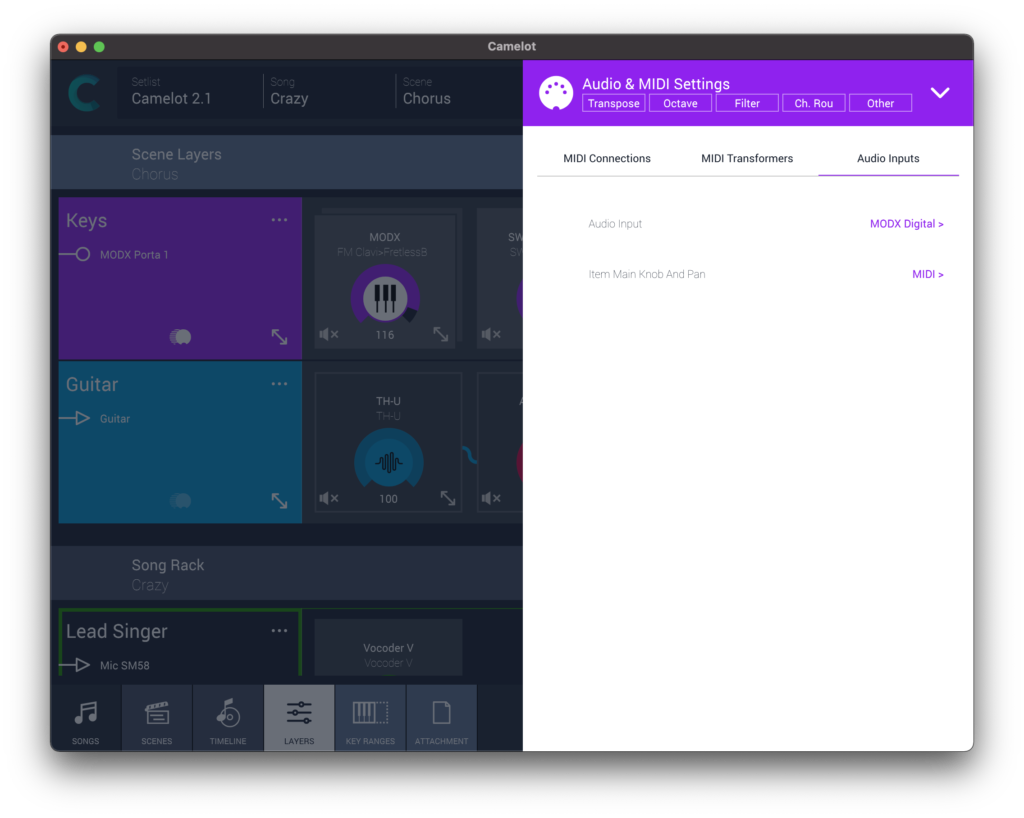
Hardware keyboards or synths being managed with a MIDI SMART Map or MIDI Program now also can be associated with an audio input, enabling you to use audio effects plugins to process hardware instruments just as you do with software instruments.
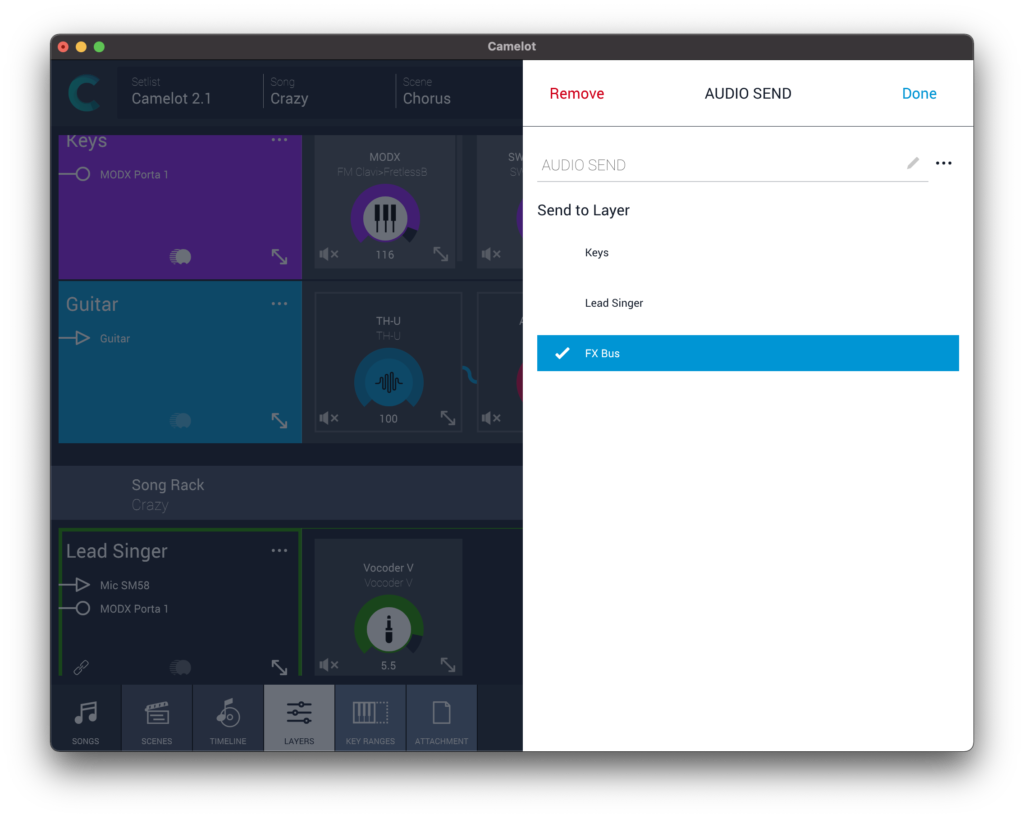
The ability to send audio from one layer to another opens up endless routing options For example, FX buses can be set up by creating a Layer containing only FX, and then inserting an Audio Layer Connector on each layer you want to process. This provides a dedicated send level for each layer. An Audio Layer Connector can be placed anywhere in a Layer signal path, allowing you to pick off audio before or after any processor in the Layer.