
One of the biggest challenges music composers face is expressing their ideas clearly to the musicians performing their music. No matter how accurate and detailed a music score is, ultimately music notation is always subject to the interpretation of the person reading it. Sometimes, the most effective way to quickly and easily communicate ideas is to create a digital mockup of what we would like the final piece to sound like.
While there are very good sample libraries out there, it’s impossible to achieve true expressivity using samples. This limitation comes from the simple fact that samples are pre-recorded. No matter how good they are, they were not created with the specific needs of your original piece in mind.
In comes the magic of physically modeled instruments. With physical modeling, the sound is not pre-recorded. Physically modeled instruments do not work with samples at all. What they do is using complex equations and algorithms to model the mechanical system of an instrument according to some external input.
The SWAM plug-ins are virtual instruments going even further because they use special techniques, in addition to physical modeling, to not only model the way an instrument reacts, but also model the unconscious behaviors of a real professional musician.
Because these virtual instruments can express a full range of emotions, they are perfect for creating mockups of ensemble and chamber music compositions.
In this tutorial, we’ll have a look at how to create a mockup of a string quartet using MIDI files created from a score.
Here are the exact versions of my system and the applications I’ll be using:
- GarageBand v10.3.2
- SWAM Solo Strings Audio Unit plug-ins v3.0.2
- MuseScore3 v3.6.2
- macOS Catalina 10.15.3
Step 1 — Getting ready to use SWAM virtual instruments in Garageband
Purchase, download, and install SWAM Solo Strings v3
After purchasing the SWAM instruments you want, you’ll need to create an account in Audio Modeling’s Customer Portal and register your license keys. After that, all your license keys and the installers will be available in your account.
If you need more details on how to open an account, register, or install SWAM instruments, visit our Knowledge Base.
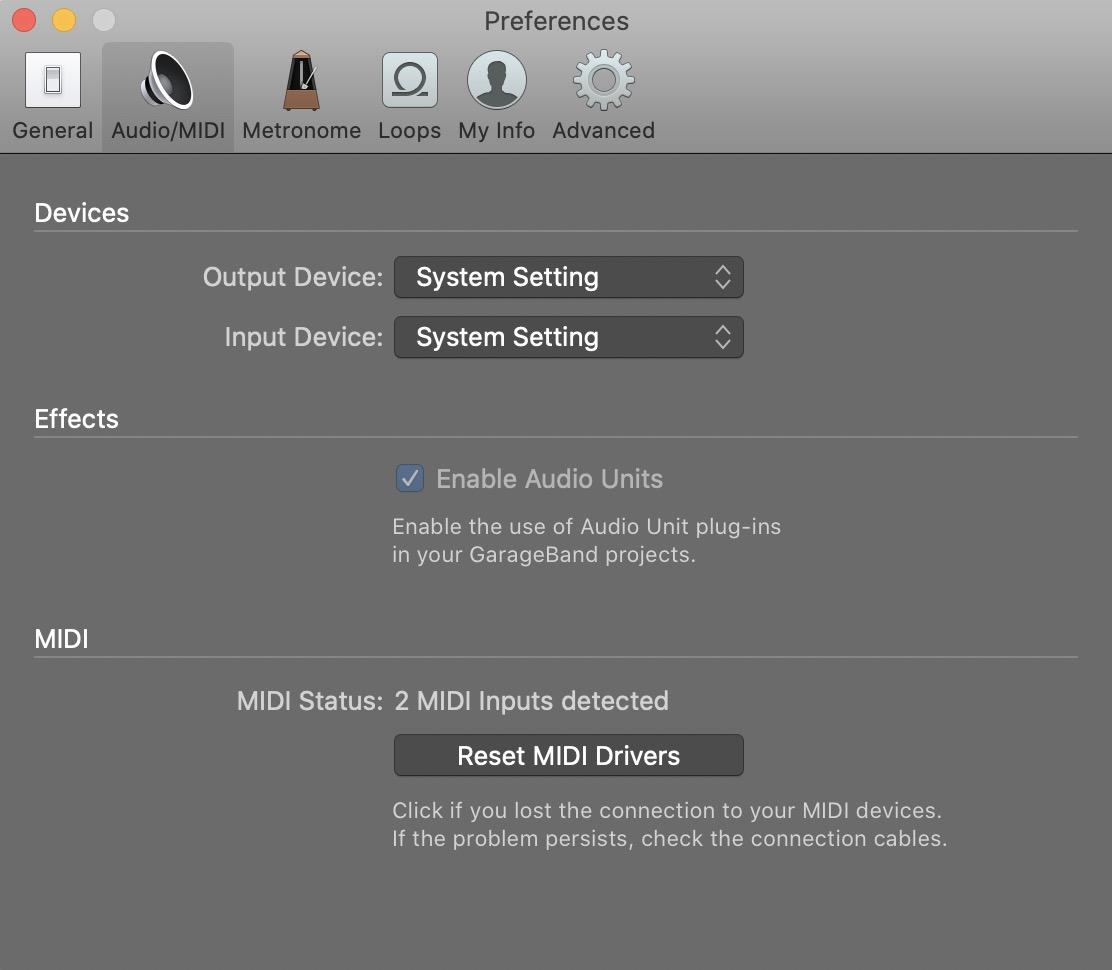
Enable Audio Unit plug-Ins
Open Garageband and go to Preferences > Audio/Midi. Make sure the box next to Enable Audio Units is checked.
Step 2 — Create MIDI files from your instrument parts in MuseScore3
Open MuseScore3. If you only have a full score of your composition, start by creating individual parts for each instrument. If you don’t know how to do this, you can refer to this post in MuseScore’s handbook.
Once you have files for each individual instrument part, open one of them in MuseScore3. In the top menu, click on File > Export… and select MIDI in the Export To dropdown menu. Click on Export.
Repeat this step for each instrument part.

Step 3 — Create new tracks in Garageband by importing each MIDI file and choosing the right SWAM plug-ins
Open Garageband and create a new empty project. When prompted what kind of audio track you’d like to create, choose Software Instrument.
Navigate to your Finder folder where you saved your MIDI files created with MuseScore3. Drag and drop a MIDI file in the track to import it into your project. Select Import Tempo when prompted if you want to use the tempo information you wrote in your original score.
Click on the knob symbol (next to the scissors) in the left corner of the Garageband interface. Now, at the bottom of the screen, you should see the Controls and EQ window. Make sure Track is selected. Click on the arrow next to where it says plug-in and select the SWAM instrument you want to use.
Repeat this process by creating new tracks for each instrument you’ll be using.
In this tutorial, since we are creating a string quartet mockup, we’ll have two tracks with SWAM Solo Violin (violin 1 and violin 2), one track with SWAM Solo Viola, and one track with SWAM Solo Cello, all of them in mono.
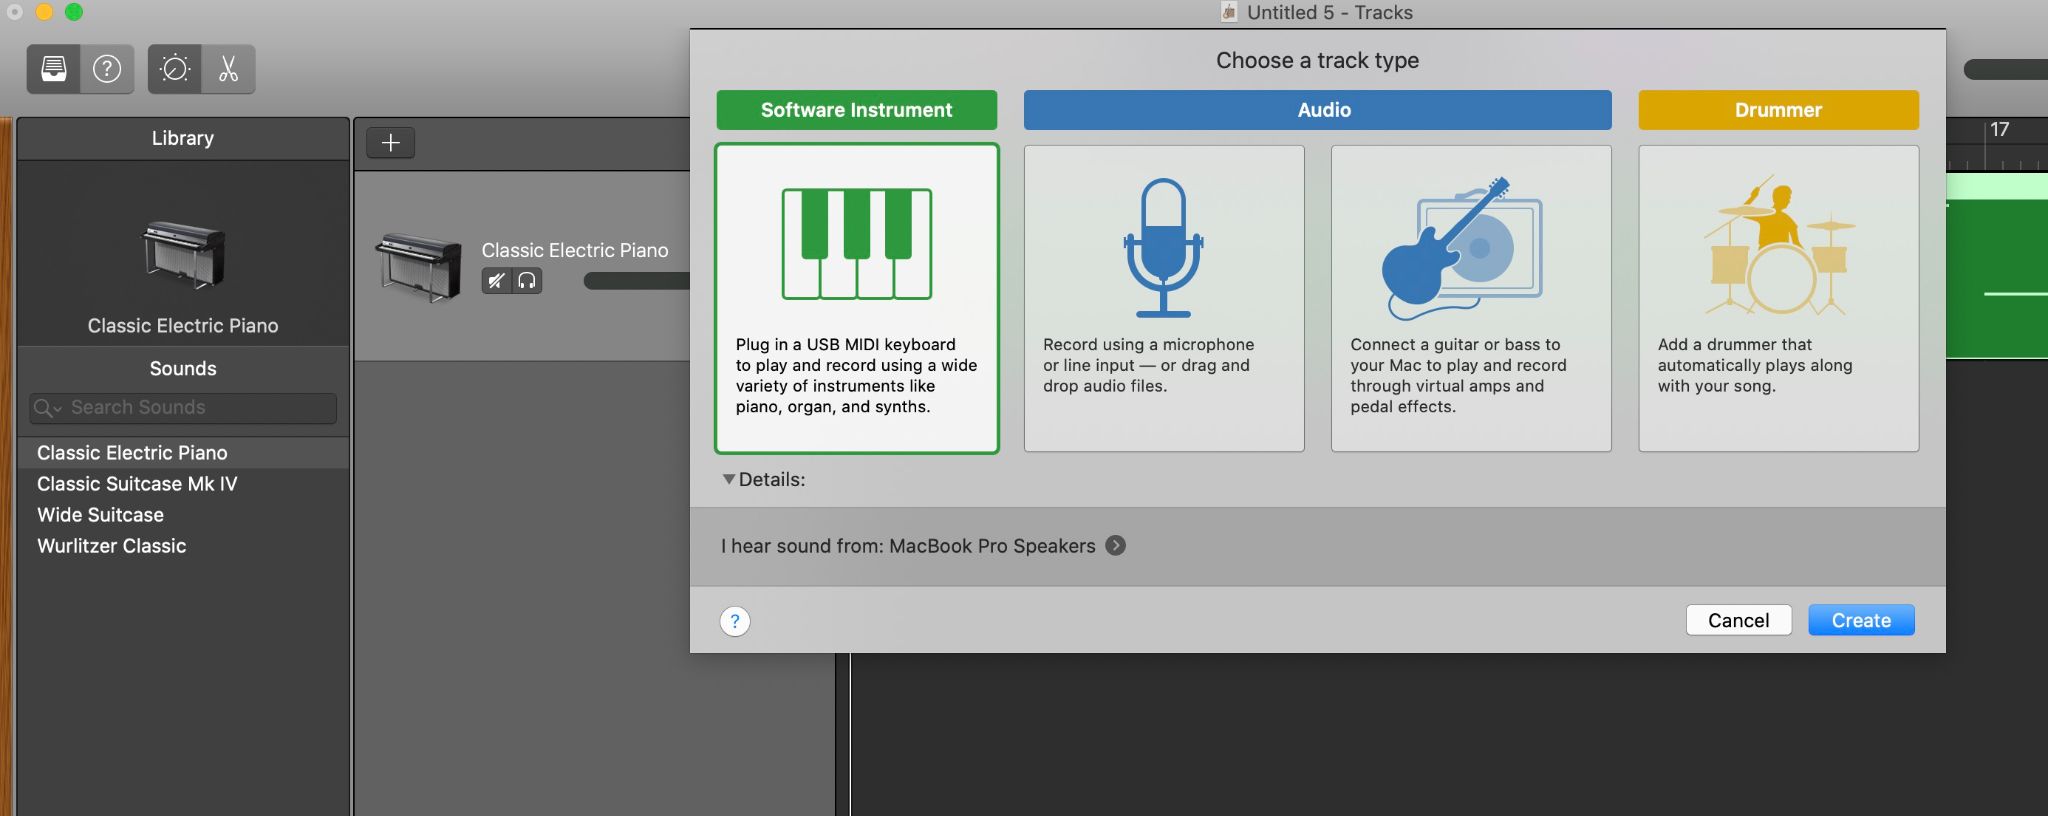
When prompted, choose Software Instrument
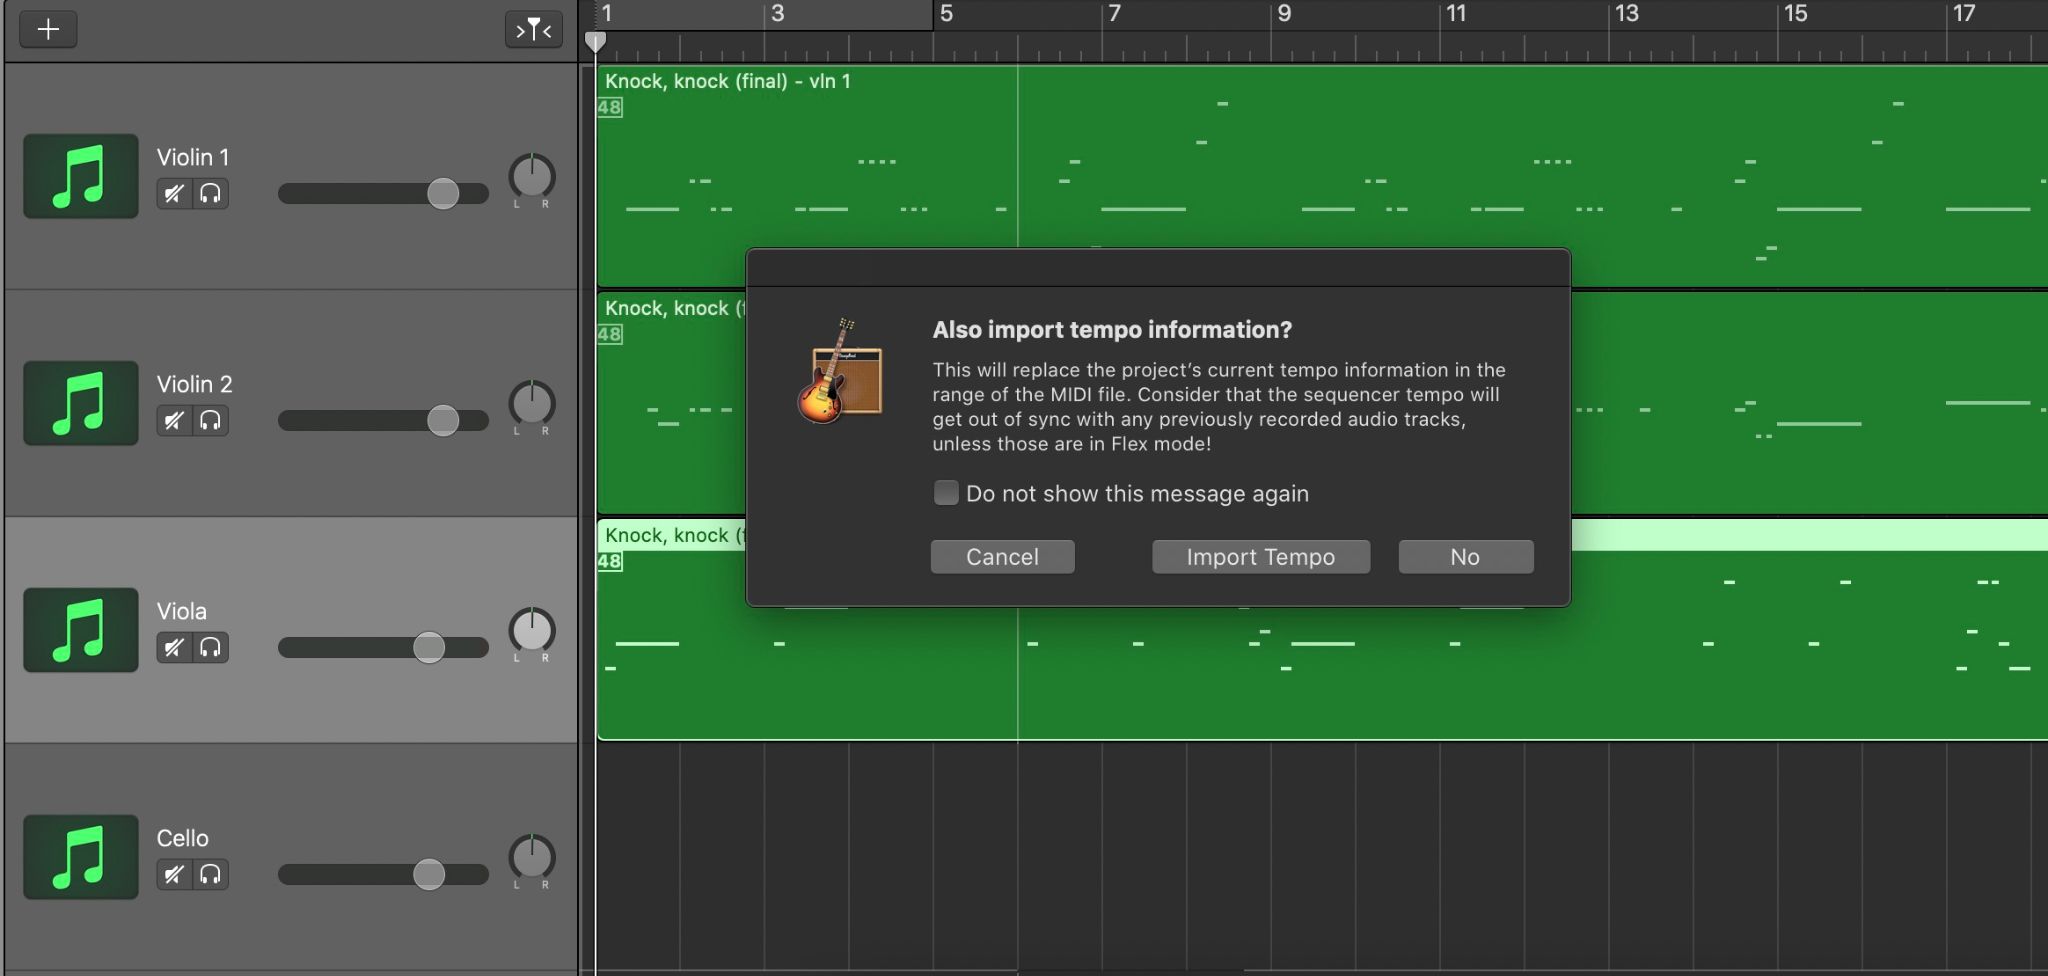
Import the tempo information from your score
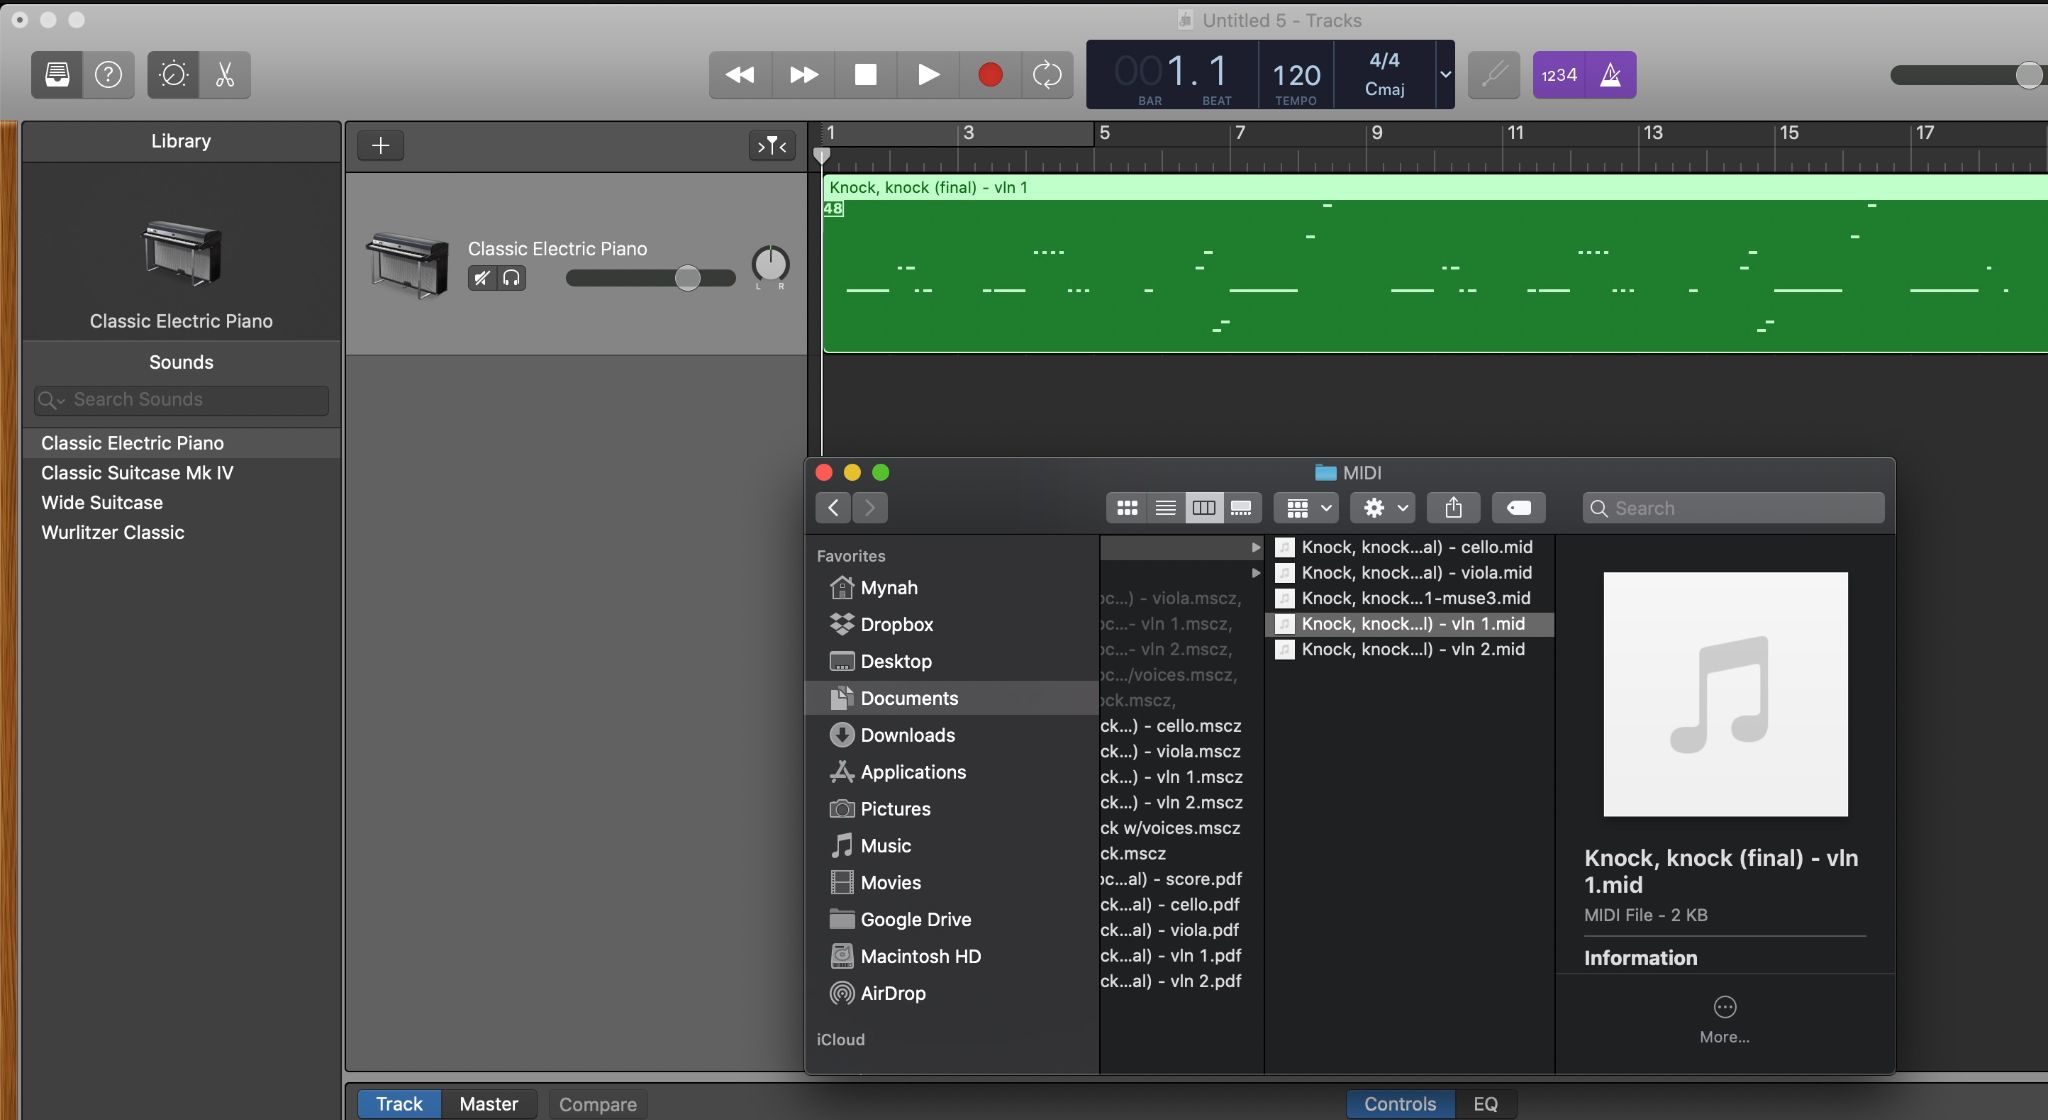
Drag and drop a MIDI file in the track you created to import it into your project
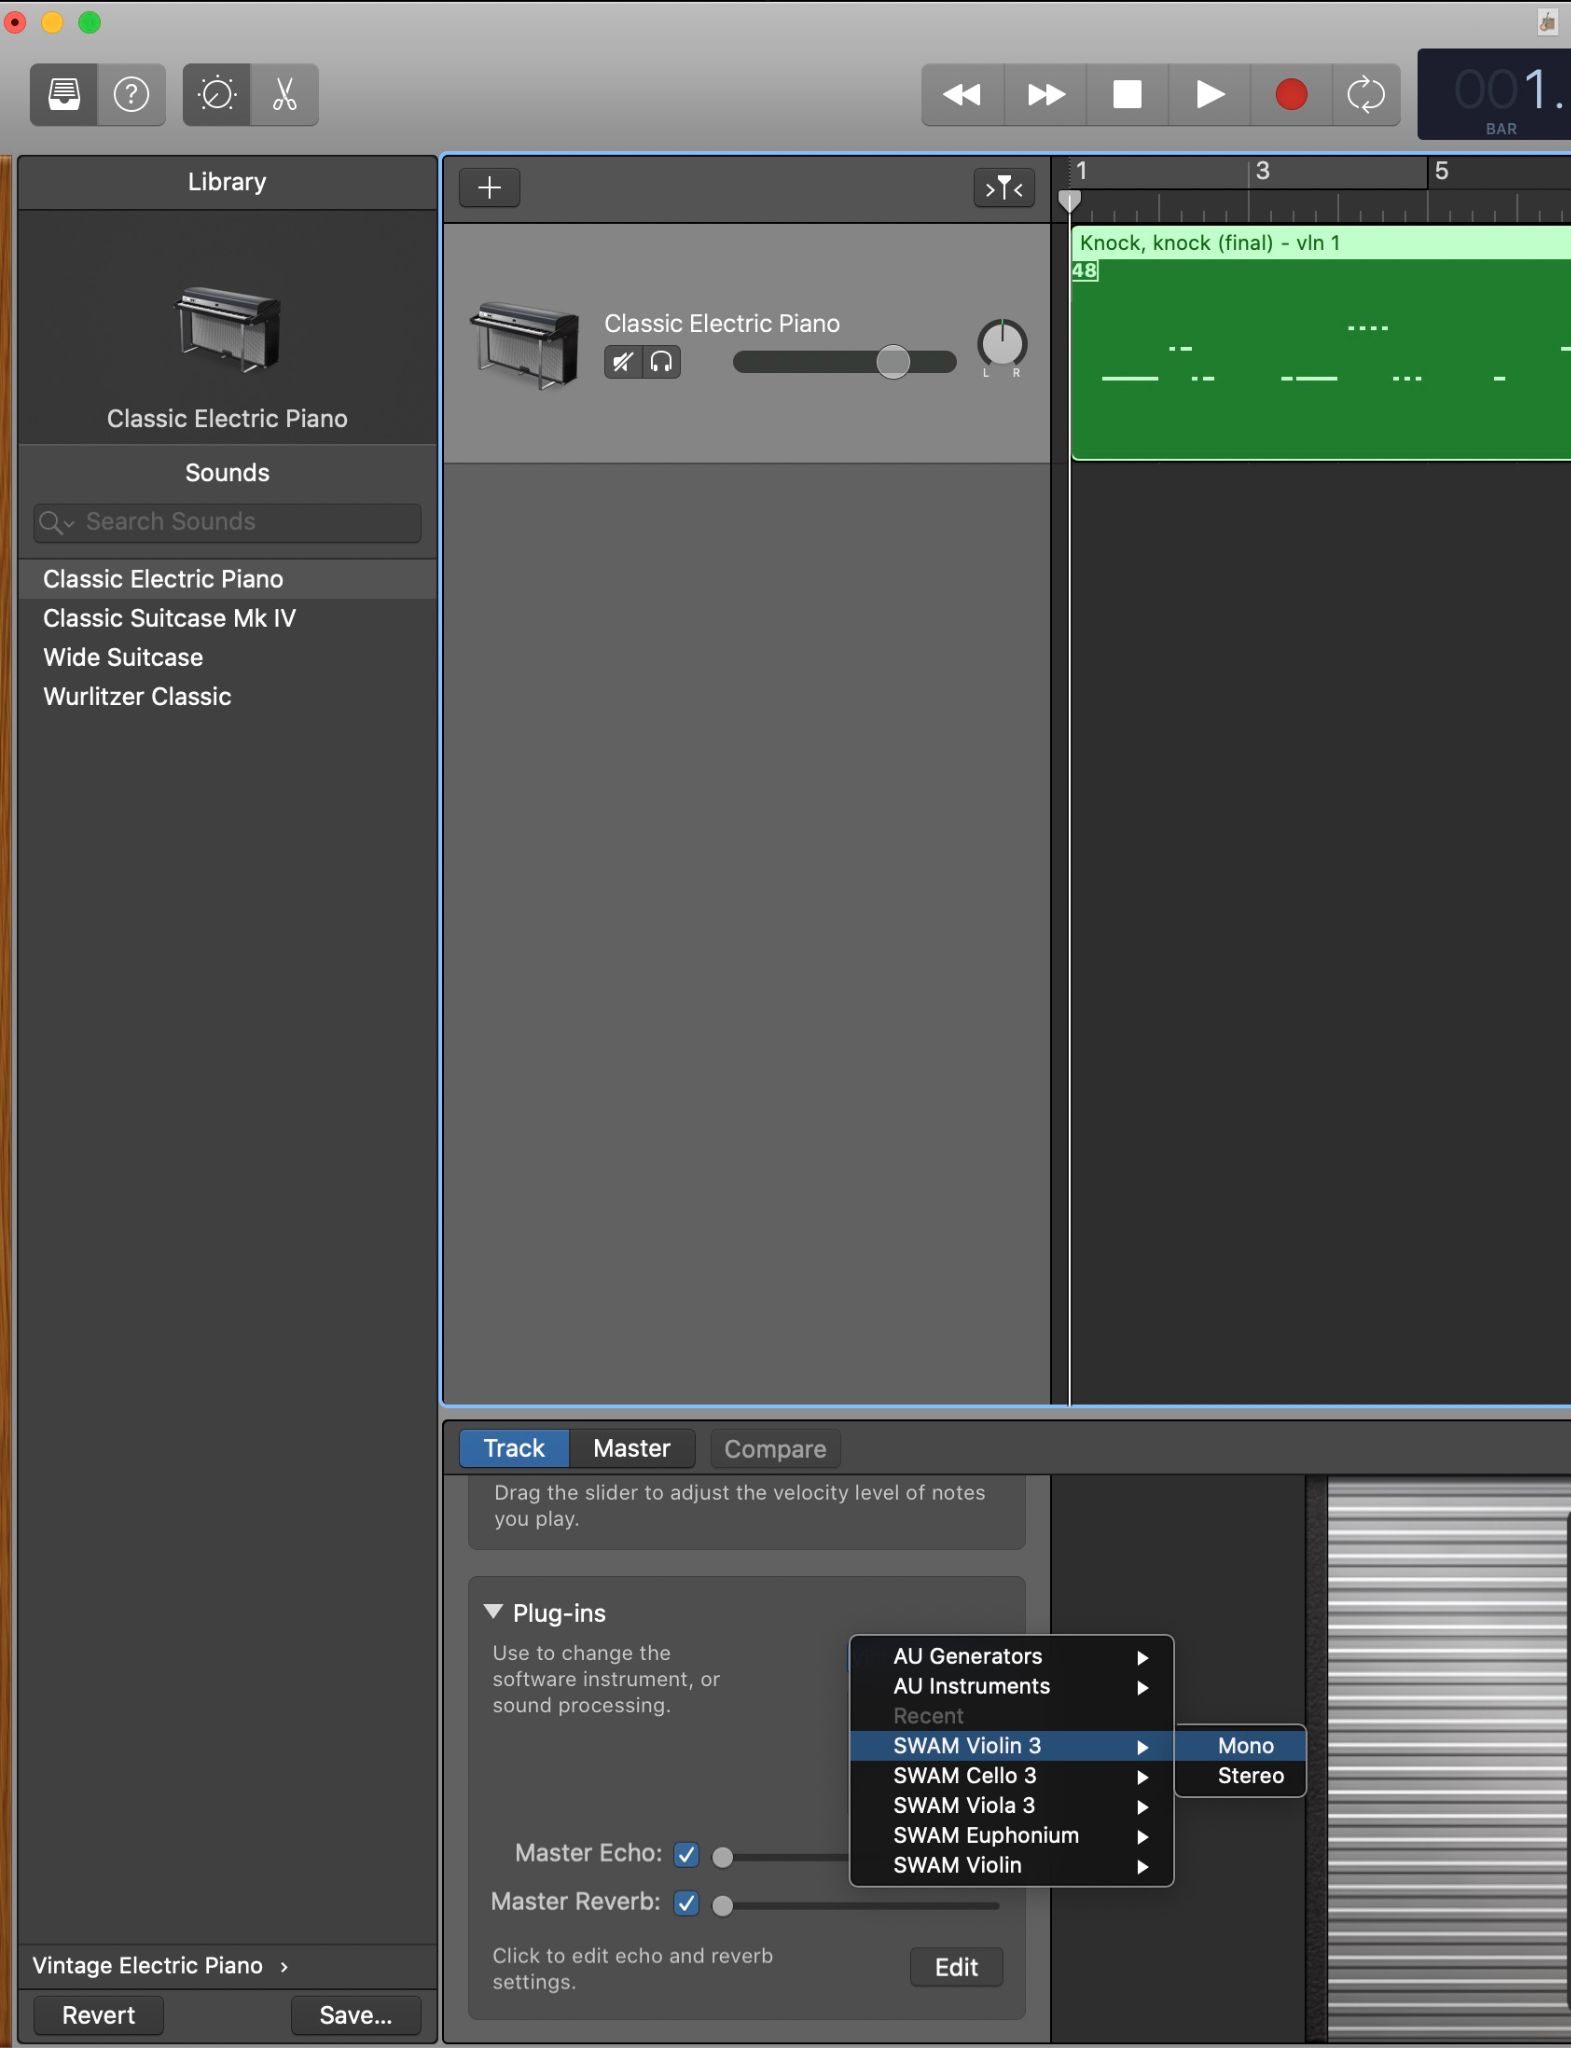
Choose the SWAM instrument you want to use
Step 4 — Clean up the MIDI tracks if needed
You are now ready to listen to your composition played by a SWAM Solo Strings quartet (or any other formation you chose to create). Of course, it still won’t have the level of Expression you are looking for because we haven’t drawn the Expression curve yet, but you can still get an idea of how your composition sounds like using the default settings.
More importantly, you can clean up any unwanted notes that might have been created by MuseScore3 when exporting your file to MIDI (for example, extra notes created when in reality, they are tied together and shouldn’t be repeated).
Editing MIDI is very easy in Garageband, simply click on the scissors icon at the top left corner of the interface and make sure to select Piano Roll in the bottom window to see the MIDI editor appear. From there you can change, move, and delete any MIDI note. Make sure you have the correct track selected before editing anything.
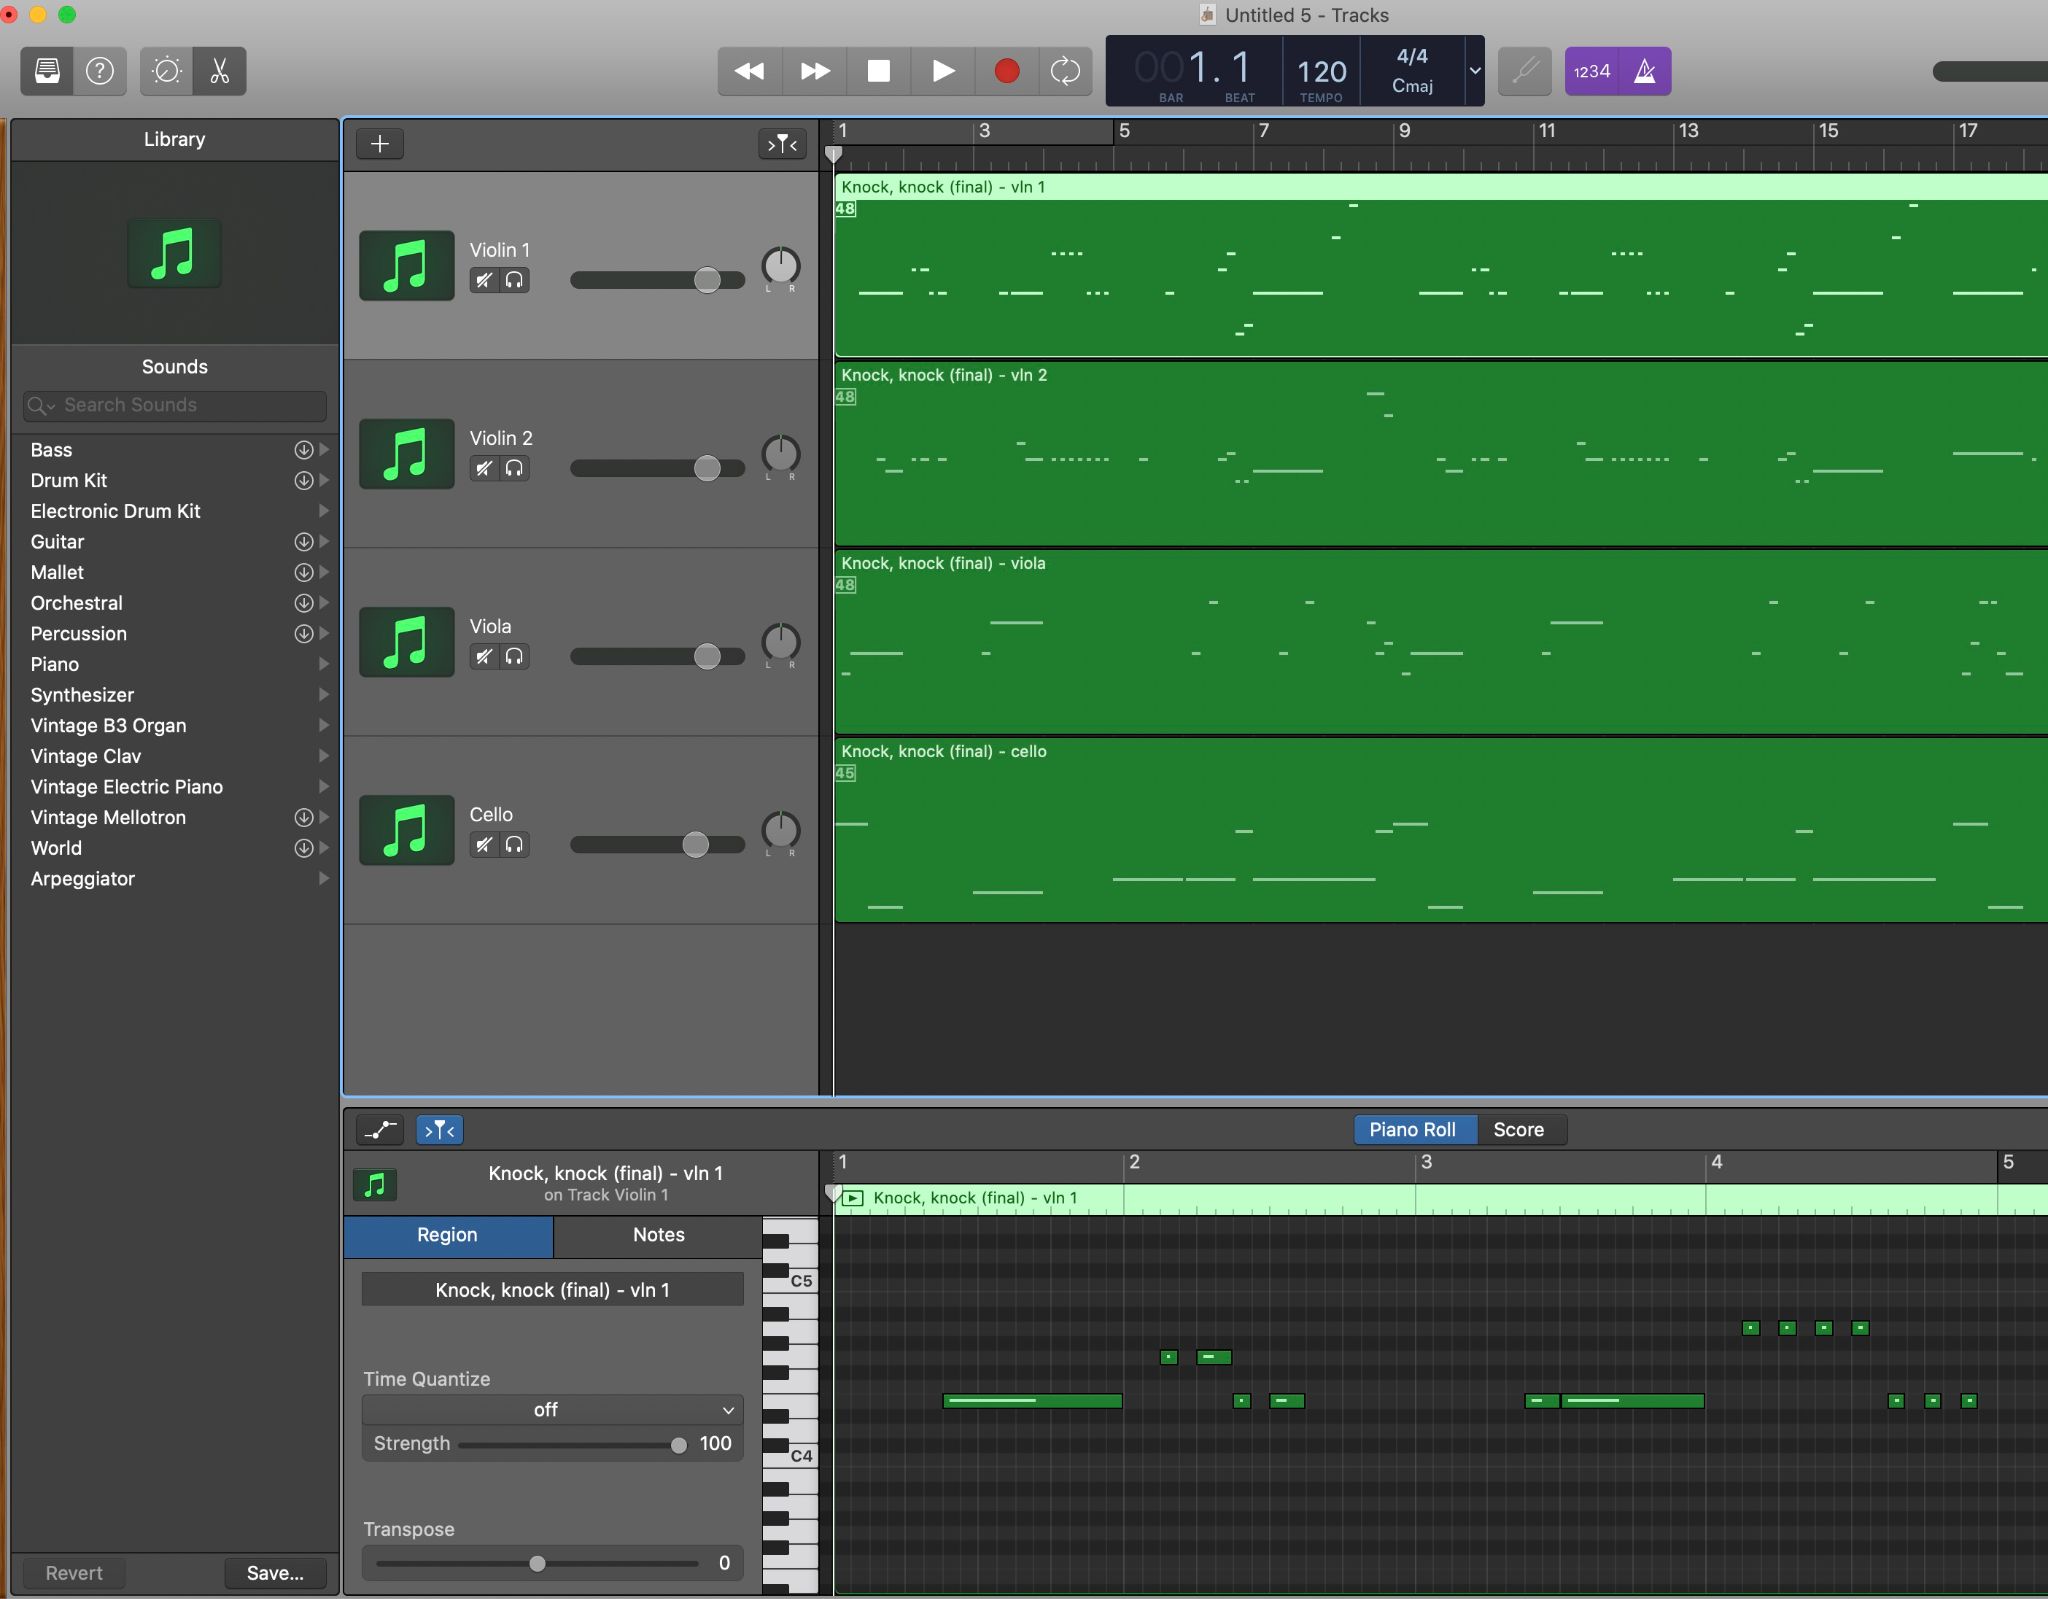
The Piano Roll view allows you to easily edit MIDI files.
Step 5 — Adjust Note On velocity
SWAM virtual instruments can’t be accurately controlled with note on velocity alone, but velocity is important for your composition to be played as expected.
For example, consecutive connected notes played with a velocity below 25 will have a slur between them. The bigger the difference between the velocity values, the faster the slur. The velocity will also affect how strong is the attack at the beginning of a legato phrase. If you want the note to be played with a softer attack, the velocity value should be lower.
You can get a lot more details about how note on velocity affects the way the instrument plays by referring to the SWAM Solo Strings user manual.
With that in mind, you can play around with the velocity of each note to make sure you get the result you want. To do that in Garageband, simply select a MIDI note (or a group of notes if you want to edit in bulk) in the Piano Roll view and adjust the velocity value with the slider on the left.
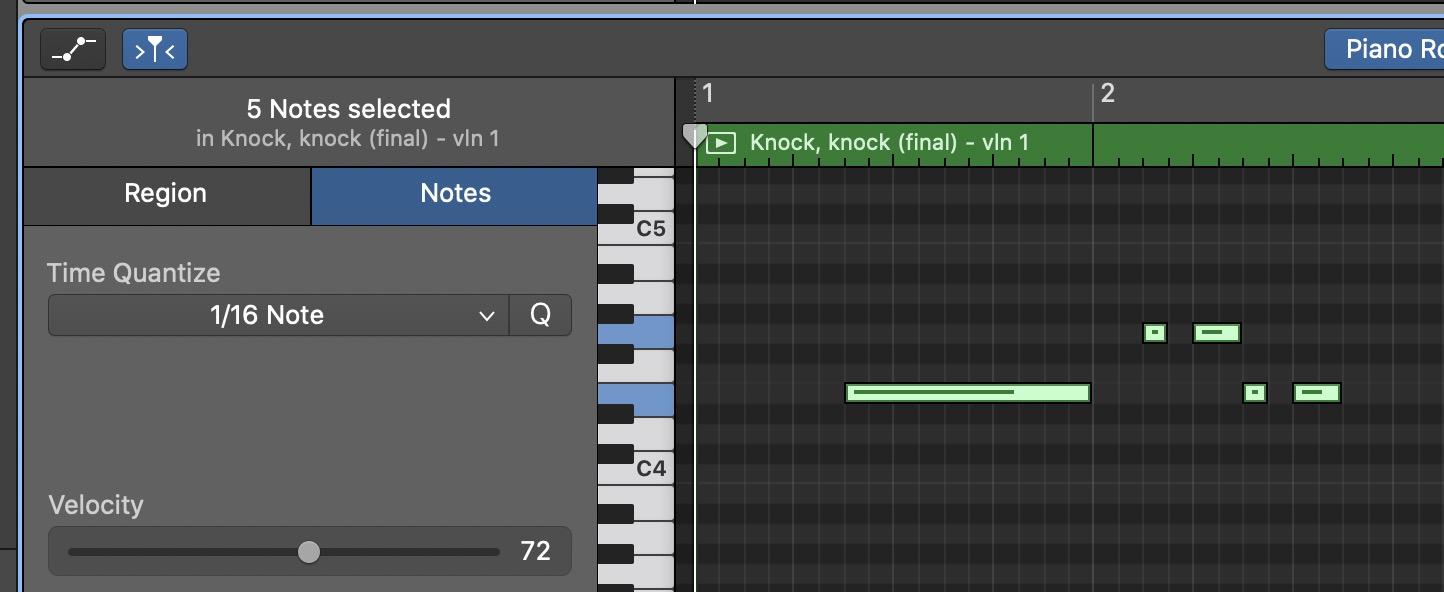
Select one or more notes in the Piano Roll view and adjust the velocity using the Velocity slider on the left.
Step 6 — Draw the Expression curve
The Expression parameter is where all the SWAM magic happens. When SWAM instruments are recorded in real-time, we need to control the Expression with a controller that has this capability such as a sustain pedal, a breath controller, a knob, a wheel…
But since we are not playing the instruments in real-time and we are importing MIDI tracks instead, we can manually draw the Expression curve without the need for an external controller.
To do this in Garageband, click on the knob icon in the top left corner of the interface. Next, in the application navigation bar, select Mix > Show Automation. You should see a new dropdown menu appear below the main controls of each track. The parameter showing by default will be Volume. Click on the arrows, then navigate to the name of the SWAM plug-in (in the picture below, it’s the Violin), then Expressivity Group > Expression. Click to select it.
Next, click anywhere inside your track to see a straight line representing the selected parameter appear.
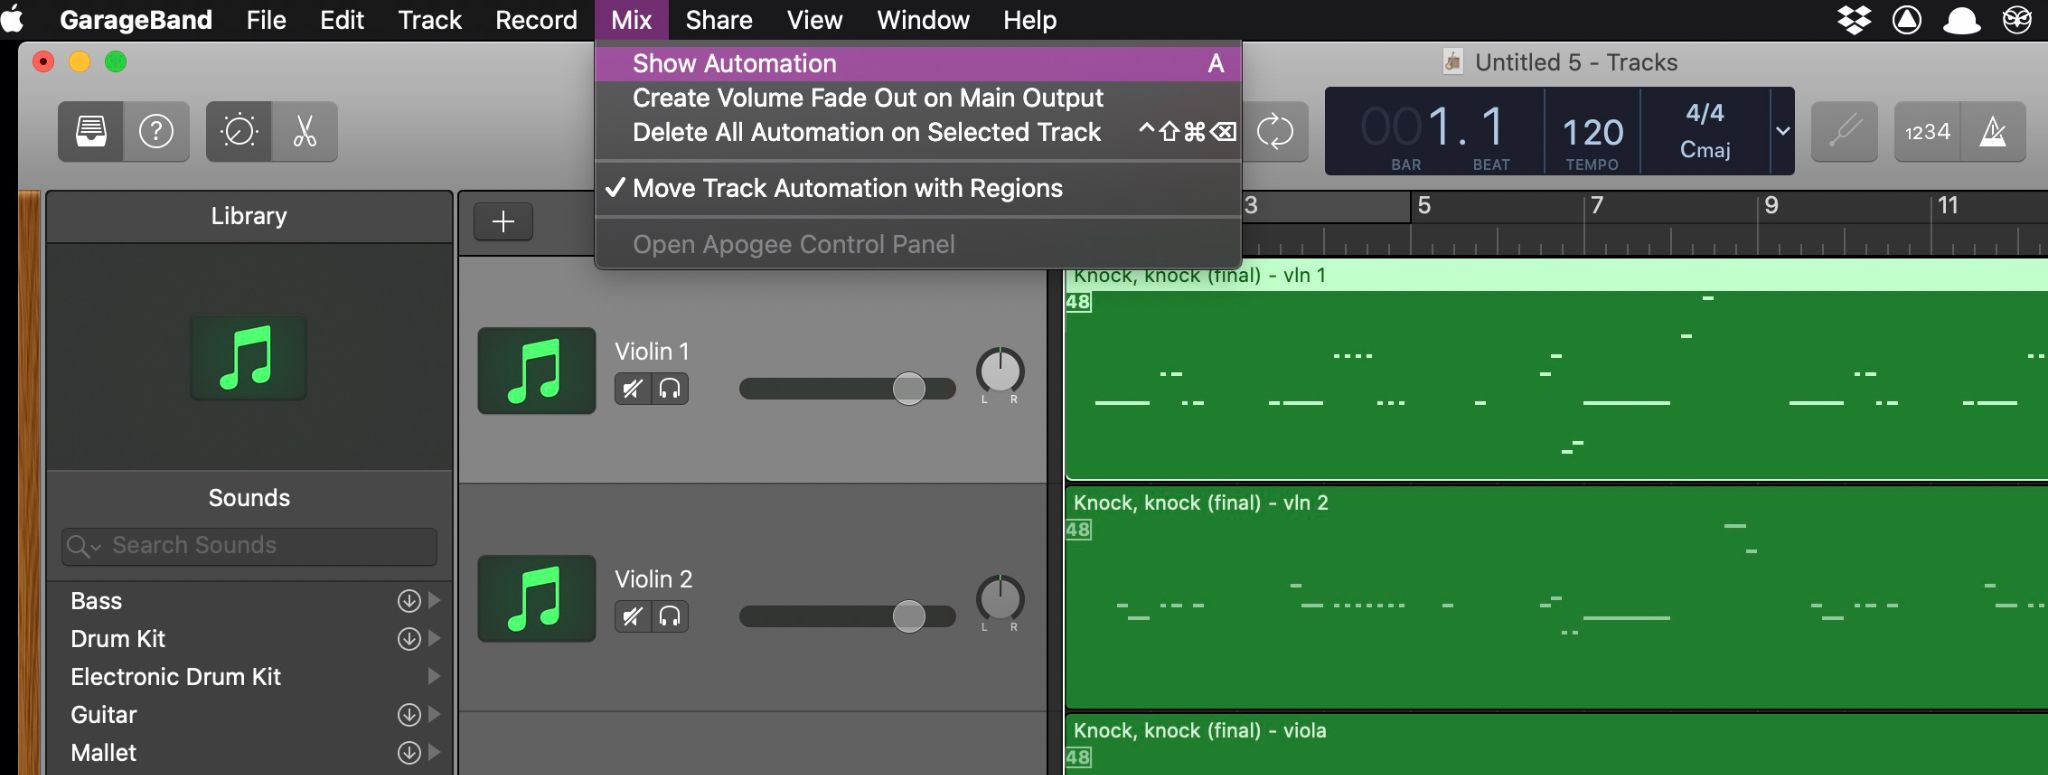
Click on Show Automation
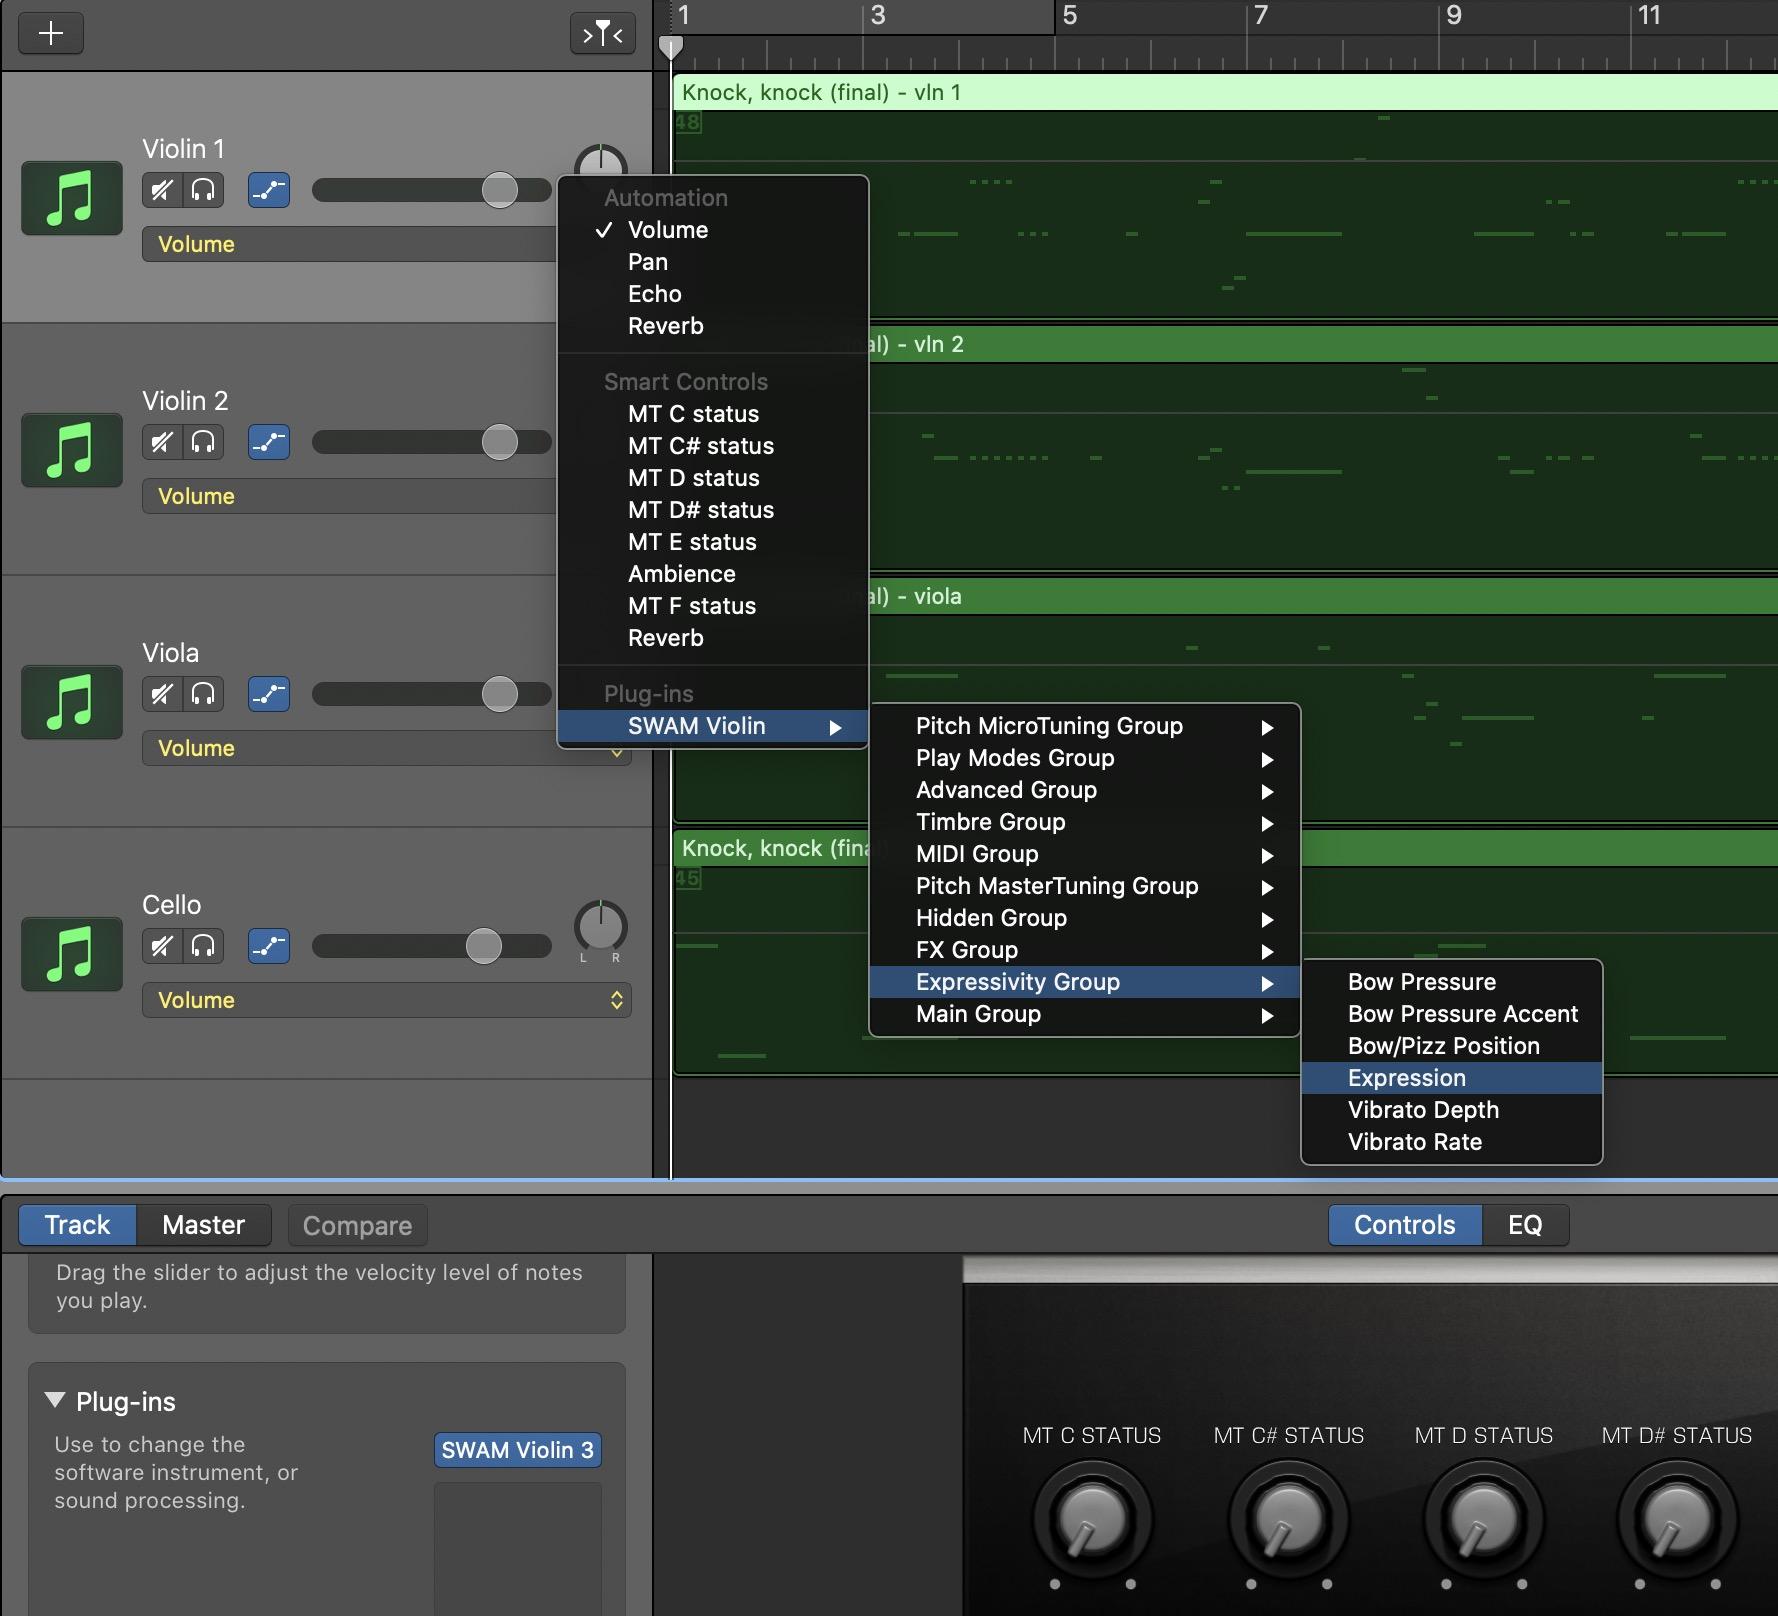
Select the Expression parameter from the dropdown menu

Click anywhere in the area where the MIDI track is to see the straight line representing the Expression parameter appear
The Expression parameter is where all the emotion of a player is simulated. So drawing the Expression curve properly means you are putting yourself in the shoes of the musician and literally playing the instrument!
This is where dynamics will shine. The more precisely you draw the curve, and the more you have an accurate knowledge of how that instrument is played in real life, the more emotions and realism you’ll be able to inject into the way your composition sounds.
To draw the Expression curve (or to draw any other parameter), click on the straight line to create dots, then move them around and adjust the curve to your liking.
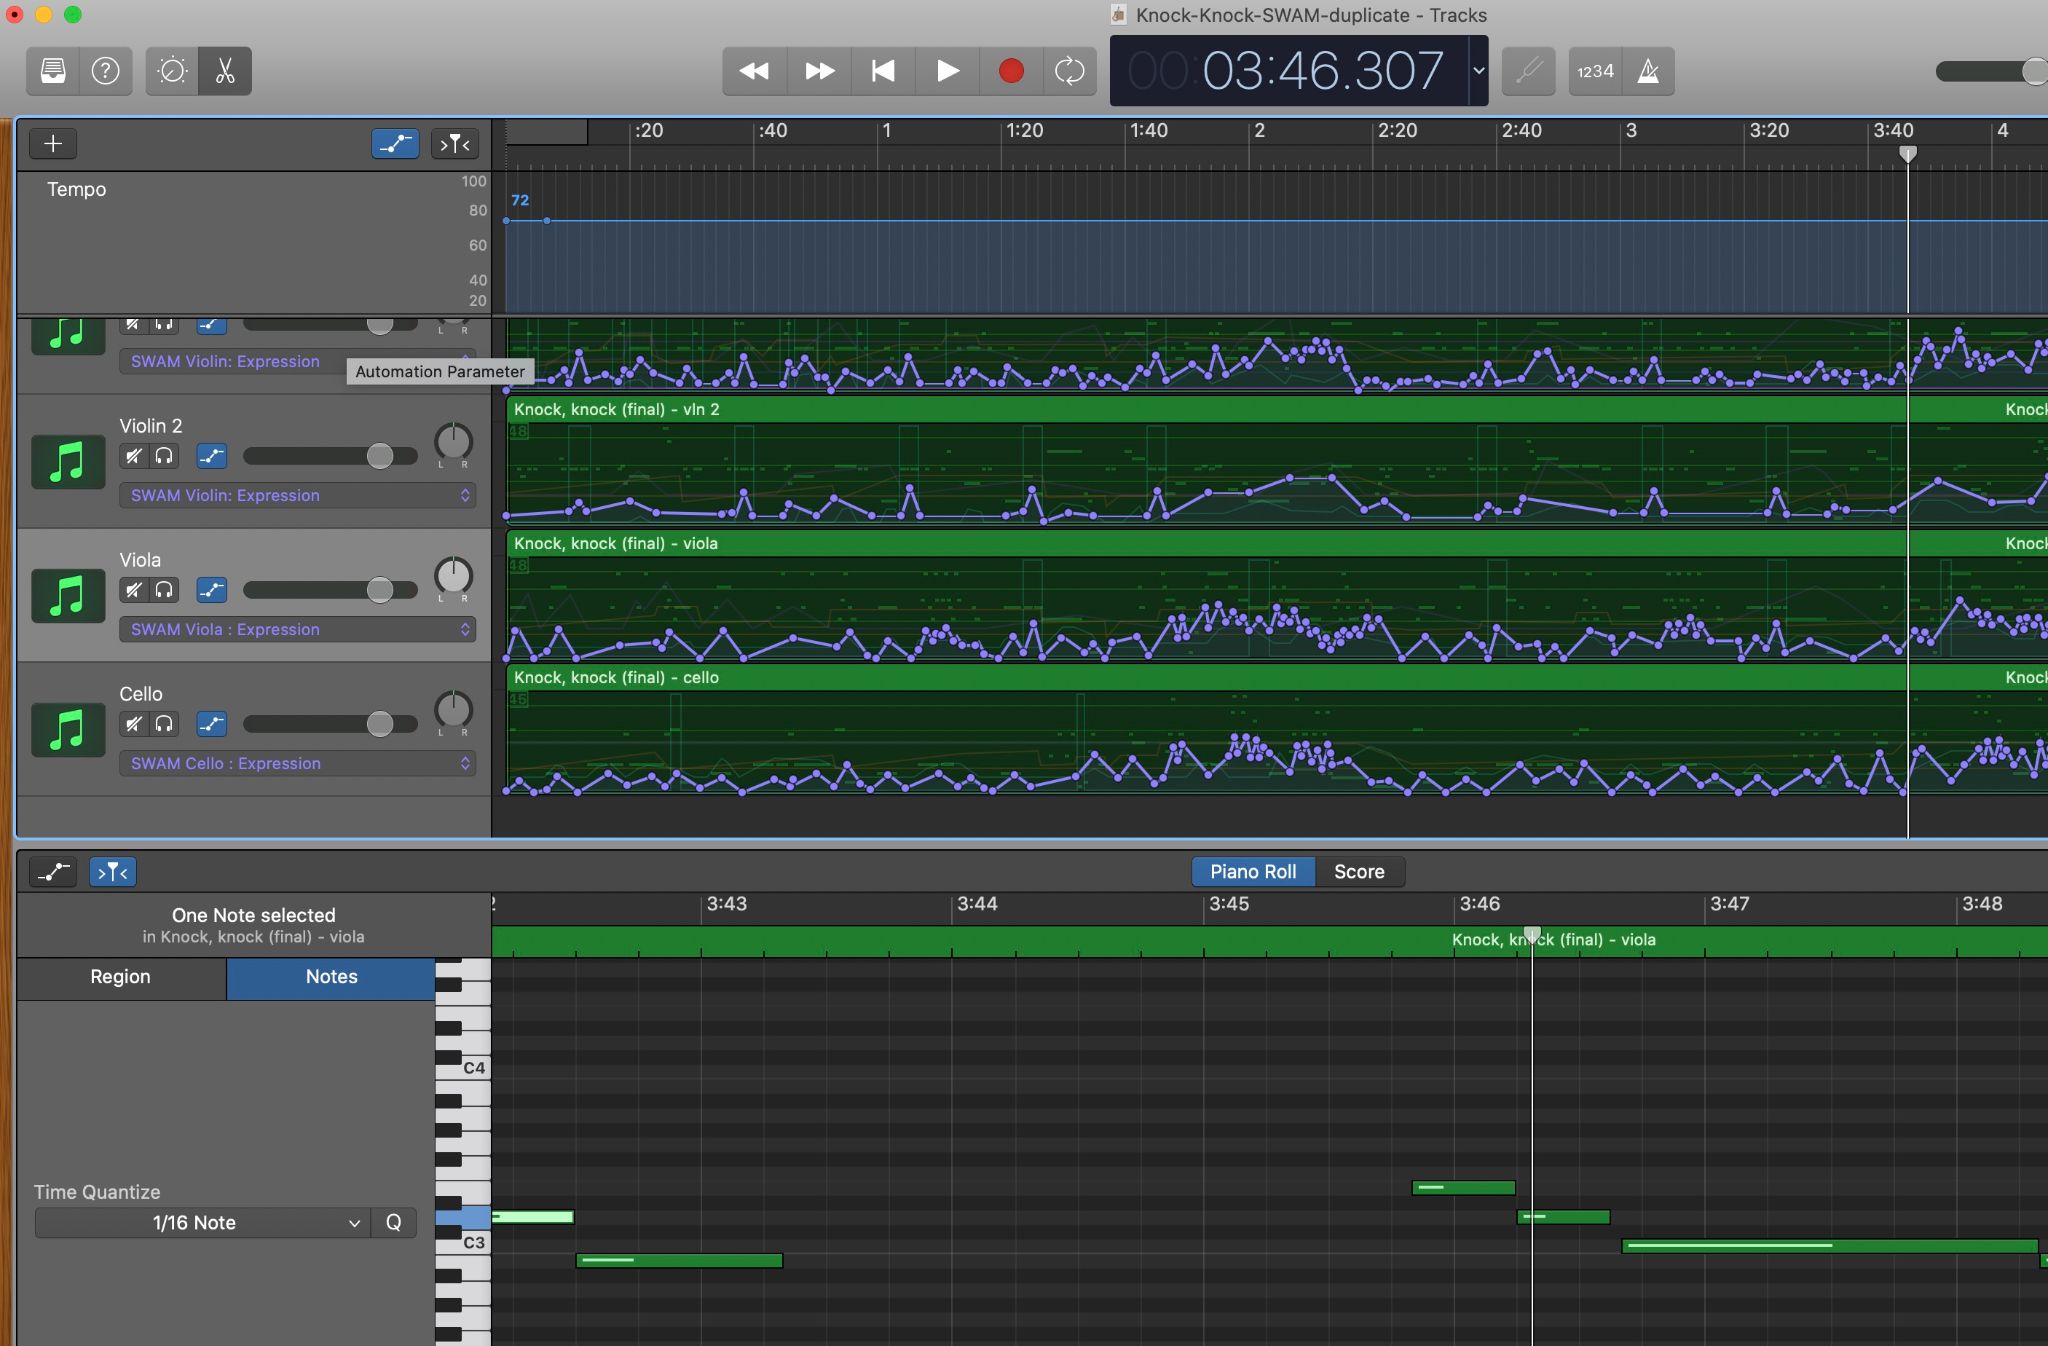
Example of what a drawn Expression curve can look like
Step 7 — Add some Early Reflection for additional realism
You can play around with the Early Reflection parameter to help increase the overall realism of the piece. Early Reflection simulates the first reflections generated by the sound wave being reflected by the walls, floor, and ceiling of a room. Reflections are different for each musician in the room since they can’t be sitting exactly in the same position.
To obtain even more realism, you should also adjust the starting point of each note since, in real life, it’s impossible to have musicians start exactly at the same time. Some DAWs allow to apply small amounts of randomization to the notes but unfortunately, this is not possible in GarageBand. But since GarageBand is a free application, let’s not complain too much.
You can find this parameter in the automation dropdown menu (the same one you used to select the Expression parameter), then navigate to the name of the SWAM plug-in, then FX Group > Early Reflection Gain.

Play with the Early Reflection Gain parameter to add some extra realism
Step 8 — Finish up by adjusting the panning and adding reverb
Finally, it’s time to add the final touches to your composition mockup.
In the automation dropdown menu, select Pan Pot to adjust the panning of each instrument to place them in space (name of SWAM plugin > Main Group > Pan Pot).
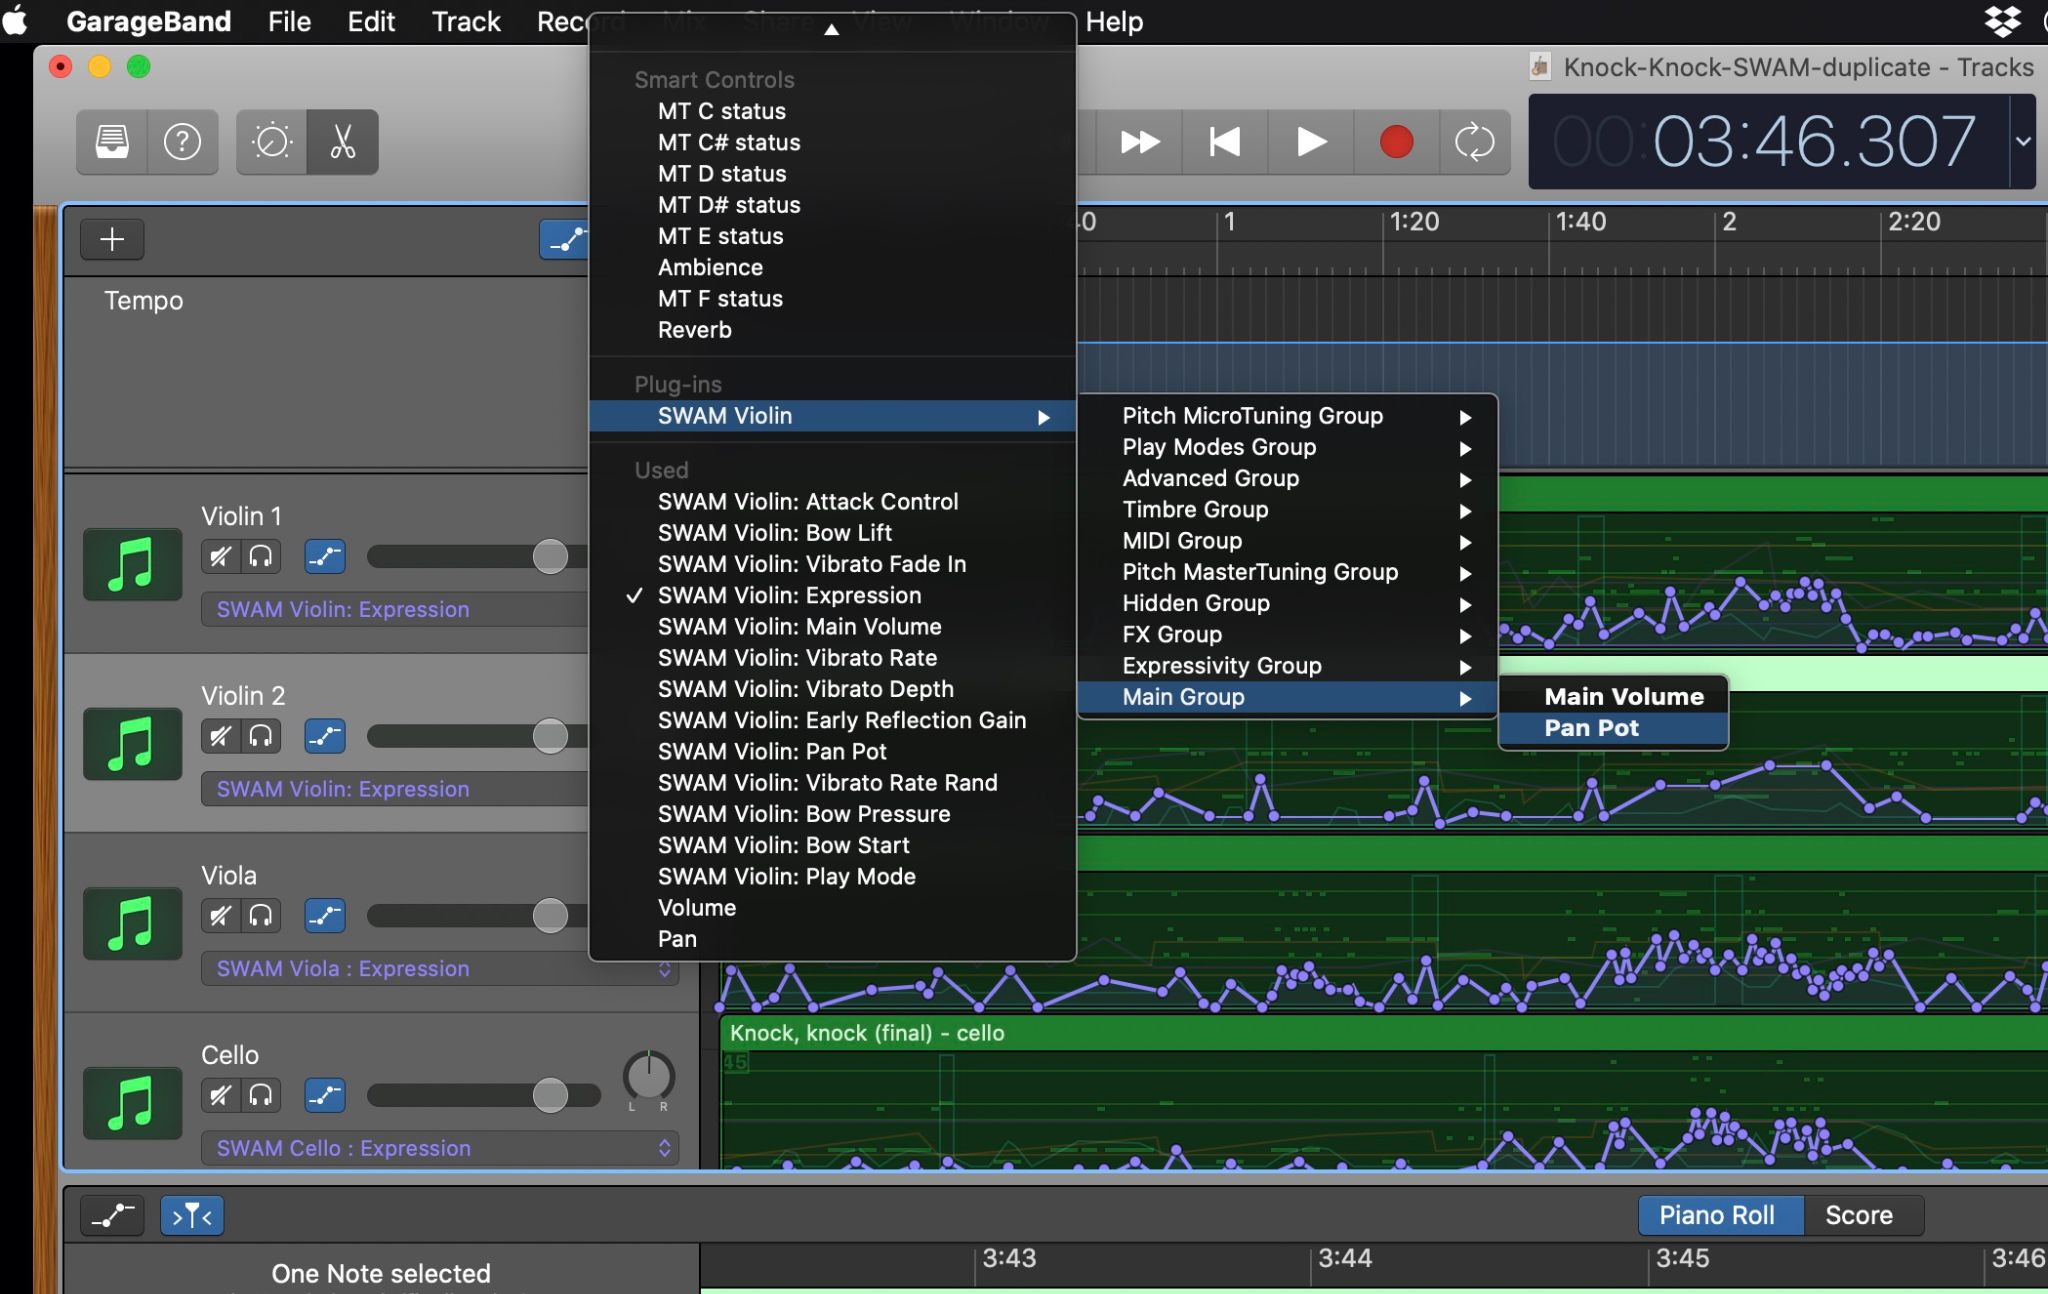
Adjust the panning of each track by adjusting the Pan Pot parameter.
Last but not least, add some reverb. Because these software instruments are physically modeled instruments, they sound quite dry by default. We recommend adding an external reverb to ensure you get the exact effect you want according to the needs of the specific project you are working on.
There are some built-in reverbs in Garageband you can play with without needing to buy any additional plug-ins. In the example below, the reverb is added on the Master track to get a more realistic effect of a string quartet playing in a medium-sized hall.
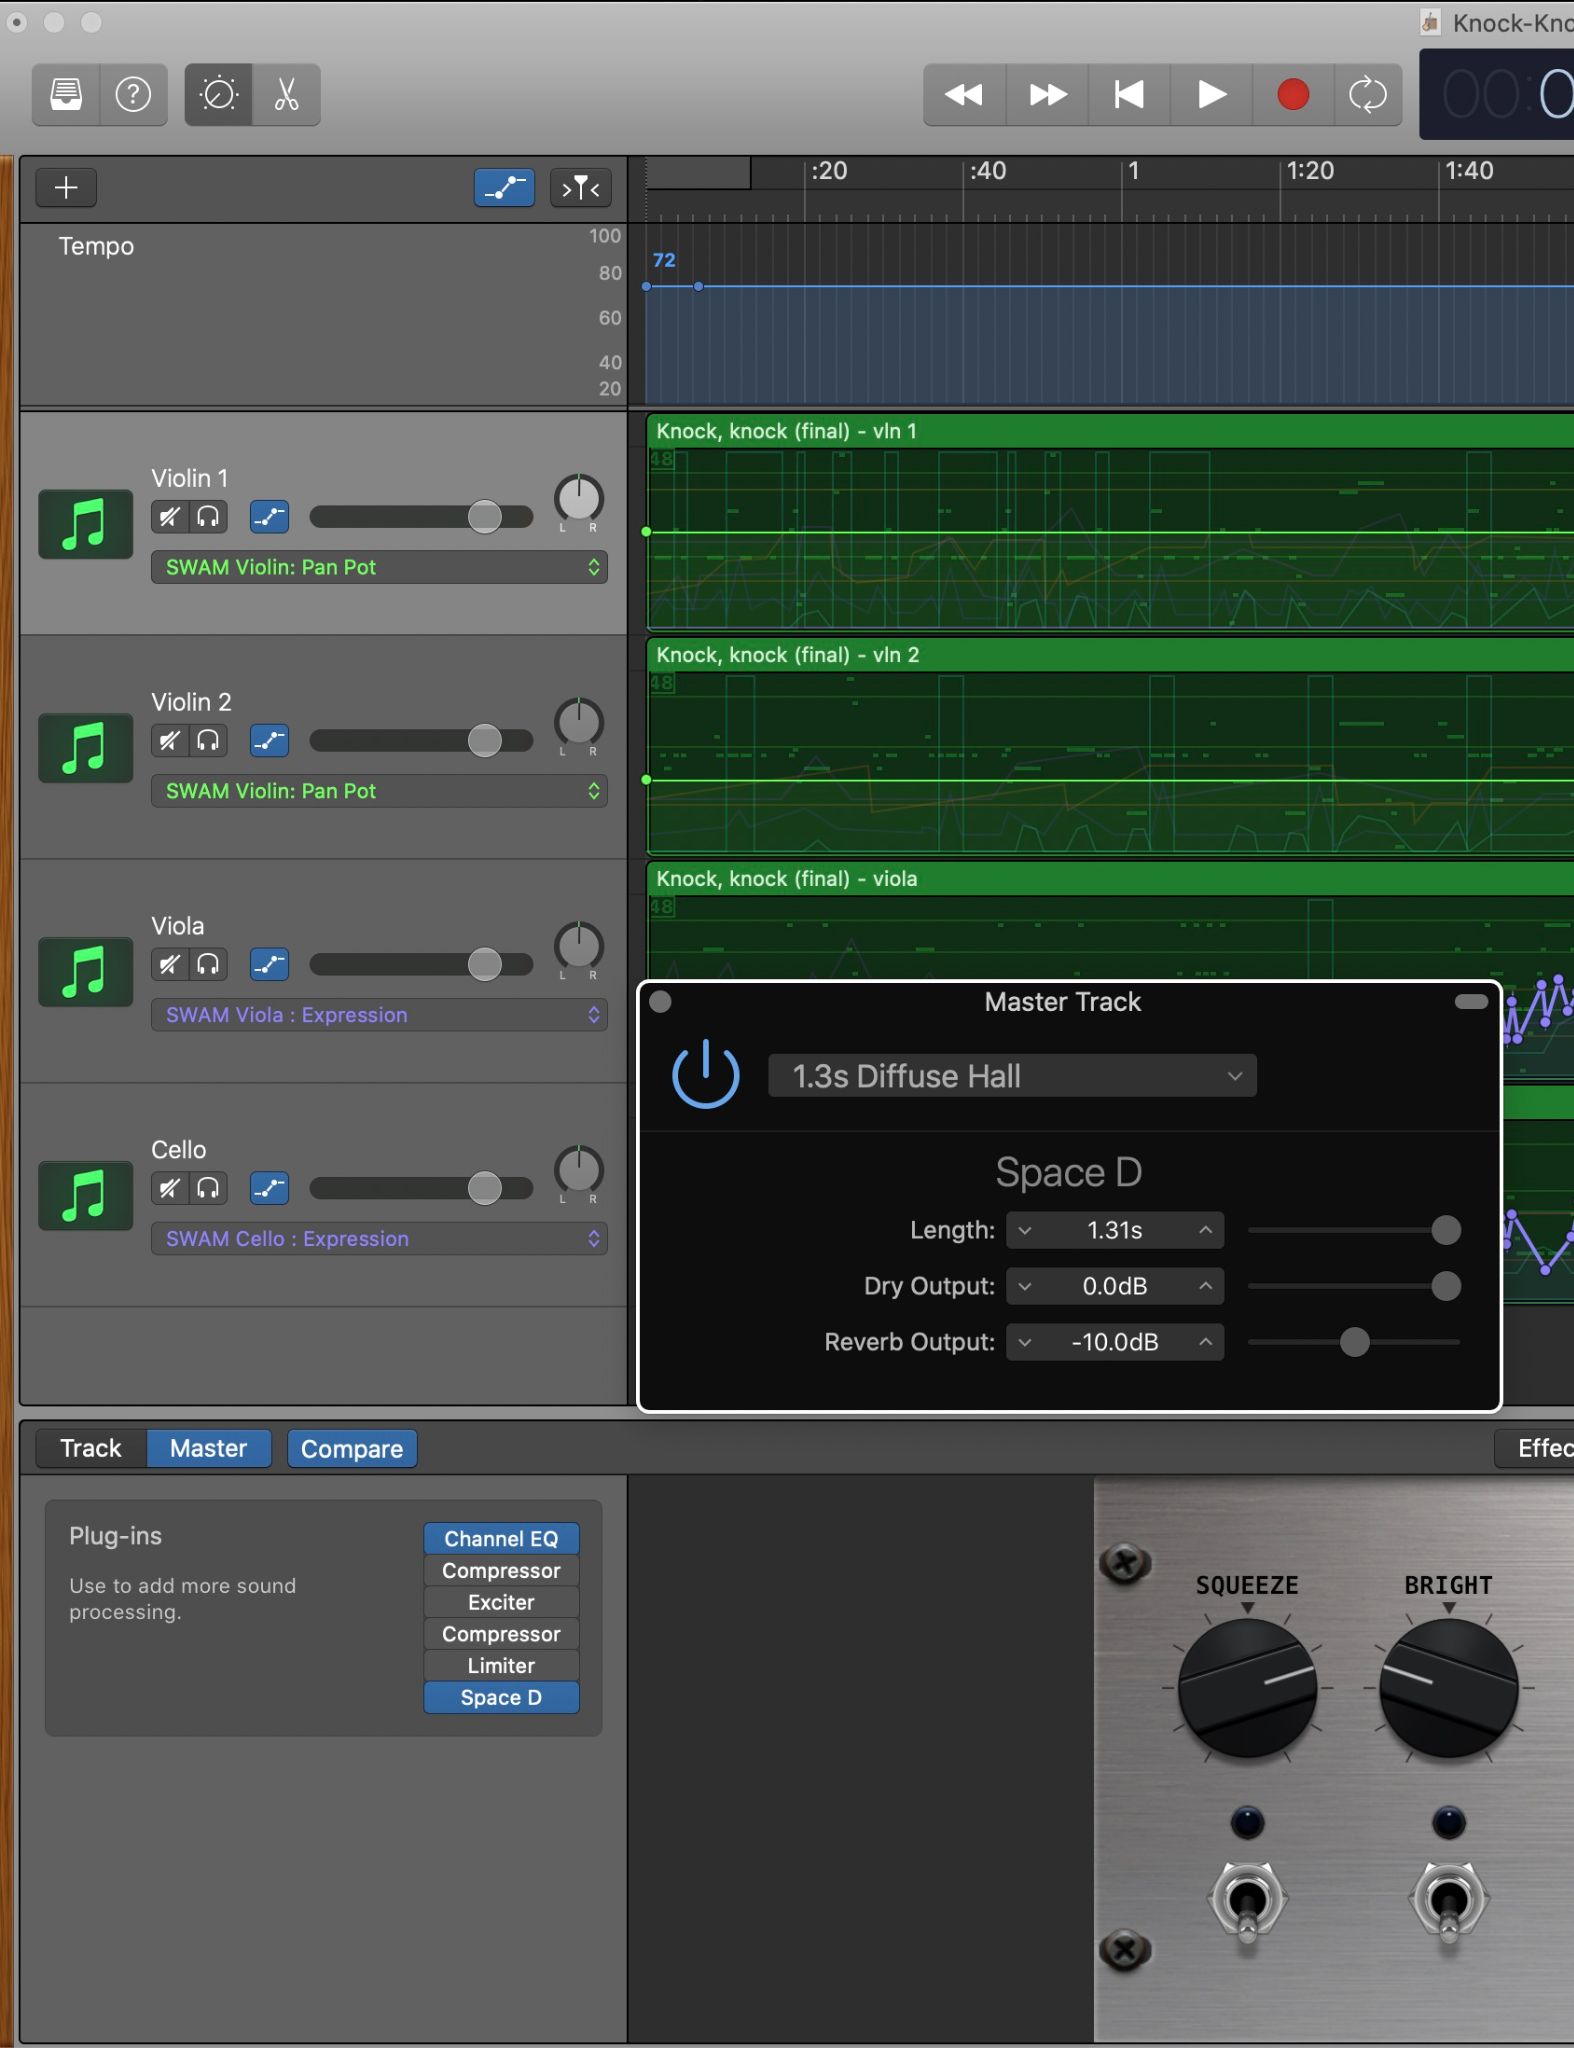
Using the built-in Space Designer reverb on the Master track.
Bonus — More useful parameters to play with
SWAM plug-ins are built to give you the possibility to control every single aspect of the instrument’s sound. Depending on the specific needs of your composition, you might want to go deeper besides simply drawing the Expression curve.
Here are a few common parameters you might want to tweak:
- Bow Pressure: Does your composition include parts that are pianissimo which would require a real musician to refrain from applying the normal amount of bow pressure? Or fortissimo which would require much more pressure than average? Adjusting the Bow Pressure parameter allows you to get those effects.
- Bow Polyphony: By default, SWAM Solo Strings are set as monophonic but if parts of your composition include double strings, you can draw the Bow Polyphony automation in Garageband to specify when the instrument should be allowed to play on two strings simultaneously. It’s recommended to have this only in the musical sections where it’s required because otherwise, you might not be able to get the exact effect you’re looking for when the instrument is supposed to be played on a single string only.
- Vibrato Depth: This controls how much of the vibrato we hear. This can be useful if you have sections you’d like to be played without any vibrato at all, for example, because you want to achieve a certain effect. You can draw the automation for the vibrato depth at your convenience.
- Vibrato Rate: You don’t need to have only one vibrato speed throughout your piece, you can draw the automation for the speed of the vibrato to change gradually on long sustained notes for example, or to adjust the default speed of the vibrato to your liking.
Express your creativity easily with SWAM instruments
Creating mockups of your pieces to pass on to musicians is the quickest and most efficient way to make sure your ideas come across correctly. Besides the SWAM instruments themselves, the software used in this tutorial is free. And if you don’t own any SWAM Solo Strings yet but you’re feeling insecure to make the investment, contact us at support@audiomodeling.com to request a Trial license! Let us know which products you’d like to try and we will provide you with a temporary license, no strings attached (pun intended!).
We also have a supportive SWAM community on Facebook where you can ask questions, find support if you run into issues, and get inspired by seeing what other musicians, composers, and producers are doing with SWAM! The possibilities are endless and we are excited to see (and hear) the incredible music you’ll create with our products.
Don’t forget to share the work you’re proud of! Share it on your social networks, tag us, and we’ll happily share your post with our audience.
Now go make some music!